×
ToyotaParts- Hello
- Login or Register
- Quick Links
- Live Chat
- Track Order
- Parts Availability
- RMA
- Help Center
- Contact Us
- Shop for
- Toyota Parts
- Scion Parts
My Garage
My Account
Cart
OEM Toyota 4Runner Engine Control Module
Engine Control Computer- Select Vehicle by Model
- Select Vehicle by VIN
Select Vehicle by Model
orMake
Model
Year
Select Vehicle by VIN
For the most accurate results, select vehicle by your VIN (Vehicle Identification Number).
123 Engine Control Modules found


Toyota 4Runner ECM Part Number: 89661-35J51
$900.84 MSRP: $1320.19You Save: $419.35 (32%)Ships in 1-3 Business Days


Toyota 4Runner ECM Part Number: 89661-35A41
$815.49 MSRP: $1195.10You Save: $379.61 (32%)Ships in 1-3 Business Days
Toyota 4Runner ECM Part Number: 89661-35B42
$868.83 MSRP: $1273.29You Save: $404.46 (32%)Ships in 1-3 Business Days
Toyota 4Runner ECM Part Number: 89666-35680-84
$732.64 MSRP: $1136.95You Save: $404.31 (36%)Ships in 1-3 Business Days
Toyota 4Runner ECM Part Number: 89661-3D552-84
$1124.74 MSRP: $1711.57You Save: $586.83 (35%)Ships in 1-3 Business DaysToyota 4Runner ECM Part Number: 89661-35A02-84
$554.22 MSRP: $817.56You Save: $263.34 (33%)Ships in 1-3 Business DaysToyota 4Runner ECM Part Number: 89666-35690-84
$555.51 MSRP: $819.47You Save: $263.96 (33%)Ships in 1-3 Business DaysToyota 4Runner ECM Part Number: 89661-3D383-84
$654.79 MSRP: $966.49You Save: $311.70 (33%)Ships in 1-3 Business DaysToyota 4Runner ECM Part Number: 89661-3D373-84
$654.79 MSRP: $966.49You Save: $311.70 (33%)Ships in 1-3 Business DaysToyota 4Runner ECM Part Number: 89661-3D572-84
$688.38 MSRP: $1016.22You Save: $327.84 (33%)Ships in 1-3 Business DaysToyota 4Runner ECM Part Number: 89666-35150-84
$688.62 MSRP: $1016.57You Save: $327.95 (33%)Ships in 1-3 Business DaysToyota 4Runner ECM Part Number: 89666-35590-84
$743.80 MSRP: $1098.28You Save: $354.48 (33%)Ships in 1-3 Business DaysToyota 4Runner ECM Part Number: 89661-3D331-84
$869.94 MSRP: $1285.08You Save: $415.14 (33%)Ships in 1-3 Business DaysToyota 4Runner ECM Part Number: 89661-3D150-84
$906.17 MSRP: $1338.58You Save: $432.41 (33%)Ships in 1-3 Business DaysToyota 4Runner ECM Part Number: 89661-35D70
$363.29 MSRP: $532.41You Save: $169.12 (32%)Ships in 1-3 Business DaysToyota 4Runner ECM Part Number: 89661-35D42
$442.30 MSRP: $648.19You Save: $205.89 (32%)Ships in 1-3 Business DaysToyota 4Runner ECM Part Number: 89661-35D52
$546.72 MSRP: $801.22You Save: $254.50 (32%)Ships in 1-3 Business Days


Toyota 4Runner ECM Part Number: 89666-35420
$1654.82 MSRP: $2425.15You Save: $770.33 (32%)

Toyota 4Runner Computer Part Number: 89661-3D070-84
Toyota 4Runner ECM Part Number: 89661-3D321-84
| Page 1 of 7 |Next >
1-20 of 123 Results
Toyota 4Runner Engine Control Module
Choose genuine Engine Control Module that pass strict quality control tests. You can trust the top quality and lasting durability. Shopping for OEM Engine Control Module for your Toyota 4Runner? Our website is your one-stop destination. We stock an extensive selection of genuine Toyota 4Runner parts. The price is affordable so you can save more. It only takes minutes to browse and find the exact fit. Easily add to cart and check out fast. Our hassle-free return policy will keep you stress-free. We process orders quickly for swift delivery. Your parts will arrive faster, so you can get back on the road sooner.
Toyota 4Runner Engine Control Module Parts and Q&A
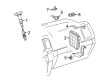
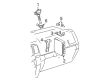
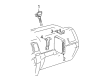
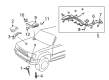
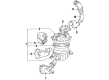
- Q: How to install the Engine Control Module (ECM) and its associated components on Toyota 4Runner?A:Begin the ECM installation process by mounting ECM bracket No. 2 with 2 screws and then proceed to attach ECM bracket No. 1 by using two more screws. Once bracket mounting is complete you should secure the ECM with 3 nuts to a torque of 13 Nm (133 kgf-cm, 10 ft-lbf) before connecting the 5 ECM connectors. After that you can proceed to install the instrument panel finish panel lower No. 2 and the glove compartment door sub-assembly and instrument panel under cover sub-assembly No. 2. The ECM requires installation with three securing nuts which need to be torqued to 13 Nm (133 kgf-cm, 10 ft-lbf). Next, connect the 5 ECM connectors. The ECM installation procedure should begin by mounting the instrument panel finish panel lower No. 2 before installing the glove compartment door sub-assembly and ending with the instrument panel under cover sub-assembly No. 2.
- Q: How to remove the Engine Control Module (ECM) on Toyota 4Runner?A:The procedure to extract the ECM for 1GR-FE engine control system begins by removing the instrument panel under cover sub-assembly No. 2 while also removing the glove compartment door sub-assembly and instrument panel finish panel lower No. 2. Begin by breaking the connections between the ECM and 5 connectors before unfastening the 3 ECM securing nuts. Following the removal of screws you should detach ECM bracket No. 1 from the ECM using two screws until you can detach ECM bracket No. 2 from the ECM with its screws.

Related Toyota 4Runner Parts
 Toyota 4Runner Crankshaft Position Sensor
 Toyota 4Runner Headlight Relay
 Toyota 4Runner Ignition Coil
 Toyota 4Runner Knock Sensor
 Toyota 4Runner Oxygen Sensor
 Toyota 4Runner Throttle Position Sensor
 Toyota 4Runner Camshaft Position Sensor
 Toyota 4Runner Daytime Running Light Relay
 Toyota 4Runner Horn Relay
 Toyota 4Runner Ignition Relay
 Toyota 4Runner Radiator Fan Relay
 Toyota 4Runner Spark Plug