×
ToyotaParts- Hello
- Login or Register
- Quick Links
- Live Chat
- Track Order
- Parts Availability
- RMA
- Help Center
- Contact Us
- Shop for
- Toyota Parts
- Scion Parts
My Garage
My Account
Cart
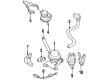
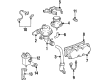
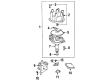
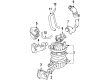
OEM Toyota Knock Sensor
Engine Knock Sensor- Select Vehicle by Model
- Select Vehicle by VIN
Select Vehicle by Model
orMake
Model
Year
Select Vehicle by VIN
For the most accurate results, select vehicle by your VIN (Vehicle Identification Number).
24 Knock Sensors found


Toyota Knock Sensor Part Number: 89615-12090
$145.22 MSRP: $205.57You Save: $60.35 (30%)Ships in 1-3 Business DaysProduct Specifications- Other Name: Sensor, Knock Control; Ignition Knock (Detonation) Sensor
- Manufacturer Note: DENSO
- Replaces: 89615-12050, 89615-32010


Toyota Knock Sensor Part Number: 89615-06010
$142.28 MSRP: $201.42You Save: $59.14 (30%)Ships in 1-3 Business DaysProduct Specifications- Other Name: Sensor, Knock Control; Ignition Knock (Detonation) Sensor
- Replaces: 89615-BZ030, 89615-20090, 89615-BZ040


Toyota Knock Sensor Part Number: 89615-12040
$190.35 MSRP: $271.78You Save: $81.43 (30%)Product Specifications- Other Name: Sensor, Knock Control; Ignition Knock (Detonation) Sensor


Toyota Knock Sensor Part Number: 89615-52010
$152.39 MSRP: $215.72You Save: $63.33 (30%)Ships in 1 Business DayProduct Specifications- Other Name: Sensor, Knock Control; Ignition Knock (Detonation) Sensor
- Manufacturer Note: MATSUSHITA
- Replaces: 89615-12030, 89615-22050


Toyota Knock Sensor Part Number: 89615-44010
$153.91 MSRP: $217.88You Save: $63.97 (30%)Ships in 1 Business DayProduct Specifications- Other Name: Sensor, Knock Control; Ignition Knock (Detonation) Sensor
- Manufacturer Note: W(PAINTED=ORANGE)


Toyota Knock Sensor Part Number: 89615-20010
$155.44 MSRP: $220.04You Save: $64.60 (30%)Ships in 1-3 Business DaysProduct Specifications- Other Name: Sensor, Knock Control
- Replaces: 89615-20020


Toyota Knock Sensor Part Number: 89615-30080
$186.50 MSRP: $266.29You Save: $79.79 (30%)Ships in 1-2 Business DaysProduct Specifications- Other Name: Sensor, Knock Control; Ignition Knock (Detonation) Sensor
- Manufacturer Note: MATSUSHITA


Toyota Knock Sensor Part Number: 89615-30020
$164.49 MSRP: $232.85You Save: $68.36 (30%)Ships in 1-3 Business DaysProduct Specifications- Other Name: Sensor, Knock Control


Toyota Knock Sensor Part Number: 89615-22030
$170.01 MSRP: $240.67You Save: $70.66 (30%)Ships in 1-3 Business DaysProduct Specifications- Other Name: Sensor, Knock Control


Toyota Sensor, Knock Control Part Number: 89615-22040
$149.68 MSRP: $211.89You Save: $62.21 (30%)Ships in 1 Business DayProduct Specifications- Other Name: Ignition Knock (Detonation) Sensor; Knock Sensor


Toyota Knock Sensor Part Number: 89615-32030
$150.04 MSRP: $212.39You Save: $62.35 (30%)Ships in 1-2 Business DaysProduct Specifications- Other Name: Sensor, Knock Control; Ignition Knock (Detonation) Sensor
- Replaces: 89615-20030, 89615-33010, 89615-32040, 89615-33020


Toyota Knock Sensor Part Number: 89615-26010
$153.91 MSRP: $217.88You Save: $63.97 (30%)Ships in 1-3 Business DaysProduct Specifications- Other Name: Sensor, Knock Control


Toyota Knock Sensor Part Number: 89615-30050
$170.01 MSRP: $240.67You Save: $70.66 (30%)Ships in 1 Business DayProduct Specifications- Other Name: Sensor, Knock Control


Toyota Sensor, Knock Control Part Number: 89615-50010
$167.66 MSRP: $237.34You Save: $69.68 (30%)Ships in 1-3 Business DaysProduct Specifications- Other Name: Ignition Knock (Detonation) Sensor; Knock Sensor
- Manufacturer Note: MATSUSHITA

Toyota Sensor, Knock Control Part Number: 89615-F6010
$126.65 MSRP: $179.29You Save: $52.64 (30%)Ships in 1-2 Business Days
Toyota Knock Sensor Part Number: 89615-12120
$150.04 MSRP: $212.39You Save: $62.35 (30%)Product Specifications- Other Name: Sensor, Knock Control; Ignition Knock (Detonation) Sensor
- Replaces: 89615-12110

Toyota Knock Sensor Part Number: 89615-WAA01
$30.02 MSRP: $41.78You Save: $11.76 (29%)Ships in 1-3 Business DaysProduct Specifications- Other Name: Sensor, Knock Control; Ignition Knock (Detonation) Sensor


Toyota Knock Sensor Part Number: 89615-WB001
$81.61 MSRP: $114.56You Save: $32.95 (29%)Ships in 1-3 Business DaysProduct Specifications- Other Name: Sensor, Knock Control; Ignition Knock (Detonation) Sensor

Toyota Knock Sensor Part Number: SU003-06707
$61.47 MSRP: $80.25You Save: $18.78 (24%)Ships in 1-2 Business DaysProduct Specifications- Other Name: Sensor Assembly-Knock; Ignition Knock (Detonation) Sensor; Sensor, Knock Control
- Replaces: SU003-00415


Toyota Knock Sensor Part Number: 89615-35040
$157.91 MSRP: $223.54You Save: $65.63 (30%)Product Specifications- Other Name: Sensor, Knock Control
- Replaces: 89615-35030
| Page 1 of 2 |Next >
1-20 of 24 Results
Toyota Knock Sensor
OEM parts deliver unmatched quality you can rely on. They pass extensive quality control inspections. Toyota produces them to the official factory specifications. This process helps prevent defects and imperfections. So you can get exceptional lifespan and a flawless fit. Need new OEM Toyota Knock Sensor? You'll love our wide selection of genuine options. Shop in minutes and skip the hunt. Our prices are unbeatable, you'll save time and money. It's easy to shop and find the right piece. Our committed customer service team gives professional help from start to finish. Every part includes a manufacturer's warranty. We ship quickly, your parts will arrive fast at your door.
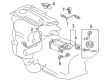
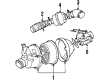
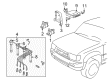
Toyota Knock Sensor allows engines to be protected against ping by detecting knock at the possible stage and prompting quick adjustments in the ignition timing. Toyota gained international recognition through matching waste cutting production with vehicles that run longer, guzzle less fuel and arm drivers with the authority to fix hiccups on the production line before they become huge headaches costing the company a lot of money. Toyota continues to make bets on hybrids and this time built a better Hybrid Synergy Drive into sedans, crossovers, and pickups to ensure owners can have the punch of a launch without sacrificing the range or pocket at the pump. To reduce weight, reduce the center of gravity and shrink handling, TNGA allows Toyota to use the platform to make its vehicles firmer and responsive, rather than numb. Toyota extends that expertise between compact Prius and plug-in RAV4, such that each time it places just one badge, that badge provides a family or a commuter with the type of choice that they didn't need to waste time uncovering. Within the engine valley is a Knock Sensor composed of piezoelectric crystal that converts the vibration into voltage. The powertrain computer interprets this signal a millionth of a second at a time and pushes timing backwards when the knock is about to hit the pistons. Since the Knock Sensor responds quicker than a driver can raise a foot, it maintains low-octane fuel torque and prevents damaging pressure spikes which otherwise would beat bearings and overheat cylinder walls. The computer can dumb down an entire engine instead of fine-tuning the spark angle in individual cylinders, which is done by modern twins, one Knock Sensor per bank, and isolates only the troubled chamber, allowing power to remain lively.
Toyota Knock Sensor Parts and Q&A
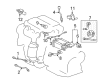
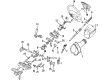
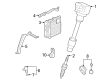
- Q: How to replace the Knock Sensor on Toyota Camry?A:The first step before replacing the Knock Sensor (from July 2003) requires draining the engine coolant. You must start by removing the air cleaner cap then the air cleaner hose before taking out the throttle body assembly then the intake manifold through the removal of 5 bolts and 2 nuts and both the intake manifold and the gasket. The knock sensor needs to have its connector detached before extracting the sensor with its retaining nut. The new knock sensor requires installation with its nut tightened to 20 N.m (204 kgf.cm, 15 ft.lbf) before reconnecting its connector. Mount the new gasket before placing the intake manifold using its 5 bolts and 2 nuts which need torquing to 30 N.m (306 kgf.cm, 22 ft.lbf). The installation process includes placing back the throttle body assembly as well as the air cleaner cap after securing the air cleaner hose. Complete the vacuum hose check before you add engine coolant and perform a final leak test for engine coolant.
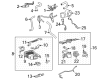
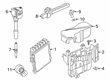
- Q: How to service the knock sensor on Toyota Tacoma?A:Service of the knock sensor requires disconnecting the battery cable followed by engine under cover sub-assembly removal for 4WD and Pre-Runner models then draining engine coolant before disconnecting the intake air connector. Next, remove the throttle with motor body assembly, disconnect fuel hose and fuel hose No.2, and remove the intake manifold by disconnecting the fuel vapor feed hose from the VSV, the vacuum hose, the bolt and clamp bracket, the water by-pass hose No. 2, the ventilation hose No. 3, the VSV connector, disengaging the engine wire harness clamp, disconnecting the compressor magnetic clutch connector (if equipped with air conditioning), disengaging the wire harness clamp, removing the bolt and harness clamp bracket, disconnecting the 3 connectors, removing the nut shown in the illustration, and disconnecting the engine wire harness from the relay block before removing the 5 bolts and 2 nuts to take off the intake manifold. Detachment of the knock control sensor requires first disconnecting its connector followed by bolt removal. Attachment of the knock control sensor begins with installing the bolt while maintaining proper sensor angle before connecting its connector. Next, install a new gasket onto the intake manifold, then install the intake manifold with the 5 bolts and 2 nuts, torquing them to 25 N.m (255 kgf.cm, 18 ft.lbf), connect the engine wire harness to the relay block, install the nut shown in the illustration with a torque of 10 N.m (102 kgf.cm, 7 ft.lbf), connect the 3 connectors, install the harness clamp bracket with the bolt torqued to 8.2 N.m (84 kgf.cm, 73 in.lbf), engage the wire harness clamp, connect the compressor magnetic clutch connector (if equipped with air conditioning), engage the engine wire harness clamp, connect the VSV connector, connect the ventilation hose No. 3, connect the water by-pass hose No. 2, install the clamp bracket with the bolt torqued to 19 N.m (194 kgf.cm, 14 in.lbf), connect the vacuum hose, and connect the fuel vapor feed hose to the VSV. Proceed with installing the fuel hose along with fuel hose No.2 before placing the throttle and motor body assembly together with the intake air connector. The battery cable must be restored to its negative terminal with a torque of 3.9 N.m (40 kgf.cm, 35 in.lbf), while checking for fuel leakage followed by engine under cover sub-assembly No.1 installation (for both 4WD and Pre-Runner).


Related Toyota Parts
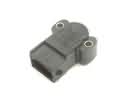 Toyota Throttle Position Sensor
 Toyota Relay
 Toyota Spark Plug
 Toyota Engine Control Module
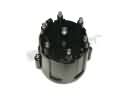 Toyota Distributor Cap
 Toyota Headlight Relay
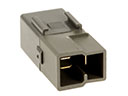 Toyota Horn Relay
 Toyota Igniter
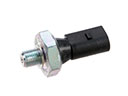 Toyota Oil Pressure Switch
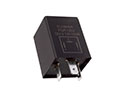 Toyota Turn Signal Relay
 Toyota Air Bag Control Module
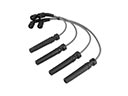 Toyota Spark Plug Wire
Browse Toyota Knock Sensor by Models
Tacoma 4Runner Camry Tundra Corolla RAV4 Highlander Prius Sienna Land Cruiser Pickup FJ Cruiser 86 Sequoia T100 Avalon Celica Supra Yaris Matrix MR2 Solara Venza GR86 Echo C-HR Grand Highlander Paseo Previa Prius C Prius Prime Corolla Cross Corolla iM Crown Crown Signia GR Corolla MR2 Spyder Prius V Tercel Yaris iA Prius Plug-In GR Supra Prius AWD-e RAV4 Prime