×
ToyotaParts- Hello
- Login or Register
- Quick Links
- Live Chat
- Track Order
- Parts Availability
- RMA
- Help Center
- Contact Us
- Shop for
- Toyota Parts
- Scion Parts
My Garage
My Account
Cart
OEM Toyota Clock Spring
Spiral Cable Clock Spring- Select Vehicle by Model
- Select Vehicle by VIN
Select Vehicle by Model
orMake
Model
Year
Select Vehicle by VIN
For the most accurate results, select vehicle by your VIN (Vehicle Identification Number).
110 Clock Springs found


Toyota Angle Sensor Part Number: 84306-0E010
$246.97 MSRP: $352.61You Save: $105.64 (30%)Ships in 1-3 Business DaysProduct Specifications- Other Name: Cable Sub-Assembly, Spiral; Steering Wheel Position Sensor; Air Bag Clockspring; Clockspring; Cable Sub-Assembly, Spiral W/Sensor
- Replaces: 84306-48030


Toyota Clockspring Part Number: 84306-04080
$151.09 MSRP: $213.89You Save: $62.80 (30%)Ships in 1-3 Business DaysProduct Specifications- Other Name: Cable Sub-Assembly, Spiral; Air Bag Clockspring


Toyota Clockspring Part Number: 84307-08020
$511.53 MSRP: $749.66You Save: $238.13 (32%)Ships in 1-3 Business DaysProduct Specifications- Other Name: Cable Sub-Assembly, Spiral; Air Bag Clockspring; Cable Sub-Assembly, Spiral W/Sensor


Toyota Cable Sub-Assembly, Spiral W/Sensor Part Number: 84307-30090
$602.11 MSRP: $882.39You Save: $280.28 (32%)Ships in 1-3 Business DaysProduct Specifications- Other Name: Cable Sub-Assembly, Spiral; Air Bag Clockspring


Toyota Clockspring Part Number: 84306-0C021
$332.25 MSRP: $474.37You Save: $142.12 (30%)Ships in 1 Business DayProduct Specifications- Other Name: Cable Sub-Assembly, Spiral; Air Bag Clockspring


Toyota Clockspring Part Number: 84306-07030
$270.85 MSRP: $386.71You Save: $115.86 (30%)Ships in 1 Business DayProduct Specifications- Other Name: Cable Sub-Assembly, Spiral; Air Bag Clockspring


Toyota Clockspring Part Number: 84306-60050
$357.51 MSRP: $523.94You Save: $166.43 (32%)Ships in 1-3 Business DaysProduct Specifications- Other Name: Cable Sub-Assembly, Spiral; Air Bag Clockspring
- Manufacturer Note: W(TILT & TELESCOPIC STEERING)


Toyota Clockspring Part Number: 84306-07040
$266.54 MSRP: $380.56You Save: $114.02 (30%)Ships in 1-3 Business DaysProduct Specifications- Other Name: Cable Sub-Assembly, Spiral; Air Bag Clockspring
- Replaces: 84306-06070, 84306-60080, 84306-33090


Toyota Clockspring Part Number: 84306-02110
$300.91 MSRP: $429.63You Save: $128.72 (30%)Ships in 1-2 Business DaysProduct Specifications- Other Name: Cable Sub-Assembly, Spiral; Air Bag Clockspring


Toyota Clockspring Part Number: 84307-0T010
$501.43 MSRP: $734.85You Save: $233.42 (32%)Ships in 1-2 Business DaysProduct Specifications- Other Name: Cable Sub-Assembly, Spiral; Air Bag Clockspring; Cable Sub-Assembly, Spiral W/Sensor


Toyota Clockspring Part Number: 84307-35010
$536.50 MSRP: $786.25You Save: $249.75 (32%)Ships in 1-2 Business DaysProduct Specifications- Other Name: Cable Sub-Assembly, Spiral; Air Bag Clockspring


Toyota Clockspring Part Number: 84307-06090
$549.78 MSRP: $805.71You Save: $255.93 (32%)Ships in 1-3 Business DaysProduct Specifications- Other Name: Cable Sub-Assembly, Spiral; Air Bag Clockspring; Cable Sub-Assembly, Spiral W/Sensor


Toyota Clockspring Part Number: 84306-06030
$338.42 MSRP: $483.19You Save: $144.77 (30%)Ships in 1-3 Business DaysProduct Specifications- Other Name: Cable Sub-Assembly, Spiral; Air Bag Clockspring
- Replaces: 84306-33080


Toyota Clockspring Part Number: 84307-0R050
$473.28 MSRP: $693.60You Save: $220.32 (32%)Ships in 1-2 Business DaysProduct Specifications- Other Name: Cable Sub-Assembly, Spiral; Air Bag Clockspring; Cable Sub-Assembly, Spiral W/Sensor
- Replaces: 84307-42050


Toyota Clockspring Part Number: 84306-06150
$270.62 MSRP: $386.38You Save: $115.76 (30%)Ships in 1-2 Business DaysProduct Specifications- Other Name: Cable Sub-Assembly, Spiral; Air Bag Clockspring


Toyota Clockspring Part Number: 84306-22010
$281.92 MSRP: $402.52You Save: $120.60 (30%)Ships in 1 Business DayProduct Specifications- Other Name: Cable Sub-Assembly, Spiral; Air Bag Clockspring
- Manufacturer Note: MEXICO SPEC


Toyota Clockspring Part Number: 84306-06010
$338.42 MSRP: $483.19You Save: $144.77 (30%)Product Specifications- Other Name: Cable Sub-Assembly, Spiral; Air Bag Clockspring


Toyota Clockspring Part Number: 84306-48040
$357.51 MSRP: $523.94You Save: $166.43 (32%)Ships in 1 Business DayProduct Specifications- Other Name: Cable Sub-Assembly, Spiral; Air Bag Clockspring


Toyota Clockspring Part Number: 84307-02220
$473.28 MSRP: $693.60You Save: $220.32 (32%)Ships in 1-3 Business DaysProduct Specifications- Other Name: Cable Sub-Assembly, Spiral; Air Bag Clockspring; Cable Sub-Assembly, Spiral W/Sensor


Toyota Angle Sensor Part Number: 84307-0C020
$476.23 MSRP: $697.93You Save: $221.70 (32%)Ships in 1-2 Business DaysProduct Specifications- Other Name: Cable Sub-Assembly, Spiral; Air Bag Clockspring; Clockspring; Cable Sub-Assembly, Spiral W/Sensor
| Page 1 of 6 |Next >
1-20 of 110 Results
Toyota Clock Spring
OEM parts deliver unmatched quality you can rely on. They pass extensive quality control inspections. Toyota produces them to the official factory specifications. This process helps prevent defects and imperfections. So you can get exceptional lifespan and a flawless fit. Need new OEM Toyota Clock Spring? You'll love our wide selection of genuine options. Shop in minutes and skip the hunt. Our prices are unbeatable, you'll save time and money. It's easy to shop and find the right piece. Our committed customer service team gives professional help from start to finish. Every part includes a manufacturer's warranty. We ship quickly, your parts will arrive fast at your door.
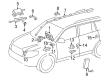
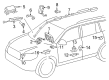
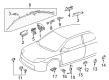
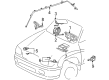
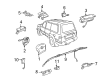
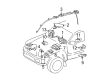
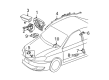
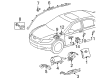
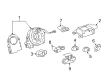
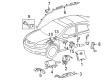
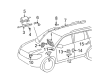
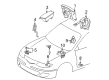
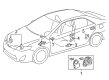
Toyota Clock Spring maintains the flow of power to airbags and wheel controls during wheel rotation. Toyota perfects production to reduce waste and allow workers to correct glitches along the production line within a short time. Toyota continues to advance hybrid technology and is putting more electrified drive trains into vehicles that everyday commuters are purchasing on the open market. Toyota has developed the TNGA platform to enhance handling, increase body stiffness, and crash score. Toyota has earned a reputation for being trusted worldwide because of matching fuel economy with mile-consuming durability each year. Electric range has been extended with hybrids maintaining gas backup, meaning that drivers no longer have to worry about charge range. The platform also simplifies the process of production because there is a switchover of sedan, crossover, and truck production by the factories with minimum downtime. Feedback loops on the assembly floors provide the staff with the ability to stop belts, correct root causes, and avoid recurring defects until cars pass through. Clock Spring has a flat ribbon cable that is curled in a spiral form, thereby ensuring that each turn of the wheels flexes the ribbon in a gentle manner where power flow to airbags, horn, and wheel buttons continues. The low-friction slip rings and brushed contacts allow Clock Spring to endure thousands of rotations since they do not wear out or collect heat. Clock Spring installs in all steering columns without software reboots, allowing owners to install controls quickly and inexpensively. Clock Spring prevents the use of critical circuits and deploys an airbag when the sensors detect a crash.
Toyota Clock Spring Parts and Q&A
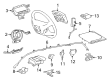
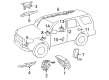
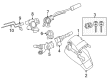
- Q: How to service and repair the Clock Spring Assembly / Spiral Cable on Toyota 4Runner?A:Service and repair procedures for the Clock Spring Assembly / Clock Spring begin by taking out the Steering Wheel Pad along with the Upper and Lower Column Covers and the Steering Wheel and Clock Spring. Start installation by positioning the Clock Spring followed by the Upper and Lower Column Covers afterwards place the Steering Wheel before applying the Steering Wheel Pad.
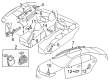
- Q: How to service and repair the Clock Spring Assembly / Spiral Cable on Toyota Tacoma?A:Service and repair of the Clock Spring Assembly / Clock Spring requires beginning with the removal of the Steering Wheel Pad together with the Steering Wheel and Upper and Lower Covers and the Clock Spring. First position the Clock Spring followed by Upper and Lower Column Covers then install the Steering Wheel before placing the Steering Wheel Pad.


Related Toyota Parts
 Toyota Key Fob
 Toyota TPMS Sensor
 Toyota Airbag
 Toyota Camshaft Position Sensor
 Toyota Horn
 Toyota Antenna Mast
 Toyota Body Control Module
 Toyota Ignition Control Module
 Toyota Ignition Lock Cylinder
 Toyota Oil Pressure Switch
 Toyota Cooling Fan Relay
 Toyota Distributor Rotor
Browse Toyota Clock Spring by Models
Tacoma 4Runner Camry Tundra Corolla RAV4 Highlander Prius Sienna Land Cruiser FJ Cruiser 86 Sequoia T100 Avalon Celica Supra Yaris Matrix MR2 Solara Venza GR86 Echo C-HR Grand Highlander Paseo Previa Prius C Prius Prime bZ4X Corolla Cross Corolla iM Crown Crown Signia GR Corolla Mirai MR2 Spyder Prius V Tercel Yaris iA Prius Plug-In GR Supra Prius AWD-e RAV4 Prime