×
ToyotaParts- Hello
- Login or Register
- Quick Links
- Live Chat
- Track Order
- Parts Availability
- RMA
- Help Center
- Contact Us
- Shop for
- Toyota Parts
- Scion Parts
My Garage
My Account
Cart
OEM Toyota Matrix Clock Spring
Spiral Cable Clock Spring- Select Vehicle by Model
- Select Vehicle by VIN
Select Vehicle by Model
orMake
Model
Year
Select Vehicle by VIN
For the most accurate results, select vehicle by your VIN (Vehicle Identification Number).
3 Clock Springs found


Toyota Matrix Angle Sensor Part Number: 84306-0E010
$246.97 MSRP: $352.61You Save: $105.64 (30%)Ships in 1-3 Business Days


Toyota Matrix Clockspring Part Number: 84306-04080
$151.09 MSRP: $213.89You Save: $62.80 (30%)Ships in 1-3 Business Days


Toyota Matrix Clockspring Part Number: 84306-02110
$300.91 MSRP: $429.63You Save: $128.72 (30%)Ships in 1-2 Business Days
Toyota Matrix Clock Spring
Choose genuine Clock Spring that pass strict quality control tests. You can trust the top quality and lasting durability. Shopping for OEM Clock Spring for your Toyota Matrix? Our website is your one-stop destination. We stock an extensive selection of genuine Toyota Matrix parts. The price is affordable so you can save more. It only takes minutes to browse and find the exact fit. Easily add to cart and check out fast. Our hassle-free return policy will keep you stress-free. We process orders quickly for swift delivery. Your parts will arrive faster, so you can get back on the road sooner.
Toyota Matrix Clock Spring Parts and Q&A
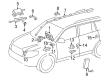
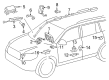
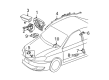
- Q: How to install the Clock Spring without VSC on Toyota Matrix?A:You should straighten the front wheels and place the turn signal switch in neutral when installing the clock spring without VSC to prevent damaging the pin. The installation of the clock spring requires using 3 claws which need a lock pin removal for new part installations before placing on the Steering Wheel assembly. Afterward, connect all the connectors while taking caution to protect the Air Bag wire harness. To implement VSC installation secure the clock spring through attachment with six claws and two pins to the Steering Angle Sensor. The procedure for clock spring installation with the steering angle sensor starts from following completed checks together with the proper connection verification steps. The installation process continues with the horn button wire sub-assembly along with various finish panels and console box components that include both the 2WD and 4WD configurations of the front console box assembly. The system involves installing both manual and automatic transaxle panel assemblies such as console box carpet and switch hole bases and glove compartment door assembly and center instrument cluster finish panel assemblies. These assemblies should be set in place with their respective shift lever knob sub-assemblies. The adjustment of the clock spring requires the ignition off along with a negative battery terminal disconnection period of 90 seconds to disable the SRS system before installing the lower instrument panel finish panel assembly and center instrument cluster finish panel sub-assembly. Start rotating the clock spring downwards until it reaches a stop point before continuing the motion with upward turns of about 2.5 complete rotations while maintaining the wire harness of the Air Bag in a separate position. The last steps include steering wheel assembly installation alongside steering pad installation and lower steering wheel covers. Also inspect the steering wheel center point while reattaching the negative battery terminal followed by an SRS warning light check.
- Q: How to remove the Clock Spring Assembly / Spiral Cable on Toyota Matrix?A:The first step toward Clock Spring Assembly / Clock Spring removal includes positioning front wheels straight ahead followed by negative battery cable disconnection then waiting at least 90 seconds to make sure the SRS system is disabled. The technician must remove lower No. 3 Steering Wheel cover followed by lower No. 2 cover after which comes steering pad and finally the steering wheel assembly. Take out the center instrument cluster finish panel sub-assembly followed by the lower instrument panel finish panel assembly, shift lever knob sub-assembly (suitable for manual and automatic transaxles), and the center instrument cluster finish panel assembly (for both manual and automatic transaxles). The procedure includes the removal of glove compartment door assembly, front upper console box and No. 2 switch hole base and both front console box assemblies and front console box carpet (both 2WD and 4WD). Proceed to separate the front No. 1 and No. 2 console box inserts while also taking out the lower center instrument panel finish panel that applies to both manual and automatic transaxles followed by the lower instrument panel finish panel sub-assembly. Start by disconnecting the connector from the horn button wire sub-assembly which does not include the steering pad switch and cruise control system before taking away the lower and upper steering column covers. After removing connectors from the clock spring which does not contain VSC, the technician must separate the Air Bag wire harness while disconnecting the Air Bag connector before pushing out the clock spring thanks to the 3 exposed claws. When removing the clock spring with VSC the connectors require disconnection followed by careful handling of the Air Bag wire harness and disengagement of three claws to obtain the clock spring with the Steering Angle Sensor. To take out the clock spring with VSC from the steering angle sensor you must first disconnect both the 6 claws and 2 pins.


Related Toyota Matrix Parts
 Toyota Matrix Airbag
 Toyota Matrix Engine Control Module
 Toyota Matrix Air Bag Control Module
 Toyota Matrix Air Bag Sensor
 Toyota Matrix Antenna Mast
 Toyota Matrix Camshaft Position Sensor
 Toyota Matrix Crankcase Breather Hose
 Toyota Matrix Door Jamb Switch
 Toyota Matrix Hazard Warning Switch
 Toyota Matrix Neutral Safety Switch
 Toyota Matrix Oil Pressure Switch
 Toyota Matrix Seat Belt