×
ToyotaParts- Hello
- Login or Register
- Quick Links
- Live Chat
- Track Order
- Parts Availability
- RMA
- Help Center
- Contact Us
- Shop for
- Toyota Parts
- Scion Parts
My Garage
My Account
Cart
OEM Toyota Matrix Seat Belt
Seat Safety Belt- Select Vehicle by Model
- Select Vehicle by VIN
Select Vehicle by Model
orMake
Model
Year
Select Vehicle by VIN
For the most accurate results, select vehicle by your VIN (Vehicle Identification Number).
32 Seat Belts found


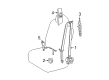
Toyota Matrix Lap & Shoulder Belt, Passenger Side Part Number: 73210-02340-B1
$230.66 MSRP: $329.33You Save: $98.67 (30%)Ships in 1-3 Business Days

Toyota Matrix Lap & Shoulder Belt, Passenger Side Part Number: 73210-02142-B1
$270.15 MSRP: $385.72You Save: $115.57 (30%)Ships in 1-3 Business Days


Toyota Matrix Buckle, Driver Side Part Number: 73240-01030-B0
$30.58 MSRP: $42.57You Save: $11.99 (29%)Ships in 1-3 Business Days

Toyota Matrix Buckle, Passenger Side Part Number: 73230-02330-B0
$38.83 MSRP: $54.04You Save: $15.21 (29%)Ships in 1-3 Business Days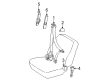
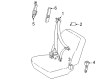
Toyota Matrix Lap & Shoulder Belt, Driver Side Part Number: 73220-02131-B1
$273.06 MSRP: $389.87You Save: $116.81 (30%)Ships in 1-3 Business Days

Toyota Matrix Lap & Shoulder Belt, Outer Driver Side Part Number: 73370-02140-B1
$141.46 MSRP: $200.25You Save: $58.79 (30%)Ships in 1-3 Business DaysToyota Matrix Lap & Shoulder Belt, Outer Passenger Side Part Number: 73360-02400-B1
$145.81 MSRP: $206.41You Save: $60.60 (30%)Ships in 1-3 Business Days
Toyota Matrix Lap & Shoulder Belt, Center Part Number: 73350-02090-B1
$148.98 MSRP: $210.90You Save: $61.92 (30%)Ships in 1-3 Business Days
Toyota Matrix Lap & Shoulder Belt, Center Part Number: 73350-01040-B2
$156.29 MSRP: $221.25You Save: $64.96 (30%)Ships in 1-3 Business DaysToyota Matrix Lap & Shoulder Belt, Center Part Number: 73350-01041-B2
$157.79 MSRP: $223.37You Save: $65.58 (30%)Ships in 1-3 Business DaysToyota Matrix Lap & Shoulder Belt, Center Part Number: 73350-02090-B0
$169.07 MSRP: $239.34You Save: $70.27 (30%)Ships in 1-3 Business DaysToyota Matrix Lap & Shoulder Belt, Outer Driver Side Part Number: 73370-02140-B0
$178.23 MSRP: $254.48You Save: $76.25 (30%)Ships in 1-3 Business DaysToyota Matrix Lap & Shoulder Belt, Outer Passenger Side Part Number: 73360-02400-B0
$178.00 MSRP: $254.15You Save: $76.15 (30%)Ships in 1-3 Business DaysToyota Matrix Lap & Shoulder Belt, Driver Side Part Number: 73220-02420-B1
$237.65 MSRP: $339.31You Save: $101.66 (30%)Ships in 1-3 Business DaysToyota Matrix Lap & Shoulder Belt, Driver Side Part Number: 73220-02132-B1
$270.15 MSRP: $385.72You Save: $115.57 (30%)Ships in 1-3 Business DaysToyota Matrix Lap & Shoulder Belt, Driver Side Part Number: 73220-02310-B0
$268.52 MSRP: $383.39You Save: $114.87 (30%)Ships in 1-3 Business DaysToyota Matrix Lap & Shoulder Belt, Passenger Side Part Number: 73210-02141-B1
$273.06 MSRP: $389.87You Save: $116.81 (30%)Ships in 1-3 Business Days

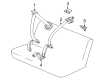
Toyota Matrix Buckle, Driver Side Part Number: 73480-01030-B0


| Page 1 of 2 |Next >
1-20 of 32 Results
Toyota Matrix Seat Belt
Choose genuine Seat Belt that pass strict quality control tests. You can trust the top quality and lasting durability. Shopping for OEM Seat Belt for your Toyota Matrix? Our website is your one-stop destination. We stock an extensive selection of genuine Toyota Matrix parts. The price is affordable so you can save more. It only takes minutes to browse and find the exact fit. Easily add to cart and check out fast. Our hassle-free return policy will keep you stress-free. We process orders quickly for swift delivery. Your parts will arrive faster, so you can get back on the road sooner.
Toyota Matrix Seat Belt Parts and Q&A
- Q: How to install the front Seat Belt assembly on Toyota Matrix?A:The installation starts with clipping the adjuster positioning hole then tightening the front shoulder belt anchor adjuster assembly through two bolts to 41 Nm (420 kgf-cm, 30 ft-lbf). The front seat outer belt assembly needs 2 bolts for installation according to the following specifications: torque Bolt [A] to 4.9 Nm (50 kgf-cm, 43 in-lbf) and Bolt [B] to 41 Nm (420 kgf-cm, 30 ft-lbf). Connect the front passenger side cable through the clamp before attaching the connector while making sure the locking button ensures complete locking then join the front seat outer belt assembly shoulder anchor to the nut which requires a torques setting of 41 Nm (420 kgf-cm, 30 ft-lbf). You must first install the upper center pillar garnish before you can connect the front seat outer belt assembly RH by installing the floor end with the front seat belt anchor base to 41 Nm (420 kgf-cm, 30 ft-lbf) torque setting and engaging the clamp while connecting the connector during which you must check ELR lock functionality by swiftly pulling out the belt. Start by installing the lower center pillar garnish and proceed to connect the front seat outer belt assembly LH using the floor end with its bolt tightened to 41 Nm (420 kgf-cm, 30 ft-lbf) and verify the ELR locking condition. The driver side lap belt outer anchor cover installation requires 3 claw attachment and the front passenger side requires 2 guides and 2 claws to engage before completing the installation. The job requires installation of rear door opening trim Weather Strip followed by rear door scuff plate and front door opening trim Weather Strip before installing front door scuff plate. The cable connection to the negative battery terminal should be followed by an examination of the SRS warning light.
- Q: How to Remove the Rear Center Seat Inner Belt Assembly of a Seat Belt on Toyota Matrix?A:The begun procedure for rear center seat inner belt assembly removal first involves removing scuff plates locating at the right-hand side (RH) and left-hand side (LH) of the rear doors. Then, take off the trims on both sides that cover the door openings. You must remove the tonneau cover assembly together with deck board No. 2 and the deck board sub-assembly. Next is the removal of the deck floor box rear unit followed by the luggage compartment tray unit. You should then detach the back door Weather Strip while also removing the deck trim cover rear. The process ends with the removal of the rear Seat Cushion assembly along with the rear seatback assembly and the rear seat inner w/center belt assembly LH after the bolt is unscrewed from its location.


Related Toyota Matrix Parts
 Toyota Matrix Airbag
 Toyota Matrix Crankshaft Position Sensor
 Toyota Matrix Starter Relay
 Toyota Matrix Engine Control Module
 Toyota Matrix ABS Relay
 Toyota Matrix Camshaft Position Sensor
 Toyota Matrix Door Jamb Switch
 Toyota Matrix Mirror Switch
 Toyota Matrix Power Window Switch
 Toyota Matrix Spark Plug
 Toyota Matrix Transmitter
 Toyota Matrix Turn Signal Flasher
Browse Toyota Matrix Seat Belt by Years
2013
2012
2011
2010
2009
2008
2007
2006
2005
2004
2003