×
ToyotaParts- Hello
- Login or Register
- Quick Links
- Live Chat
- Track Order
- Parts Availability
- RMA
- Help Center
- Contact Us
- Shop for
- Toyota Parts
- Scion Parts
My Garage
My Account
Cart
OEM Toyota Matrix Crankshaft Position Sensor
Engine Crankshaft Position Sensor- Select Vehicle by Model
- Select Vehicle by VIN
Select Vehicle by Model
orMake
Model
Year
Select Vehicle by VIN
For the most accurate results, select vehicle by your VIN (Vehicle Identification Number).
6 Crankshaft Position Sensors found


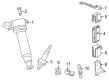
Toyota Matrix Camshaft Position Sensor, Driver Side Part Number: 90919-T5005
$106.16 MSRP: $149.02You Save: $42.86 (29%)Ships in 1-3 Business Days


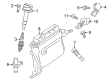
Toyota Matrix Crankshaft Position Sensor Part Number: 90919-A5004
$101.66 MSRP: $142.70You Save: $41.04 (29%)Ships in 1-3 Business Days


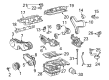
Toyota Matrix Sensor, Camshaft Position Part Number: 90080-19014
$71.44 MSRP: $85.29You Save: $13.85 (17%)Ships in 1-2 Business Days


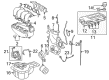
Toyota Matrix Crankshaft Position Sensor Part Number: 90919-05048
$136.64 MSRP: $193.43You Save: $56.79 (30%)Ships in 1-3 Business Days

Toyota Matrix Crankshaft Position Sensor Part Number: 90080-19024
$141.58 MSRP: $200.42You Save: $58.84 (30%)Ships in 1-2 Business Days

Toyota Matrix Crankshaft Position Sensor Part Number: 90080-19013
$148.04 MSRP: $209.57You Save: $61.53 (30%)Ships in 1-3 Business Days
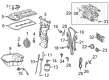
Toyota Matrix Crankshaft Position Sensor
Choose genuine Crankshaft Position Sensor that pass strict quality control tests. You can trust the top quality and lasting durability. Shopping for OEM Crankshaft Position Sensor for your Toyota Matrix? Our website is your one-stop destination. We stock an extensive selection of genuine Toyota Matrix parts. The price is affordable so you can save more. It only takes minutes to browse and find the exact fit. Easily add to cart and check out fast. Our hassle-free return policy will keep you stress-free. We process orders quickly for swift delivery. Your parts will arrive faster, so you can get back on the road sooner.
Toyota Matrix Crankshaft Position Sensor Parts and Q&A
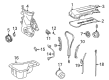
- Q: How to install the crankshaft position sensor on Toyota Matrix?A:Lightly oil the O-ring on the sensor before installing the crankshaft position sensor by applying torque of 9.0 Nm while avoiding O-ring distortion. Follow the procedure of bolt installation by applying the specified 9.0 Nm torque (92 kgf-cm, 80 in-lbf) and stay away from O-ring twisting during the process. The wire harness installation should follow the crankshaft position sensor connector clamp before connecting the crankshaft position sensor connector. The generator assembly should be installed after the sensor together with V-ribbed belt and engine under cover RH. The last step includes inspecting for oil leakage after connecting the cable to the negative battery terminal.
- Q: How to remove the Crankshaft Position Sensor on Toyota Matrix?A:The initial step to replace a 2AZ-FE engine control Crankshaft Position Sensor is disconnecting the negative battery cable. The first step entails removing two components: engine under cover from the right-hand side and V-ribbed belt. Then, remove the generator assembly. The disconnect process begins by removing the crankshaft position sensor connector then breaking the connector clamp and wire harness before removing the bolt and sensor itself.


Related Toyota Matrix Parts
 Toyota Matrix Fuse Box
 Toyota Matrix Oxygen Sensor
 Toyota Matrix Throttle Position Sensor
 Toyota Matrix Camshaft Position Sensor
 Toyota Matrix Daytime Running Light Relay
 Toyota Matrix Flasher Relay
 Toyota Matrix Fuel Pump Relay
 Toyota Matrix Horn Relay
 Toyota Matrix Knock Sensor
 Toyota Matrix PCV Hose
 Toyota Matrix Turn Signal Flasher
 Toyota Matrix Turn Signal Relay