×
ToyotaParts- Hello
- Login or Register
- Quick Links
- Live Chat
- Track Order
- Parts Availability
- RMA
- Help Center
- Contact Us
- Shop for
- Toyota Parts
- Scion Parts
My Garage
My Account
Cart
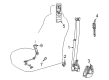
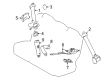
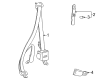
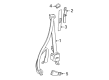
OEM Toyota RAV4 Seat Belt
Seat Safety Belt- Select Vehicle by Model
- Select Vehicle by VIN
Select Vehicle by Model
orMake
Model
Year
Select Vehicle by VIN
For the most accurate results, select vehicle by your VIN (Vehicle Identification Number).
221 Seat Belts found


Toyota RAV4 Lap & Shoulder Belt, Black, Driver Side Part Number: 73220-06390-C3
$218.66 MSRP: $312.20You Save: $93.54 (30%)Ships in 1-3 Business Days

Toyota RAV4 Lap & Shoulder Belt, Outer Passenger Side Part Number: 73360-0R040-C0
$142.16 MSRP: $201.25You Save: $59.09 (30%)Ships in 1-2 Business Days


Toyota RAV4 Buckle, Front Part Number: 73230-42050-B1
$26.04 MSRP: $36.25You Save: $10.21 (29%)Ships in 1-2 Business Days

Toyota RAV4 Lap & Shoulder Belt, Outer Driver Side Part Number: 73370-0R040-C0
$142.16 MSRP: $201.25You Save: $59.09 (30%)Ships in 1-3 Business Days

Toyota RAV4 Buckle, Gray, Driver Side GRAY Part Number: 73240-42050-B0
$68.36 MSRP: $95.96You Save: $27.60 (29%)Ships in 1-3 Business Days


Toyota RAV4 Lap & Shoulder Belt, Black/Gray, Driver Side Part Number: 73220-42320-C0
$222.39 MSRP: $317.52You Save: $95.13 (30%)Ships in 1-3 Business Days


Toyota RAV4 Lap & Shoulder Belt, Driver Side Part Number: 73220-42301-B2
$222.39 MSRP: $317.52You Save: $95.13 (30%)Ships in 1-3 Business Days

Toyota RAV4 Center Buckle, Passenger Side Part Number: 73330-0R040-C0
$23.53 MSRP: $32.75You Save: $9.22 (29%)Ships in 1-2 Business Days

Toyota RAV4 Buckle, Sand, Inner Part Number: 73380-42080-E3
$25.44 MSRP: $35.41You Save: $9.97 (29%)Ships in 1-3 Business Days
Toyota RAV4 Buckle, Gray, Inner Part Number: 73380-42080-B5
$26.04 MSRP: $36.24You Save: $10.20 (29%)Ships in 1-3 Business Days

Toyota RAV4 Inner Buckle Part Number: 73380-42070-C0
$29.74 MSRP: $41.40You Save: $11.66 (29%)Ships in 1-3 Business Days
Toyota RAV4 Buckle, Blue, Driver Side Part Number: 73230-42070-B0
$44.32 MSRP: $61.69You Save: $17.37 (29%)Ships in 1-3 Business Days

Toyota RAV4 Buckle, Fawn, Driver Side GRAY Part Number: 73230-42100-B0
$49.70 MSRP: $69.18You Save: $19.48 (29%)Ships in 1-3 Business Days
Toyota RAV4 Lap & Shoulder Belt, Outer Passenger Side Part Number: 73360-0R100-C0
$139.81 MSRP: $197.92You Save: $58.11 (30%)Ships in 1-3 Business DaysToyota RAV4 Lap & Shoulder Belt, Outer Driver Side Part Number: 73370-0R100-C0
$139.81 MSRP: $197.92You Save: $58.11 (30%)Ships in 1-3 Business DaysToyota RAV4 Lap & Shoulder Belt, Gray, Passenger Side Part Number: 73210-42340-B3
$244.52 MSRP: $349.12You Save: $104.60 (30%)Ships in 1-3 Business Days
Toyota RAV4 Buckle, Gray, Passenger Side Part Number: 73230-42081-B1
$44.44 MSRP: $61.86You Save: $17.42 (29%)
Toyota RAV4 Buckle, Driver Side Part Number: 73240-42020-B0


| Page 1 of 12 |Next >
1-20 of 221 Results
Toyota RAV4 Seat Belt
Choose genuine Seat Belt that pass strict quality control tests. You can trust the top quality and lasting durability. Shopping for OEM Seat Belt for your Toyota RAV4? Our website is your one-stop destination. We stock an extensive selection of genuine Toyota RAV4 parts. The price is affordable so you can save more. It only takes minutes to browse and find the exact fit. Easily add to cart and check out fast. Our hassle-free return policy will keep you stress-free. We process orders quickly for swift delivery. Your parts will arrive faster, so you can get back on the road sooner.
Toyota RAV4 Seat Belt Parts and Q&A
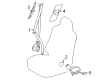
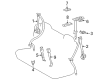
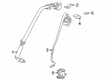
- Q: How to remove the rear center Seat Belt assembly on Toyota RAV4?A:The starting point for rear center seat outer belt assembly removal is disconnecting the negative (-) cable from the battery terminal before waiting 90 seconds to avoid Air Bag and seat belt pretensioner activation. The right-hand shoulder belt anchor cover should be started by removing its 4 claws with a screwdriver which requires a taped screwdriver tip. You should now drop the rear part of the roof headlining just enough but not to the point of complete removal. The last step involves removing the rear center seat belt assembly through dissolving its 2 securing bolts.
- Q: How to install the rear Seat Belt assembly on the LH side on Toyota RAV4?A:Assemble the LH rear seat outer belt by inserting its claws into the seat belt holes and fastening the retractor with two bolts, torque the upper bolt to 8.5 Nm and the lower bolt to 42 Nm while connecting the shoulder anchor with a bolt torqued to 42 Nm. After installing the inner roof side garnish assembly LH for vehicles with the rear No. 2 seat you can add the rear No. 2 seat outer belt assembly LH by aligning its claws before securely attaching the retractor with two bolts that need the same torque specifications from earlier installation. Then complete the process by connecting the shoulder anchor and closing the cover cap. When the car lacks the rear No. 2 seat, install the inner roof side garnish assembly LH. Position the deck trim side panel assembly LH and attach the rear No. 2 seat outer belt assembly LH by screwing bolt onto floor anchor at 42 Nm (428 kgf-cm, 31 ft-lbf) then shut the cover. The rear No. 1 seat outer belt assembly LH requires attachment by securing its floor anchor with a bolt at 42 Nm torque along with installation of the lap belt outer anchor cover. Rephrase the code for the reclining remote control lever bezel LH for cars that lack the rear No. 2 seat followed by the rear floor finish plate then the rear floor No. 1 mat support side plate then the rear floor No. 3 board then the rear floor No. 2 board. Both rear No. 2 seat assemblies LH and RH should be installed together with the leg covers and hinge covers for each side. The installation of the deck board assembly requires rear floor No. 1 board together with tonneau cover assembly and package tray trim pocket sub-assembly only in vehicles without the rear No. 2 seat. Complete the installation by putting the rear door opening trim Weather Strip on the left-hand side and the rear door scuff plate on the left along with connecting the cable to the negative battery terminal.


Related Toyota RAV4 Parts
 Toyota RAV4 Oxygen Sensor
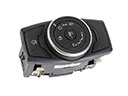 Toyota RAV4 Headlight Switch
 Toyota RAV4 Relay
 Toyota RAV4 Speedometer
 Toyota RAV4 ABS Relay
 Toyota RAV4 Door Jamb Switch
 Toyota RAV4 Horn Relay
 Toyota RAV4 Ignition Lock Assembly
 Toyota RAV4 Mirror Switch
 Toyota RAV4 Radiator Fan Relay
 Toyota RAV4 Relay Block
 Toyota RAV4 Transmitter
Browse Toyota RAV4 Seat Belt by Years
2025
2024
2023
2022
2021
2020
2019
2018
2017
2016
2015
2014
2013
2012
2011
2010
2009
2008
2007
2006
2005
2004
2003
2002
2001
2000
1999
1998
1997
1996