×
ToyotaParts- Hello
- Login or Register
- Quick Links
- Live Chat
- Track Order
- Parts Availability
- RMA
- Help Center
- Contact Us
- Shop for
- Toyota Parts
- Scion Parts
My Garage
My Account
Cart
OEM Toyota ABS Control Module
Anti Lock Brake Control Module- Select Vehicle by Model
- Select Vehicle by VIN
Select Vehicle by Model
orMake
Model
Year
Select Vehicle by VIN
For the most accurate results, select vehicle by your VIN (Vehicle Identification Number).
602 ABS Control Modules found


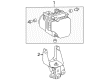
Toyota Actuator Assembly, Brake Part Number: 44050-48191
$1446.09 MSRP: $2119.27You Save: $673.18 (32%)Ships in 1-2 Business DaysProduct Specifications- Other Name: ACTUATOR ASSY, BRAKE; ABS Control Module
- Replaces: 44050-48190


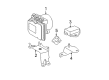
Toyota Modulator Valve Part Number: 44050-48320
$1273.46 MSRP: $1603.04You Save: $329.58 (21%)Ships in 1-3 Business DaysProduct Specifications- Other Name: Actuator Assembly, Brake; ABS Modulator Valve; ABS Control Module; ABS Control Unit; Actuator


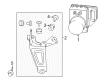
Toyota Modulator Valve Part Number: 44500-47141
$1404.10 MSRP: $1767.49You Save: $363.39 (21%)Ships in 1-3 Business DaysProduct Specifications- Other Name: Actuator Assembly, Brake; ABS Modulator Valve; ABS Pump And Motor Assembly; ABS Control Module; Actuator Assembly
- Replaces: 44500-47140

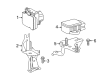
Toyota Modulator Valve Part Number: 44500-47091
$1404.10 MSRP: $1767.49You Save: $363.39 (21%)Ships in 1-3 Business DaysProduct Specifications- Other Name: Actuator Assembly, Brake; ABS Modulator Valve; ABS Pump And Motor Assembly; ABS Control Module; Actuator Assembly
- Replaces: 44500-47090


Toyota Control Module Part Number: 89541-0C062
$471.35 MSRP: $690.78You Save: $219.43 (32%)Ships in 1-2 Business DaysProduct Specifications- Other Name: Computer, Skid Control; ABS Control Module

Toyota Control Module Part Number: 89541-0C070
$515.28 MSRP: $755.14You Save: $239.86 (32%)Product Specifications- Other Name: Computer, Skid Control; ABS Control Module


Toyota Modulator Valve Part Number: 44050-42240
$817.30 MSRP: $1028.83You Save: $211.53 (21%)Ships in 1-3 Business DaysProduct Specifications- Other Name: Actuator Assembly, Brake; ABS Modulator Valve; ABS Pump And Motor Assembly; ABS Control Module; Actuator Assembly
- Manufacturer Note: THIRD SEAT-WITH(2PERSONS)


Toyota Modulator Valve Part Number: 44050-06070
$964.28 MSRP: $1213.85You Save: $249.57 (21%)Ships in 1-3 Business DaysProduct Specifications- Other Name: Actuator Assembly, Brake; ABS Modulator Valve; ABS Control Module; Actuator


Toyota Modulator Valve Part Number: 44050-08221
$1011.39 MSRP: $1273.14You Save: $261.75 (21%)Ships in 1-2 Business DaysProduct Specifications- Other Name: Actuator Assembly, Brake; ABS Hydraulic Assembly; ABS Control Module; Actuator


Toyota Modulator Valve Part Number: 44050-06260
$1030.80 MSRP: $1297.57You Save: $266.77 (21%)Ships in 1-3 Business DaysProduct Specifications- Other Name: Actuator Assembly, Brake; ABS Modulator Valve; ABS Control Module; Actuator
- Manufacturer Note: MARK Y1


Toyota Modulator Valve Part Number: 44050-06131
$1079.60 MSRP: $1359.01You Save: $279.41 (21%)Product Specifications- Other Name: Actuator Assembly, Brake; ABS Modulator Valve; ABS Control Module; Actuator


Toyota Hydraulic Unit Part Number: 44050-08061
$1058.38 MSRP: $1332.29You Save: $273.91 (21%)Ships in 1-3 Business DaysProduct Specifications- Other Name: Actuator Assembly, Brake; ABS Hydraulic Assembly; ABS Control Module; Actuator
- Manufacturer Note: W(VSC)


Toyota Hydraulic Unit Part Number: 44050-08150
$1112.97 MSRP: $1401.01You Save: $288.04 (21%)Ships in 1-3 Business DaysProduct Specifications- Other Name: Actuator Assembly, Brake; ABS Hydraulic Assembly; ABS Control Module; Actuator
- Manufacturer Note: W(VSC)


Toyota Modulator Valve Part Number: 44050-30660
$1111.15 MSRP: $1398.73You Save: $287.58 (21%)Ships in 1-3 Business DaysProduct Specifications- Other Name: Actuator Assembly, Brake; ABS Hydraulic Assembly; ABS Control Module; Actuator
- Replaces: 44050-30300


Toyota Modulator Valve Part Number: 44050-02440
$1081.19 MSRP: $1361.01You Save: $279.82 (21%)Ships in 1-3 Business DaysProduct Specifications- Other Name: Actuator Assembly, Brake; ABS Control Module
- Manufacturer Note: VSC-WITH (W/CUT OFF SW) V2P


Toyota Control Module Part Number: 44050-0C410
$1079.03 MSRP: $1358.29You Save: $279.26 (21%)Product Specifications- Other Name: Actuator Assembly, Brake; ABS Pump And Motor Assembly; ABS Control Module; Actuator Assembly


Toyota Modulator Valve Part Number: 44050-0C310
$1079.03 MSRP: $1358.29You Save: $279.26 (21%)Product Specifications- Other Name: Actuator Assembly, Brake; ABS Hydraulic Assembly; ABS Pump And Motor Assembly; ABS Control Module; Actuator Assembly

Toyota Modulator Valve Part Number: 44050-0C212
$1063.71 MSRP: $1339.01You Save: $275.30 (21%)Product Specifications- Other Name: Actuator Assembly, Brake; ABS Hydraulic Assembly; ABS Pump And Motor Assembly; ABS Control Module; Actuator Assembly
- Manufacturer Note: REAR SUSPENSION-AIR SUSPENSION
- Replaces: 44050-0C211


Toyota Actuator Assembly Part Number: 47050-60321
$1355.75 MSRP: $1986.86You Save: $631.11 (32%)Product Specifications- Other Name: Cylinder Assembly, Brake; ABS Modulator Valve; ABS Pump And Motor Assembly; ABS Control Module
- Replaces: 47050-60320


Toyota Control Module Part Number: 89540-35092
Product Specifications- Other Name: Computer Assembly, Skid; ABS Control Module; Computer Assembly, Skid Control
- Manufacturer Note: W(ABS)
- Replaces: 89540-35091, 89540-35090
| Page 1 of 31 |Next >
1-20 of 602 Results
Toyota ABS Control Module
OEM parts deliver unmatched quality you can rely on. They pass extensive quality control inspections. Toyota produces them to the official factory specifications. This process helps prevent defects and imperfections. So you can get exceptional lifespan and a flawless fit. Need new OEM Toyota ABS Control Module? You'll love our wide selection of genuine options. Shop in minutes and skip the hunt. Our prices are unbeatable, you'll save time and money. It's easy to shop and find the right piece. Our committed customer service team gives professional help from start to finish. Every part includes a manufacturer's warranty. We ship quickly, your parts will arrive fast at your door.
Toyota ABS Control Module has been designed to avoid wheel lock in order to retain control in the event of sudden halts. Toyota is efficient in production, constructs quality, and continuously develops hybrid systems to squeeze the last gallon. Toyota relies on its TNGA platform to reduce the center of gravity and narrow handling of sedans, SUVs, and trucks. Toyota gains respect in cars that are abused every day but still get started on cold mornings and shake off rough roads. Toyota extends the option by plug-in hybrids that run silently on urban roads and reduce emissions without panache. Employees detect problems in time and halt the production line, prevent wastage of materials, and increase morale. Fewer recalls and vehicles that are valuable even after the warranty has been revoked. Continuous improvement culture considers all ideas worth trying out, and thus, small increments accumulate into significant reliability. Due to wiser cooling designs, hybrid batteries are much longer lasting. ABS Control Module samples the wheel-speed data dozens of times per second, compares the rates, and in turn pulses the hydraulic valves and operates an electric pump in order to adjust the traction discrepancies on wet, gravel, or icy pavement. ABS Control Module also feeds data to stability and traction logic allowing them to reduce engine torque or activate brakes to prevent a slide before it grows. ABS Control Module is quicker resulting in a shorter stop distance and enables steering to respond in panic braking. ABS Control Module is sturdy and does not lose calibration due to heat, vibrations, and thousands of cycles.
Toyota ABS Control Module Parts and Q&A
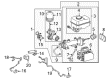
- Q: How to overhaul the ABS Control Module for Antilock Brakes on Toyota 4Runner?A:The Hydraulic Control Assembly for Antilock Brakes needs to receive lithium soap base glycol grease treatment on specified parts before examining if the brake actuator tube No.1 sustains high-pressure deformation. Turn off the ignition switch and perform brake pedal depression more than 20 times before beginning the work. First drain all brake fluid when you encounter painted surfaces then detach the front door scuff plate LH and front floor footrest followed by cowl side trim board LH and instrument panel finish plate and instrument panel finish panel sub-assembly lower and steering column hole cover by using the clips for removal. Begin by unharnessing the 3 connectors attached to the brake master cylinder followed by using SST 09023-00101 to detach the 4 brake lines. The push rod pin requires removing its clip before proceeding. Extract the brake master cylinder by removing its 4 nuts before eliminating the brake booster gasket. Brake actuators with 5 mm hexagon wrenches can be used to detach bracket no:1 before removing wire connections to the warning switch. The first step for repairing the brake master cylinder reservoir sub-assembly involves hitting the pin with a pin punch and hammer while unscrewing and pulling it out before removing the master cylinder reservoir filler cap and the three reservoir grommets. Workers should use needle nose pliers to unhook clips before they remove the brake actuator hose then employ SST to use on brake actuator tube No.1. The brake booster with accumulator pump assembly requires removal of two plugs and disconnecting master cylinder solenoid wire harnesses before extracting the assembly together with its two brake booster pump collars and bushes. The technician should detach brake booster pump bracket No.2 using a 5 mm hexagon wrench before removing brake actuator bracket No.3. Place the brake booster with accumulator pump assembly into a vise while securing it so you can remove the brake booster accumulator assembly with its O-ring to prevent any foreign entries into the pump. The brake booster pump assembly motor functionality can be checked through battery lead connection during inspection. Cut the brake booster accumulator assembly using safety glasses between the points designated as A and B to dispose of it properly. Releasing the 6 bolts and gasket for master cylinder solenoid enables you to detach it from the brake system. Next loosen the lock nuts to move the push rod clevis and rod operating adapter. To access both the master cylinder boot and the brake master cylinder kit use the piston push method after removing the C-ring and successfully withdraw the piston directly. You should apply lithium soap base glycol grease to the piston before installing the new brake master cylinder kit together with its snap ring. Subscribe the master cylinder boot along with push rod clevis by applying 26 Nm of torque to the lock nuts. Fit the master cylinder solenoid together with a new gasket and torque it at 32 Nm and then install the brake booster accumulator assembly with a new O-ring at 57 Nm. The mechanic should torque brake actuator bracket No.3 and brake booster pump bracket No.2 to 7.8 Nm. Secure all brake booster with accumulator pump assembly components in place before tightening the brake actuator tube No.1 to 14 Nm using SST 09023-00101 at SST. After attaching the brake actuator hose and reservoir grommets one should install the brake master cylinder reservoir sub-assembly by screwing it at 1.7 Nm tension followed by filling the reservoir. The installation includes braking actuator bracket No.1 and brake booster gasket along with brake master cylinder at 14 Nm while verifying proper connection and adequate torque of all brake lines. After reversing the component removal sequence you must install the push rod pin, steering column hole cover followed by all earlier components before bleeding the brake booster, brake line and master cylinder solenoid as you check brake pedal height and free play, reserve distance, fluid level, leakage and master cylinder operating condition.
- Q: How to install the ABS Control Module on Toyota Tacoma?A:Before installing the brake actuator start by affixing the actuator bracket assembly with 3 bolts torqued to 5.4 Nm. The installation requires to bolt the three nuts between brake actuator assembly and bracket while maintaining 19 Nm (194 kgf-cm, 14 ft-lbf) torque and avoiding brake tubes and wire harness damage. Each brake tube received temporary placement on the brake actuator before installing six brake tubes through the union nut wrench by using 20 Nm (199 kgf-cm, 14 ft-lbf) torque for 12 mm flare nuts with and without the wrench while 15 Nm (155 kgf-cm, 11 ft-lbf) torque and 14 Nm (145 kgf-cm, 10 ft-lbf) torque were used for 10 mm flare nuts with and without the wrench respectively. The brake actuator connector requires connection then secure locking. The air injection control driver should be mounted with two 10 Nm (102 kgf-cm, 7 ft-lbf) torqued bolts while the two connectors must be connected. The correct installation order is the air cleaner case followed by the air cleaner filter element sub-assembly and then by the air cleaner cap sub-assembly. Reattach the negative battery cable and tighten it to 3.9 Nm (40 kgf-cm, 35 in-lbf). Start by filling the reservoir with brake fluid before completing master cylinder bleeding procedure alongside brake line and brake actuator. The brake fluid reservoir should be checked for its fluid level while looking for signs of fluid leakage. Techstream helps users to check and calibrate the brake actuator while conducting yaw rate and acceleration sensor zero point calibration and to detect and reset any diagnostic trouble codes.


Related Toyota Parts
 Toyota Airbag
 Toyota Knock Sensor
 Toyota Speedometer
 Toyota ABS Relay
 Toyota Brake Light Switch
 Toyota Horn Relay
 Toyota Ignition Control Module
 Toyota Ignition Relay
 Toyota Speedometer Cable
 Toyota Hazard Warning Switch
 Toyota Radiator Fan Relay
 Toyota Spark Plug Wire
Browse Toyota ABS Control Module by Models
Tacoma 4Runner Camry Tundra Corolla RAV4 Highlander Prius Sienna Land Cruiser Pickup 86 Sequoia T100 Avalon Celica Supra Yaris Matrix MR2 Solara Venza GR86 Echo C-HR Cressida Grand Highlander Paseo Previa Prius Prime bZ4X Corolla Cross Corolla iM Crown Crown Signia GR Corolla Mirai MR2 Spyder Tercel Yaris iA GR Supra Prius AWD-e RAV4 Prime