×
ToyotaParts- Hello
- Login or Register
- Quick Links
- Live Chat
- Track Order
- Parts Availability
- RMA
- Help Center
- Contact Us
- Shop for
- Toyota Parts
- Scion Parts
My Garage
My Account
Cart
OEM Toyota RAV4 ABS Control Module
Anti Lock Brake Control Module- Select Vehicle by Model
- Select Vehicle by VIN
Select Vehicle by Model
orMake
Model
Year
Select Vehicle by VIN
For the most accurate results, select vehicle by your VIN (Vehicle Identification Number).
74 ABS Control Modules found


Toyota RAV4 Modulator Valve Part Number: 44050-42240
$817.30 MSRP: $1028.83You Save: $211.53 (21%)Ships in 1-3 Business Days
Toyota RAV4 Modulator Valve Part Number: 44050-0R230
$984.60 MSRP: $1239.42You Save: $254.82 (21%)Ships in 1-3 Business DaysToyota RAV4 Modulator Valve Part Number: 44050-0R071
$635.02 MSRP: $799.37You Save: $164.35 (21%)Ships in 1-3 Business DaysToyota RAV4 Modulator Valve Part Number: 44050-0R081
$725.59 MSRP: $913.38You Save: $187.79 (21%)Ships in 1-3 Business DaysToyota RAV4 Modulator Valve Part Number: 44050-0R061
$725.59 MSRP: $913.38You Save: $187.79 (21%)Ships in 1-3 Business DaysToyota RAV4 Actuator Assembly Part Number: 44050-0R690
$835.35 MSRP: $1051.54You Save: $216.19 (21%)Ships in 1-2 Business DaysToyota RAV4 Actuator Assembly Part Number: 44050-0R680
$835.35 MSRP: $1051.54You Save: $216.19 (21%)Ships in 1-2 Business Days
Toyota RAV4 Actuator Assembly Part Number: 44050-42D00
$848.79 MSRP: $1068.46You Save: $219.67 (21%)Ships in 1-3 Business DaysToyota RAV4 Modulator Valve Part Number: 44050-42C90
$874.28 MSRP: $1100.55You Save: $226.27 (21%)Ships in 1-3 Business DaysToyota RAV4 Actuator Assembly Part Number: 44050-42P50
$881.32 MSRP: $1109.41You Save: $228.09 (21%)Ships in 1-2 Business DaysToyota RAV4 Actuator Assembly Part Number: 44050-42D40
$880.52 MSRP: $1108.41You Save: $227.89 (21%)Ships in 1-3 Business DaysToyota RAV4 Modulator Valve Part Number: 44050-42520
$880.52 MSRP: $1108.41You Save: $227.89 (21%)Ships in 1-3 Business DaysToyota RAV4 Modulator Valve Part Number: 44050-0R150
$907.76 MSRP: $1142.70You Save: $234.94 (21%)Ships in 1-3 Business DaysToyota RAV4 Modulator Valve Part Number: 44050-0R390
$899.25 MSRP: $1131.98You Save: $232.73 (21%)Ships in 1-3 Business DaysToyota RAV4 Modulator Valve Part Number: 44050-0R170
$899.70 MSRP: $1132.55You Save: $232.85 (21%)Ships in 1-3 Business DaysToyota RAV4 Modulator Valve Part Number: 44050-42420
$932.85 MSRP: $1174.27You Save: $241.42 (21%)Ships in 1-3 Business DaysToyota RAV4 Actuator Assembly Part Number: 44050-42P20
$912.55 MSRP: $1148.73You Save: $236.18 (21%)Ships in 1-2 Business DaysToyota RAV4 Modulator Valve Part Number: 44050-0R152
$916.61 MSRP: $1153.84You Save: $237.23 (21%)Ships in 1-3 Business Days
Toyota RAV4 Actuator Assembly, Brake Part Number: 44050-42S41
$949.76 MSRP: $1195.56You Save: $245.80 (21%)Ships in 1-2 Business Days

Toyota RAV4 Modulator Valve Part Number: 44050-0R094
$979.27 MSRP: $1232.71You Save: $253.44 (21%)Ships in 1-3 Business Days
| Page 1 of 4 |Next >
1-20 of 74 Results
Toyota RAV4 ABS Control Module
Choose genuine ABS Control Module that pass strict quality control tests. You can trust the top quality and lasting durability. Shopping for OEM ABS Control Module for your Toyota RAV4? Our website is your one-stop destination. We stock an extensive selection of genuine Toyota RAV4 parts. The price is affordable so you can save more. It only takes minutes to browse and find the exact fit. Easily add to cart and check out fast. Our hassle-free return policy will keep you stress-free. We process orders quickly for swift delivery. Your parts will arrive faster, so you can get back on the road sooner.
Toyota RAV4 ABS Control Module Parts and Q&A
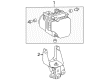
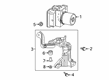
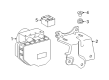
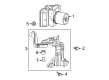
- Q: How to install the ABS Control Module with the brake actuator and bracket on Toyota RAV4?A:Before installing the brake actuator together with its bracket you must keep the hole plug inside until completing the brake tube connection because new brake actuators contain brake fluid. Three nuts require a 19 Nm (194 kgf-cm, 14 ft-lbf) torque for installation of the actuator with bracket. It is essential to tighten the nuts in alphabetical order yet maintain proper care for the brake tubes and to avoid dropping the actuator with a mandatory replacement if it does get dropped. Begin by adding the brake tube clamp to the bracket; then correctly position all Brake Lines on the actuator before connecting them with a 10 mm union nut wrench at 15 Nm torque (155 kgf-cm, 11 ft-lbf) wrench-free or 14 Nm (145 kgf-cm, 10 ft-lbf) with wrench support while maintaining a 300 mm (11.8 in.) torque wrench fulcrum at 90 degrees from the union nut wrench. The procedure starts by attaching the connector then lowering the lock lever while performing fluid addition to the reservoir followed by bleeding air through the Brake Master Cylinder and brake lines and ABS and traction actuator assembly before checking the fluid level and inspecting for leaks. The assembly process includes adding the air cleaner case sub-assembly for both 2AR-FE and 2GR-FE engines. Prior to checking the ABS and traction actuator assembly with Techstream you must connect the cable to the negative battery terminal.
- Q: How to remove the ABS Control Module for Antilock Brakes on Toyota RAV4?A:Begin the Hydraulic Control Assembly for Antilock Brakes removal process by disconnecting the negative cable battery terminal then waiting 90 seconds to avoid activating Air Bag and seat belt pretensioners. To access the air cleaner case of the 2AZ-FE engine you should perform the maintenance steps which start with purge VSV removal and culminate in the air cleaner case removal. The air cleaner case removal process for 2GR-FE units should begin by following the same procedure from air cleaner cap sub-assembly removal until it reaches the air cleaner case. The draining process for brake fluid should be followed by urgency to wash away fluid from painted areas. The service technician should detach each of the 6 Brake Lines from the actuator with Special Service Tool: 09023-00101 while tagging the installation spots on the lines. The procedure ends with removing the ABS and traction actuator assembly with bracket where you first disconnect the connector through the lock lever upward movement then remove the brake tube clamp from the bracket followed by taking off 3 nuts and removing the actuator and bracket while handling brake tubes with caution.


Related Toyota RAV4 Parts
 Toyota RAV4 Brake Light Switch
 Toyota RAV4 Coolant Temperature Sensor
 Toyota RAV4 Relay
 Toyota RAV4 ABS Relay
 Toyota RAV4 Flasher Relay
 Toyota RAV4 Igniter
 Toyota RAV4 Ignition Control Module
 Toyota RAV4 Mirror Switch
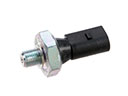 Toyota RAV4 Oil Pressure Switch
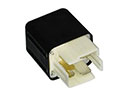 Toyota RAV4 Overload Relay
 Toyota RAV4 Turn Signal Flasher
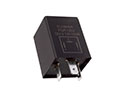 Toyota RAV4 Turn Signal Relay
Browse Toyota RAV4 ABS Control Module by Years
2025
2024
2023
2022
2021
2020
2019
2018
2017
2016
2015
2014
2013
2012
2011
2010
2009
2008
2007
2006
2005
2004
2000
1999
1998
1997
1996