×
ToyotaParts- Hello
- Login or Register
- Quick Links
- Live Chat
- Track Order
- Parts Availability
- RMA
- Help Center
- Contact Us
- Shop for
- Toyota Parts
- Scion Parts
My Garage
My Account
Cart
OEM Toyota Exhaust Pipe
Exhaust Tail Pipe- Select Vehicle by Model
- Select Vehicle by VIN
Select Vehicle by Model
orMake
Model
Year
Select Vehicle by VIN
For the most accurate results, select vehicle by your VIN (Vehicle Identification Number).
1126 Exhaust Pipes found


Toyota Intermediate Pipe, Front Part Number: 17450-50070
$229.03 MSRP: $299.50You Save: $70.47 (24%)Ships in 1-2 Business DaysProduct Specifications- Other Name: Pipe Assembly, Exhaust Front; Catalytic Converter; Direct-Fit Exhaust; Exhaust System Kit; Exhaust Pipe; Second Converter; Front Pipe; Center Pipe; Pipe Assembly, Exhaust, Front
- Position: Front
- Replaces: 17450-50050


Toyota Muffler & Pipe Assembly, Center Part Number: 17403-50151
$661.92 MSRP: $888.49You Save: $226.57 (26%)Ships in 1-3 Business DaysProduct Specifications- Other Name: Pipe Sub-Assembly, Exhaust Muffler; Direct-Fit Exhaust; Exhaust System Kit; Tail Pipe; Muffler & Pipe; Muffler; Pipe Assembly, Exhaust, Center
- Position: Center


Toyota Front Pipe Part Number: 17410-37B52
$1105.71 MSRP: $1484.18You Save: $378.47 (26%)Product Specifications- Other Name: Pipe Assembly, Exhaust; Catalytic Converter, Rear; Exhaust Pipe; Pipe Assembly, Exhaust, Front
- Manufacturer Note: *114=TOYOTA/TL3/Y
- Position: Front
- Replaces: 17410-37A00, 17410-37B50


Toyota Pipe Assembly, Exhaust, Center Part Number: 17420-38100
$617.66 MSRP: $829.07You Save: $211.41 (26%)Ships in 1-2 Business DaysProduct Specifications- Other Name: Pipe Assembly, Exhaust; Exhaust Pipe; Tail Pipe; Muffler
- Position: Center


Toyota Front Pipe Part Number: 17410-0V090
$939.88 MSRP: $1261.60You Save: $321.72 (26%)Ships in 1-3 Business DaysProduct Specifications- Other Name: Pipe Assembly, Exhaust; Catalytic Converter; Exhaust Pipe; Pipe Assembly, Exhaust, Front
- Position: Front


Toyota Front Pipe Part Number: 17410-0S070
$1589.67 MSRP: $2133.80You Save: $544.13 (26%)Product Specifications- Other Name: Pipe Assembly, Exhaust; Catalytic Converter, Right; Exhaust Pipe; Pipe Assembly, Exhaust, Front
- Position: Front


Toyota Exhaust Pipe, Front Part Number: 17410-21500
$2263.86 MSRP: $3038.76You Save: $774.90 (26%)Ships in 1-3 Business DaysProduct Specifications- Other Name: Pipe Assembly, Exhaust; Front Pipe; Pipe Assembly, Exhaust, Front
- Manufacturer Note: *114=TOYOTA/GD3EA6/Y
- Position: Front


Toyota Catalytic Converter, Front Part Number: 17450-75020
$1460.85 MSRP: $1960.88You Save: $500.03 (26%)Ships in 1-3 Business DaysProduct Specifications- Other Name: Pipe Assembly, Exhaust Front; Exhaust Pipe; Converter & Pipe; Pipe Assembly, Exhaust, Front
- Position: Front


Toyota Exhaust Pipe, Front Part Number: 17410-37300
$1718.83 MSRP: $2307.17You Save: $588.34 (26%)Product Specifications- Other Name: Pipe Assembly, Exhaust; Exhaust Intermediate Pipe; Front Pipe; Pipe Assembly, Exhaust, Front
- Manufacturer Note: *114=TOYOTA/GP1TB1/Y
- Position: Front


Toyota Exhaust Pipe, Front Part Number: 17450-20100
$289.37 MSRP: $378.42You Save: $89.05 (24%)Ships in 1-3 Business DaysProduct Specifications- Other Name: Pipe Assembly, Exhaust Front; Exhaust Intermediate Pipe; Front Pipe; Pipe Assembly, Exhaust, Front
- Position: Front


Toyota Muffler & Pipe Part Number: 17430-37A70
$470.90 MSRP: $632.08You Save: $161.18 (26%)Ships in 1-3 Business DaysProduct Specifications- Other Name: Pipe Assembly, Exhaust Tail; Exhaust Muffler; Exhaust Pipe; Tail Pipe; Muffler; Pipe Assembly, Exhaust, Tail
- Replaces: 17430-37720, 17430-37721, 17430-37620


Toyota Muffler & Tail Pipe Part Number: 17430-0P010
$548.08 MSRP: $735.68You Save: $187.60 (26%)Product Specifications- Other Name: Pipe Assembly, Exhaust Tail; Muffler; Direct-Fit Exhaust; System Kit; Pipe; Muffler & Pipe; Pipe Assembly, Exhaust, Tail; Muffler


Toyota Muffler & Tail Pipe, Center Part Number: 17403-62170
$551.14 MSRP: $739.79You Save: $188.65 (26%)Ships in 1-3 Business DaysProduct Specifications- Other Name: Pipe Sub-Assembly, Exhaust Muffler; Direct-Fit Exhaust; Exhaust System Kit; Tail Pipe; Muffler & Pipe; Pipe Assembly, Exhaust, Center; Muffler
- Manufacturer Note: CALIFORNIA SPEC
- Position: Center


Toyota Rear Muffler Part Number: 17430-0P340
$582.92 MSRP: $782.45You Save: $199.53 (26%)Product Specifications- Other Name: Pipe Assembly, Exhaust Tail; Exhaust Muffler; Exhaust Pipe; Muffler; Pipe Assembly, Exhaust, Tail


Toyota Exhaust Pipe, Front Part Number: 17410-21261
$1543.25 MSRP: $2071.49You Save: $528.24 (26%)Product Specifications- Other Name: Pipe Assembly, Exhaust; Catalytic Converter; Front Pipe; Pipe Assembly, Exhaust, Front
- Position: Front
- Replaces: 17410-21260


Toyota Exhaust Pipe, Front Part Number: 17410-22132
$1625.31 MSRP: $2181.64You Save: $556.33 (26%)Ships in 1-3 Business DaysProduct Specifications- Other Name: Pipe Assembly, Exhaust; Exhaust Intermediate Pipe; Front Pipe; Pipe Assembly, Exhaust, Front
- Manufacturer Note: *115=TOYOTA/00-/Y
- Position: Front
- Replaces: 17410-22131, 17410-22130


Toyota Resonator & Pipe Part Number: 17430-50220
$269.57 MSRP: $352.52You Save: $82.95 (24%)Ships in 1-3 Business DaysProduct Specifications- Other Name: Pipe Assembly, Exhaust Tail; Direct-Fit Exhaust; System Kit; Resonator; Muffler; Muffler & Tail Pipe; Tailpipe; Pipe Assembly, Exhaust, Tail


Toyota Muffler & Pipe Part Number: PTR03-18170
$1475.72 MSRP: $2162.68You Save: $686.96 (32%)Ships in 1-2 Business DaysProduct Specifications- Other Name: 86 Trd Cat Back Exhaust; Exhaust Pipe; Tail Pipe; Muffler
- Replaces: PTR03-18131


Toyota Muffler, Driver Side Part Number: 17440-F0100
$304.29 MSRP: $434.45You Save: $130.16 (30%)Ships in 1-3 Business DaysProduct Specifications- Other Name: Pipe Assembly, Exhaust Tail; Pipe, Exhaust Tail, Driver Side
- Position: Driver Side


Toyota Rear Muffler, Driver Side Part Number: 17440-0P080
$304.29 MSRP: $434.45You Save: $130.16 (30%)Ships in 1-3 Business DaysProduct Specifications- Other Name: Pipe Assembly, Exhaust Tail; Exhaust Muffler, Left; Muffler; Pipe, Exhaust Tail, Driver Side
- Position: Driver Side
| Page 1 of 57 |Next >
1-20 of 1126 Results
Toyota Exhaust Pipe
OEM parts deliver unmatched quality you can rely on. They pass extensive quality control inspections. Toyota produces them to the official factory specifications. This process helps prevent defects and imperfections. So you can get exceptional lifespan and a flawless fit. Need new OEM Toyota Exhaust Pipe? You'll love our wide selection of genuine options. Shop in minutes and skip the hunt. Our prices are unbeatable, you'll save time and money. It's easy to shop and find the right piece. Our committed customer service team gives professional help from start to finish. Every part includes a manufacturer's warranty. We ship quickly, your parts will arrive fast at your door.
Toyota Exhaust Pipe transfers burnt gases fast and enhances breathing of engines and safety of cabins. Toyota has grown since 1937, lean-production start-up to the name of the world that reduces waste, values durability and transforms hybrid drive into billions of real-life savings in the pockets of millions, all as its TNGA chassis narrows the steering response and enhances crash strength. Toyota invests the recent Hybrid Synergy Drive into compacts, SUVs, and plug-ins such as the RAV4, proving that electrification can be applied during school runs and cross-country hauls without worry of range anxiety or gimmicks, saving fuel and time each day by their owners. The Toyota metal also laughs at rust and potholes and thus value remains high and drivers come back to have their next ride. The Exhaust Pipe directs the hot gases in the rear direction, reduces back pressure and allows the engine to breathe freely, which ensures that the pull on the hills and highway merges is strong. Constructed of heavy stainless steel, the Exhaust Pipe not only withstands salt, the impact of gravel and the extreme changes in temperatures that would break weaker piping. Mandrel bends maintain smooth flow, minimize drone and provide sharp data to oxygen sensors. The Exhaust Pipe protects cabins against fumes thus guaranteeing passengers breathe fresh air even when they have to wait a long time. Using the cat and muffler, the Exhaust Pipe also contributes to the life of the emissions gear by ensuring that the noise is not too much to be civil and that the power is not strangled. It is precisely such practical detail that Toyota is always leading in longevity surveys.
Toyota Exhaust Pipe Parts and Q&A
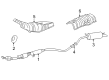
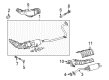
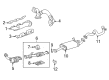
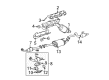
- Q: How to service and repair the exhaust pipe on Toyota 4Runner?A:Service and repair work on the exhaust pipe begins with removing its tail assembly by pulling out two bolts and exhaust pipe support and tail pipe. Detaching the exhaust pipe assembly center requires removing its 2 bolts alongside the 2 compression springs before proceeding to remove the 4 exhaust pipe supports along with the exhaust pipe center. The removal process for exhaust front pipe assembly No. 2 requires separating its 2 bolts, 2 nuts and extracting the entire assembly. The first step involves disconnecting the heated oxygen sensor connector followed by removing the heated oxygen sensor for Bank 1. After this, workers should proceed by removing the exhaust pipe assembly front using a 2 nut removal technique. Execute the same procedure for Bank 2 heated oxygen sensor by disconnecting its connector and extracting the sensor. When you install the heated oxygen sensor for Bank 2 you need to torque it to 44 Nm (450 kgf-cm, 33 ft. lbs.) before you attach the connector and verify the wire is untwisted because any wire twisting requires you to reinstall the sensor. You should use new gaskets to mount the exhaust pipe assembly front against the exhaust manifold before securing it with 2 nuts which require a torque of 62 Nm (630 kgf-cm, 46 ft. lbs.). The heated oxygen sensor for Bank 1 needs to be mounted on the exhaust pipe front while its torque reaches 44 Nm (450 kgf-cm, 33 ft. lbs.) before reconnecting the sensor wires and verifying they are not twisted. The exhaust front pipe assembly No. 2 requires installation with two new gaskets before securing it using two bolts and two nuts that need torquing to 62 Nm (630 kgf-cm, 46 ft. lbs.) for the nuts and 48 Nm (490 kgf-cm, 35 ft. lbs.) for the bolts. A spring replacement is necessary when the compressed length measured by a vernier caliper falls below 40.5 mm (1.5945 inch). Use a new gasket on the front of the exhaust pipe assembly before tightening its center section with two bolts reaching 43 Nm (440 kgf-cm, 32 ft. lbs.) torque. The last step involves using a new gasket on the exhaust pipe center together with tightening 2 tail pipe bolts to 48 Nm (490 kgf-cm, 35 ft. lbs.) then inspecting for exhaust gas leaks.
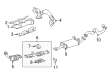
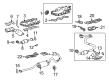
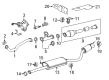
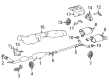
- Q: How to install the exhaust pipe assembly on Toyota Tacoma?A:The installation of the 2TR-FE exhaust pipe assembly begins with verifying the compression spring length using vernier calipers for minimum 40.5 mm (1.594 in.). A shorter number indicates the need to replace the compression spring. A wooden block along with a plastic-faced hammer should be used to install a new gasket until it is properly situated flush with the exhaust manifold while maintaining the correct angle. Always use new gaskets instead of reusing the old ones. Avoid inserting the new gasket into the exhaust manifold when you put on the exhaust pipe front. Screw the exhaust pipe front into the exhaust pipe support while tightening both bolts and compression springs at 43 Nm (438 kgf-cm, 32 ft-lbf). To attach the exhaust pipe tail, users should place a new gasket onto the exhaust pipe front before securing the pipe tail to its 4 supports and setting the 2 bolts and 2 nuts to 48 Nm (489 kgf-cm, 35 ft-lbf). Fasten the oxygen sensor and air fuel ratio sensor onto their respective positions before attaching the cable to the negative battery terminal with 3.9 Nm (40 kgf-cm, 35 in-lbf) torque. Perform a last examination of exhaust gas leakage.


Related Toyota Parts
 Toyota Catalytic Converter
 Toyota PCV Valve
 Toyota Air Injection Pump
 Toyota Exhaust Tip
 Toyota Muffler
 Toyota Exhaust Flange Gasket
 Toyota Exhaust Hanger
 Toyota Exhaust Heat Shield
 Toyota Exhaust Manifold
 Toyota Exhaust Manifold Gasket
 Toyota EGR Valve Gasket
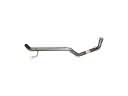 Toyota Tail Pipe
Browse Toyota Exhaust Pipe by Models
Tacoma 4Runner Camry Tundra Corolla RAV4 Highlander Prius Sienna Land Cruiser Pickup FJ Cruiser 86 Sequoia T100 Avalon Celica Supra Yaris Matrix MR2 Solara Venza GR86 Echo C-HR Cressida Grand Highlander Paseo Previa Prius C Prius Prime Corolla Cross Corolla iM Crown Crown Signia GR Corolla MR2 Spyder Prius V Starlet Tercel Van Yaris iA Prius Plug-In GR Supra Prius AWD-e RAV4 Prime