×
ToyotaParts- Hello
- Login or Register
- Quick Links
- Live Chat
- Track Order
- Parts Availability
- RMA
- Help Center
- Contact Us
- Shop for
- Toyota Parts
- Scion Parts
My Garage
My Account
Cart
OEM Toyota Avalon Exhaust Pipe
Exhaust Tail Pipe- Select Vehicle by Model
- Select Vehicle by VIN
Select Vehicle by Model
orMake
Model
Year
Select Vehicle by VIN
For the most accurate results, select vehicle by your VIN (Vehicle Identification Number).
50 Exhaust Pipes found


Toyota Avalon Rear Muffler, Driver Side Part Number: 17440-0P080
$304.29 MSRP: $434.45You Save: $130.16 (30%)Ships in 1-3 Business Days
Toyota Avalon Pipe Assembly, Exhaust, Front Part Number: 17410-F0021
$876.10 MSRP: $1175.97You Save: $299.87 (26%)Ships in 1-2 Business Days
Toyota Avalon Front Pipe Part Number: 17410-0P350
$1055.08 MSRP: $1416.23You Save: $361.15 (26%)Ships in 1-3 Business Days
Toyota Avalon Muffler, Driver Side Part Number: 17440-F0121
$286.81 MSRP: $409.49You Save: $122.68 (30%)Ships in 1-3 Business Days
Toyota Avalon Rear Muffler, Driver Side Part Number: 17440-0P201
$312.91 MSRP: $446.76You Save: $133.85 (30%)Ships in 1-3 Business DaysToyota Avalon Rear Muffler, Driver Side Part Number: 17440-0P181
$309.76 MSRP: $442.27You Save: $132.51 (30%)Ships in 1-3 Business Days
Toyota Avalon Rear Muffler, Driver Side Part Number: 17440-0P173
$330.03 MSRP: $471.21You Save: $141.18 (30%)Ships in 1-3 Business DaysToyota Avalon Rear Muffler, Passenger Side Part Number: 17430-0P573
$351.38 MSRP: $471.66You Save: $120.28 (26%)Ships in 1-3 Business Days
Toyota Avalon Rear Muffler, Passenger Side Part Number: 17430-0P230
$351.38 MSRP: $471.66You Save: $120.28 (26%)Ships in 1 Business Day
Toyota Avalon Intermed Pipe, Center Part Number: 17420-0P511
$364.89 MSRP: $489.79You Save: $124.90 (26%)Ships in 1-3 Business DaysToyota Avalon Pipe Assembly, Exhaust, Center Part Number: 17420-0P501
$354.22 MSRP: $475.46You Save: $121.24 (26%)Ships in 1-3 Business Days
Toyota Avalon Muffler W/Tpipe, Driver Side Part Number: 17440-0P010
$395.42 MSRP: $530.77You Save: $135.35 (26%)Ships in 1-3 Business Days
Toyota Avalon Muffler W/Tpipe, Passenger Side Part Number: 17430-0P040
$395.42 MSRP: $530.77You Save: $135.35 (26%)Ships in 1-3 Business Days
Toyota Avalon Muffler W/Tpipe Part Number: 17430-0A181
$519.36 MSRP: $697.14You Save: $177.78 (26%)Ships in 1-3 Business Days
Toyota Avalon Pipe Assembly, Exhaust, Front Part Number: 17410-F0451
$843.52 MSRP: $1132.25You Save: $288.73 (26%)Ships in 1-3 Business Days
Toyota Avalon Front Pipe Part Number: 17410-0P650
$995.84 MSRP: $1336.70You Save: $340.86 (26%)Ships in 1-3 Business Days
Toyota Avalon Front Pipe Part Number: 17410-0P351
$1022.40 MSRP: $1372.35You Save: $349.95 (26%)Ships in 1-3 Business Days
Toyota Avalon Front Pipe Part Number: 17410-0V110
$1115.47 MSRP: $1497.28You Save: $381.81 (26%)Ships in 1-3 Business Days

Toyota Avalon Front Pipe Part Number: 17410-0A220

Toyota Avalon Center Pipe Part Number: 17420-0P011
$357.85 MSRP: $480.35You Save: $122.50 (26%)
| Page 1 of 3 |Next >
1-20 of 50 Results
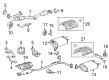
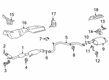
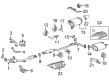
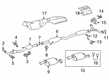
Toyota Avalon Exhaust Pipe
Choose genuine Exhaust Pipe that pass strict quality control tests. You can trust the top quality and lasting durability. Shopping for OEM Exhaust Pipe for your Toyota Avalon? Our website is your one-stop destination. We stock an extensive selection of genuine Toyota Avalon parts. The price is affordable so you can save more. It only takes minutes to browse and find the exact fit. Easily add to cart and check out fast. Our hassle-free return policy will keep you stress-free. We process orders quickly for swift delivery. Your parts will arrive faster, so you can get back on the road sooner.
The Toyota Avalon Exhaust Pipe is one of the vital parts again proving the consistent quality of Toyota products. Located in the engine of the Toyota Avalon, the Exhaust Pipe is engineered to effectively address any poisonous gasses for instance, carbon monoxide and keep them from getting into the passenger section hence increasing safety among the passengers. It has been established that Avalon exhaust pipe suits the four generations of the car; all these helps in the efficiency of the car whether it is the performance or fuel consumption. The Toyota Avalon has enjoyed commendation for its safety ratings such as the IIHS Top Safety Pick and the exhaust pipe is essential in ensuring that no leaks occur to bring down the safety rating. For instance, the Toyota Avalon Exhaust Pipe is designed to be durable for every day use with characteristics that guard against corrosion and wear thus making it long lasting. Its placement is usually on the left side of the car, especially, for American models; and the ability to get more style with different performance levels, is another advantage. Thus, under high competition in automobile manufacturing industries, the Toyota Avalon Exhaust Pipe is not only necessary but also plays a vital role in enhancing the performance as well as safety of the vehicle, which in turns supports the Toyota Company's policy of manufacturing long lasting, quality automobiles.
Toyota Avalon Exhaust Pipe Parts and Q&A
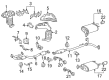
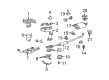
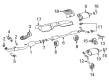
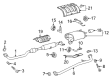
- Q: How to remove the exhaust pipe assembly on Toyota Avalon?A:The 2GR-FE engine exhaust pipe removal process requires initial evaluation of existing gaskets on the pipe and subsequent removal of both gaskets and rusted nuts and bolts that require replacement. Use the socket wrench to disconnect the wires connecting to the 2 heated Oxygen Sensors (bank 1, 2 sensor 2) until you remove them from the system. Begin with the removal of front exhaust pipe No. 1 support bracket through 2 nut removal then continue with rear exhaust pipe No. 1 support bracket by unfastening 2 bolts. You must remove all 2 left bank exhaust manifold nuts followed by right bank exhaust pipe manifold bolts which enables you to extract the exhaust pipe front combined with its 3 gasket components. Unscrew the four exhaust pipe tail nuts to detach both exhaust pipe tail and supports which enables the removal of exhaust pipe center and its accompanying two gaskets. You can disassemble the exhaust pipe damper by removing its 2 bolts. Per the next sequence finish the project by disconnecting 5 exhaust pipe supports to remove the 2 exhaust pipe tails before using a plastic hammer to tap out baffles from each tail piece until the sub assembly for the exhaust pipe tailpipe baffles is fully removed.
- Q: How to install the exhaust pipe on Toyota Avalon?A:The first step for exhaust pipe installation of the 2GR-FE engine involves placing the exhaust tail pipe baffle groove next to the exhaust pipe tail projection before securing the 5 exhaust pipe supports and attaching the 2 exhaust pipe tails. First secure the exhaust pipe damper to the exhaust pipe center with 2 bolts that should be tightened to 19 Nm (194 kgf-cm, 14 ft-lbf). Then apply 2 new gaskets between the exhaust pipe center and tails before using 2 bolts for each exhaust pipe support and tightening the exhaust pipe center to the tails with 4 nuts at 43 Nm (438 kgf-cm, 32 ft-lbf). Begin with installing three new gaskets to the exhaust pipe fronts before fitting the exhaust pipe front to the exhaust manifolds through two nuts and two bolts at 62 Nm (632 kgf-cm, 46 ft-lbf). Proceed to join the exhaust pipe front to the exhaust pipe center by adding two more nuts and bolts under 56 Nm (571 kgf-cm, 41 ft-lbf) torque. Secure the rear exhaust pipe No. 1 support bracket with 2 bolts at 33 Nm (337 kgf-cm, 24 ft-lbf) torque following correct orientation before installing the front exhaust pipe No. 1 support bracket with 2 nuts at the same torque value. Install both heated Oxygen Sensors (bank 1, 2 sensor 2) with a torque of 44 Nm (449 kgf-cm, 32 ft-lbf) and attach their corresponding connectors. Complete inspection for exhaust gas leakage followed by secure tightening of leak-prone areas should be performed immediately after installation while replacing any damaged components.


Related Toyota Avalon Parts
 Toyota Avalon Catalytic Converter
 Toyota Avalon Muffler
 Toyota Avalon Diverter Valve
 Toyota Avalon EGR Tube
 Toyota Avalon EGR Valve Gasket
 Toyota Avalon Exhaust Flange Gasket
 Toyota Avalon Exhaust Hanger
 Toyota Avalon Exhaust Heat Shield
 Toyota Avalon Exhaust Manifold
 Toyota Avalon Exhaust Manifold Gasket
 Toyota Avalon Exhaust Tip
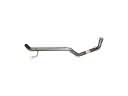 Toyota Avalon Tail Pipe