×
ToyotaParts- Hello
- Login or Register
- Quick Links
- Live Chat
- Track Order
- Parts Availability
- RMA
- Help Center
- Contact Us
- Shop for
- Toyota Parts
- Scion Parts
My Garage
My Account
Cart
OEM Toyota Catalytic Converter
Cat. Converter- Select Vehicle by Model
- Select Vehicle by VIN
Select Vehicle by Model
orMake
Model
Year
Select Vehicle by VIN
For the most accurate results, select vehicle by your VIN (Vehicle Identification Number).
406 Catalytic Converters found


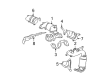
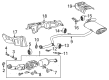
Toyota Exhaust Manifold, Driver Side Part Number: 25052-20190
$709.25 MSRP: $883.97You Save: $174.72 (20%)Ships in 1-3 Business DaysProduct Specifications- Other Name: Converter Sub-Assembly; Catalytic Converter with Integrated Exhaust Manifold, Left; Manifold Converter; Manifold; Converter Sub-Assembly, Exhaust Manifold
- Manufacturer Note: *115=TOYOTA/03-/Y
- Position: Driver Side


Toyota Exhaust Manifold, Passenger Side Part Number: 17140-31250
$706.41 MSRP: $1035.26You Save: $328.85 (32%)Ships in 1-3 Business DaysProduct Specifications- Other Name: Manifold Assembly, Exhaust; Catalytic Converter with Integrated Exhaust Manifold, Right; Manifold Converter; Manifold Sub-Assembly, Exhaust, Passenger Side
- Manufacturer Note: *114=*565
- Position: Passenger Side
- Replaces: 17140-31070


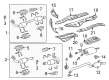
Toyota Exhaust Manifold, Driver Side Part Number: 17150-31250
$650.57 MSRP: $953.42You Save: $302.85 (32%)Ships in 1-3 Business DaysProduct Specifications- Other Name: Manifold Assembly, Exhaust; Catalytic Converter with Integrated Exhaust Manifold, Left; Manifold Converter; Manifold Sub-Assembly, Exhaust, Driver Side
- Manufacturer Note: *114=*566
- Position: Driver Side
- Replaces: 17150-31070


Toyota Manifold, Exhaust, Driver Side Part Number: 17150-50050
$737.06 MSRP: $1080.17You Save: $343.11 (32%)Ships in 1-2 Business DaysProduct Specifications- Other Name: Manifold Assembly, Exhaust; Exhaust Manifold
- Position: Driver Side


Toyota Exhaust Manifold, Driver Side Part Number: 17150-0P100
$750.45 MSRP: $1099.79You Save: $349.34 (32%)Product Specifications- Other Name: Manifold Assembly, Exhaust; Catalytic Converter with Integrated Exhaust Manifold, Left; Manifold Converter; Manifold Sub-Assembly, Exhaust, Driver Side
- Position: Driver Side
- Replaces: 17150-0P070, 17150-0P010

Toyota Exhaust Manifold, Passenger Side Part Number: 17140-0P100
$750.45 MSRP: $1099.79You Save: $349.34 (32%)Ships in 1-3 Business DaysProduct Specifications- Other Name: Manifold Assembly, Exhaust; Catalytic Converter with Integrated Exhaust Manifold, Right; Manifold Converter; Manifold Sub-Assembly, Exhaust, Passenger Side
- Position: Passenger Side
- Replaces: 17140-0P070


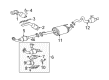
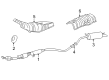
Toyota Front Pipe Part Number: 17410-37B52
$1105.71 MSRP: $1484.18You Save: $378.47 (26%)Product Specifications- Other Name: Pipe Assembly, Exhaust; Catalytic Converter, Rear; Exhaust Pipe; Pipe Assembly, Exhaust, Front
- Manufacturer Note: *114=TOYOTA/TL3/Y
- Position: Front
- Replaces: 17410-37A00, 17410-37B50


Toyota Exhaust Manifold, Passenger Side Part Number: 25051-20040
$764.75 MSRP: $953.14You Save: $188.39 (20%)Ships in 1-3 Business DaysProduct Specifications- Other Name: Converter Sub-Assembly; Catalytic Converter with Integrated Exhaust Manifold, Right; Manifold Converter; Manifold; Converter Sub-Assembly, Exhaust Manifold
- Manufacturer Note: *115=TOYOTA/03-/Y
- Position: Passenger Side


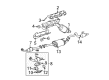
Toyota Front Pipe Part Number: 17410-0V090
$939.88 MSRP: $1261.60You Save: $321.72 (26%)Ships in 1-3 Business DaysProduct Specifications- Other Name: Pipe Assembly, Exhaust; Catalytic Converter; Exhaust Pipe; Pipe Assembly, Exhaust, Front
- Position: Front


Toyota Front Pipe Part Number: 17410-0S070
$1589.67 MSRP: $2133.80You Save: $544.13 (26%)Product Specifications- Other Name: Pipe Assembly, Exhaust; Catalytic Converter, Right; Exhaust Pipe; Pipe Assembly, Exhaust, Front
- Position: Front


Toyota Exhaust Pipe, Front Part Number: 17410-21500
$2263.86 MSRP: $3038.76You Save: $774.90 (26%)Ships in 1-3 Business DaysProduct Specifications- Other Name: Pipe Assembly, Exhaust; Front Pipe; Pipe Assembly, Exhaust, Front
- Manufacturer Note: *114=TOYOTA/GD3EA6/Y
- Position: Front


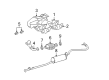
Toyota Catalytic Converter Part Number: 18450-75060
$1025.23 MSRP: $1277.79You Save: $252.56 (20%)Ships in 1-3 Business DaysProduct Specifications- Other Name: Converter Assembly, Mono; Converter Assembly, W/Catalyst


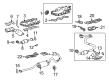
Toyota Manifold Sub-Assembly, Exhaust, Passenger Side Part Number: 17104-50180
$652.50 MSRP: $956.25You Save: $303.75 (32%)Ships in 1-3 Business DaysProduct Specifications- Other Name: Manifold Sub-Assembly, Exhaust; Exhaust Manifold
- Position: Passenger Side

Toyota Manifold Sub-Assembly, Exhaust, Passenger Side Part Number: 17140-50060
$797.55 MSRP: $1168.82You Save: $371.27 (32%)Ships in 1 Business DayProduct Specifications- Other Name: Manifold Assembly, Exhaust; Exhaust Manifold
- Position: Passenger Side


Toyota Exhaust Pipe, Front Part Number: 17410-37300
$1718.83 MSRP: $2307.17You Save: $588.34 (26%)Product Specifications- Other Name: Pipe Assembly, Exhaust; Exhaust Intermediate Pipe; Front Pipe; Pipe Assembly, Exhaust, Front
- Manufacturer Note: *114=TOYOTA/GP1TB1/Y
- Position: Front


Toyota Exhaust Manifold Part Number: 25051-0H050
$692.23 MSRP: $862.75You Save: $170.52 (20%)Product Specifications- Other Name: Converter Sub-Assembly; Catalytic Converter with Integrated Exhaust Manifold; Manifold Converter; Converter Sub-Assembly, Exhaust Manifold
- Manufacturer Note: *108
- Replaces: 25051-28330


Toyota Exhaust Manifold Part Number: 25051-28340
$703.12 MSRP: $876.33You Save: $173.21 (20%)Ships in 1 Business DayProduct Specifications- Other Name: Converter Sub-Assembly; Catalytic Converter with Integrated Exhaust Manifold; Manifold Converter; Converter Sub-Assembly, Exhaust Manifold
- Replaces: 25051-28360


Toyota Exhaust Manifold Part Number: 25051-0H040
$845.68 MSRP: $1054.01You Save: $208.33 (20%)Product Specifications- Other Name: Converter Sub-Assembly; Catalytic Converter with Integrated Exhaust Manifold; Manifold Converter; Manifold; Converter Sub-Assembly, Exhaust Manifold

Toyota Exhaust Manifold, Driver Side Part Number: 17150-0P230
$547.40 MSRP: $802.22You Save: $254.82 (32%)Ships in 1-2 Business DaysProduct Specifications- Other Name: Manifold Assembly, Exhaust; Catalytic Converter with Integrated Exhaust Manifold, Left; Manifold Sub-Assembly, Exhaust, Driver Side
- Position: Driver Side

Toyota Exhaust Manifold, Passenger Side Part Number: 17140-0P140
$894.14 MSRP: $1310.38You Save: $416.24 (32%)Product Specifications- Other Name: Manifold Assembly, Exhaust; Catalytic Converter with Integrated Exhaust Manifold, Right; Manifold Converter; Manifold Sub-Assembly, Exhaust, Passenger Side
- Manufacturer Note: MEXICO SPEC
- Position: Passenger Side
| Page 1 of 21 |Next >
1-20 of 406 Results
Toyota Catalytic Converter
OEM parts deliver unmatched quality you can rely on. They pass extensive quality control inspections. Toyota produces them to the official factory specifications. This process helps prevent defects and imperfections. So you can get exceptional lifespan and a flawless fit. Need new OEM Toyota Catalytic Converter? You'll love our wide selection of genuine options. Shop in minutes and skip the hunt. Our prices are unbeatable, you'll save time and money. It's easy to shop and find the right piece. Our committed customer service team gives professional help from start to finish. Every part includes a manufacturer's warranty. We ship quickly, your parts will arrive fast at your door.
The Catalytic Converter of Toyota reduces toxic exhaust gases in a short period, reducing pollution and maintaining engine performance vigor. Toyota implements lean techniques that identify waste before it happens and enable the assembly lines to change within minutes. Its TNGA platform reduces COG, stiffens the body, and makes the steering sharper for all models around the world. Practitioners examine how hybrid options contribute to the dissemination of compacts, sedans, SUVs, and pickups without compelling the consumer to make trade-offs in terms of space or comfort. Toyota supports such actions by enhancing Hybrid Synergy Drive to ensure that city trips consume less fuel and long-distance journeys remain silent. The 2024 plug-in RAV4 makes the case by having 42 electric miles before the gasoline engine enters the scene. Since high-quality materials combat wear, it means that odometers will turn beyond 200,000 miles before the appearance of even larger repairs. Each Toyota uses the Catalytic Converter that reduces carbon monoxide, hydrocarbons, and nitrogen oxides by reversing them to carbon dioxide, water, and nitrogen. Rare metals such as platinum, palladium, and rhodium are those that cause such reactions and remain unchanged. Housing applies accurate channel geometry to reduce back pressure, hence power and mileage remain unchanged. The Catalytic Converter is connected to flanges on the factory by direct bolts, and it sits tight, installing faster and with minimal clearance codes to protect compliance with emissions. The universal Catalytic Converter slides on shaped pipes and clamps down to allow low-budget constructions to comply with the same clean air regulations. All owners of Toyota vehicles pass through strict global tests without the need to add a special fuel additive or pay full attention to it.
Toyota Catalytic Converter Parts and Q&A
- Q: How to replace the catalytic converter on Toyota Corolla?A:The first step for catalytic converter replacement involves using a jack to lift the vehicle while waiting for the converter to cool down. Unscrew and remove the 2 bolts which secure the exhaust pipe stay while torquing them to 33 Nm (330 kg.cm, 24 ft.lb). The next step requires unscrewing of 2 center exhaust pipe bolts from the tailpipe using 19 Nm (190 kg.cm at 14ft.lb torque. You need to remove the front exhaust pipe bolt and clamp which attaches to the center pipe while torquing them to 32 Nm (320 kg.cm, 24 ft.lb). When replacing the center exhaust pipe extract the two associated gaskets because you will need to install new gaskets before reassembly. Reinstall the converter according to the removal reversal steps.
- Q: How to replace the catalytic converter on Toyota Tundra?A:The heated oxygen sensor (Bank 1) needs removing as the first step in catalytic converter replacement. Unplug the sensor then take it off. The exhaust center pipe requires removal of its four bolts and two springs. Start by removing the RH front exhaust pipe through the procedure of removing its 2 nuts together with the pipe before eliminating the 2 gaskets. The procedure for Bank 2 heated oxygen sensor requires disconnecting its connector and sensor removal. To remove the LH front exhaust pipe you must first disconnect the two nuts and the exhaust pipe support before taking away the pipe and removing the two gaskets. Unbolt the manifold stay through the removal of all its six bolts and two support stays. Begin by disconnecting the A/F sensor (Bank 1) then proceed to remove the exhaust manifold RH by taking off all its 6 nuts along with the gasket. The installer should complete the same procedure for Bank 2 A/F sensor and exhaust manifold LH. Install the exhaust manifold RH by setting it with a new gasket, where the oval opening should point forward and apply 6 nuts evenly with 21 Nm of torque (214 kgf.cm, 15 ft.lbf). The A/F sensor (Bank 1) must be installed with 44 Nm (450 kgf.cm, 33 ft.lbf) torque before connecting its sensor connector. When installing the exhaust manifold LH, orient the new gasket with its oval shape positioned backward then fasten it with 6 nuts which should be tightened to 21 Nm (214 kgf.cm, 15 ft.lbf). The Bank 2 A/F sensor requires installation at 44 Nm torque (450 kgf.cm, 33 ft.lbf) while following up with the sensor connector connection. Screw the manifold stays into place with its 6 bolts and tighten them to 40 Nm (408 kgf.cm, 30 ft.lbf). The LH front exhaust pipe requires installation of new gaskets followed by the pipe and 2 new nuts which need a torque setting of 62 Nm (630 kgf.cm, 46 ft.lbf) before installing the exhaust pipe support. Tighten the heated oxygen sensor (Bank 2) to 44 Nm (450 kgf.cm, 33 ft.lbf) while connecting its sensor connector. The RH front exhaust pipe also requires 2 new gaskets with 2 new nuts that need to be torqued to 62 Nm (630 kgf.cm, 46 ft.lbf). Installing the heated oxygen sensor (Bank 1) requires a torque of 44 Nm (450 kgf.cm, 33 ft.lbf) followed by connecting the sensor connector and attaching the exhaust center pipe by setting 2 bolts to 48 Nm (489 kgf.cm, 35 ft.lbf) and using the 2 bolts and springs which need to be tightened to 43 Nm (440 kgf.cm, 32 ft.lbf).


Related Toyota Parts
 Toyota PCV Valve
 Toyota Exhaust Tip
 Toyota Muffler
 Toyota EGR Cooler
 Toyota Exhaust Flange Gasket
 Toyota Exhaust Hanger
 Toyota Exhaust Heat Shield
 Toyota Exhaust Manifold
 Toyota Exhaust Manifold Gasket
 Toyota Exhaust Pipe
 Toyota EGR Valve Gasket
 Toyota Tail Pipe
Browse Toyota Catalytic Converter by Models
Tacoma 4Runner Camry Tundra Corolla RAV4 Highlander Prius Sienna Land Cruiser Pickup FJ Cruiser 86 Sequoia T100 Avalon Celica Supra Yaris Matrix MR2 Solara Venza GR86 Echo C-HR Cressida Grand Highlander Paseo Previa Prius C Prius Prime Corolla Cross Corolla iM Crown GR Corolla MR2 Spyder Prius V Starlet Tercel Van Yaris iA Prius Plug-In GR Supra Prius AWD-e RAV4 Prime