×
ToyotaParts- Hello
- Login or Register
- Quick Links
- Live Chat
- Track Order
- Parts Availability
- RMA
- Help Center
- Contact Us
- Shop for
- Toyota Parts
- Scion Parts
My Garage
My Account
Cart
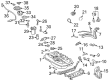
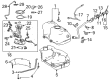
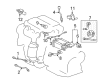
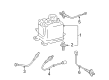
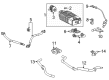
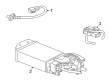
OEM Toyota Vapor Pressure Sensor
Fuel Vapor Pressure Sensor- Select Vehicle by Model
- Select Vehicle by VIN
Select Vehicle by Model
orMake
Model
Year
Select Vehicle by VIN
For the most accurate results, select vehicle by your VIN (Vehicle Identification Number).
13 Vapor Pressure Sensors found


Toyota Pressure Sensor Part Number: 89461-0C010
$280.87 MSRP: $401.02You Save: $120.15 (30%)Ships in 1-3 Business DaysProduct Specifications- Other Name: Sensor, Vapor Pressure; Evaporative Emissions; Fuel Tank; Fuel Injection; EGR Pressure; Tank Pressure Sensor; Vapor Valve; Pressure Feedback Sensor; Sensor; Sensor Assembly, Vapor Pressure
- Replaces: 89461-20010, 89461-35010


Toyota Pressure Relief Valve Part Number: 89461-48020
$206.43 MSRP: $294.72You Save: $88.29 (30%)Ships in 1-3 Business DaysProduct Specifications- Other Name: Sensor, Vapor Pressure; Fuel Tank Pressure Sensor; Fuel Injection Pressure Sensor; Fuel Pressure Sensor; Pressure Sensor; Vent Tube; Tank Pressure Sensor; Sensor Assembly, Vapor Pressure


Toyota Pressure Sensor Part Number: 89461-33020
$283.08 MSRP: $404.18You Save: $121.10 (30%)Ships in 1-2 Business DaysProduct Specifications- Other Name: Sensor, Vapor Pressure; Tank Pressure Sensor; Pressure Feedback Sensor; Sensor Assembly, Vapor Pressure
- Replaces: 89461-02030


Toyota Pressure Sensor Part Number: 89460-0C010
$208.99 MSRP: $298.39You Save: $89.40 (30%)Ships in 1-2 Business DaysProduct Specifications- Other Name: Sensor Assembly, Vapor Pressure

Toyota Check Valve Part Number: 90910-15089
$404.73 MSRP: $593.14You Save: $188.41 (32%)Ships in 1-2 Business DaysProduct Specifications- Other Name: Valve Sub-Assembly, Clos; Purge Solenoid; Vent Valve; Tank Pressure Sensor; Valve; Valve Assembly, Close Tank
- Replaces: 90910-15085

Toyota Sensor Assembly, Vapor Pressure Part Number: 89460-12010
$205.96 MSRP: $294.06You Save: $88.10 (30%)Ships in 1-3 Business DaysProduct Specifications- Other Name: EGR Pressure Sensor
- Manufacturer Note: PART NUMBER LABEL=89460-12010
- Replaces: 89460-02010

Toyota Pressure Sensor Part Number: 89460-08020
$209.34 MSRP: $298.89You Save: $89.55 (30%)Ships in 1-3 Business DaysProduct Specifications- Other Name: Sensor Assembly, Vapor Pressure; Fuel Tank Pressure Sensor; Sensor

Toyota Pressure Sensor Part Number: 89461-47010
$205.14 MSRP: $292.90You Save: $87.76 (30%)Ships in 1-2 Business DaysProduct Specifications- Other Name: Sensor, Vapor Pressure; Tank Pressure Sensor

Toyota Pressure Sensor Part Number: 89460-42010
$188.72 MSRP: $269.44You Save: $80.72 (30%)Ships in 1-3 Business DaysProduct Specifications- Other Name: Sensor Assembly, Vapor Pressure

Toyota Pressure Feedback Sensor Part Number: 89461-06040
$268.17 MSRP: $382.89You Save: $114.72 (30%)Ships in 1-3 Business DaysProduct Specifications- Other Name: Sensor, Vapor Pressure; Sensor Assembly, Vapor Pressure
- Manufacturer Note: CALIFORNIA SPEC


Toyota Sensor Assembly, Vapor Pressure Part Number: 89460-60010
Toyota Pressure Sensor Part Number: 89460-42020
Product Specifications- Other Name: Sensor Assembly, Vapor Pressure
Toyota Pressure Sensor Part Number: 89460-02020
Product Specifications- Other Name: Sensor Assembly, Vapor Pressure; Fuel Tank Pressure Sensor; EGR Pressure Sensor
- Replaces: 89460-02030
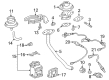
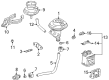
Toyota Vapor Pressure Sensor
OEM parts deliver unmatched quality you can rely on. They pass extensive quality control inspections. Toyota produces them to the official factory specifications. This process helps prevent defects and imperfections. So you can get exceptional lifespan and a flawless fit. Need new OEM Toyota Vapor Pressure Sensor? You'll love our wide selection of genuine options. Shop in minutes and skip the hunt. Our prices are unbeatable, you'll save time and money. It's easy to shop and find the right piece. Our committed customer service team gives professional help from start to finish. Every part includes a manufacturer's warranty. We ship quickly, your parts will arrive fast at your door.
Toyota Vapor Pressure Sensor reduces evaporative losses and maintains the lean delivery of fuel throughout the line. Toyota was established back in 1937 and became one of the world giants by cutting the garbage and pursuing unceasing improvement. Toyota factories enable the crews to stop the production line as soon as they notice a defect and this ensures that quality is maintained. The TNGA platform reduces mass, decreases the center of gravity and enhances steering feel to everyday drivers. The Hybrid Synergy Drive now extends the electric range of the cruise but it does not require motorists to do away with the punch or passenger room. Toyota demonstrates its versatility by piling hybrids one on top of the other between compacts, sedans and SUVs and not only with wallet but also with the planet. Long-lasting drive trains that shake off mileage and extreme weather with little effort are extolled by their owners. Scores on crash remain high due to the presence of standard safety technology that keeps an eye on lanes, auto brakes and pedestrians. The prices are very high hence making the purchase of new seldom a gamble. Vapor Pressure Sensor is a device that lives in the EVAP circuit and monitors small changes in tank pressure, supplying the ECU with leakage data to avoid the vapor of fuel leaking into the air and maintains mixtures consistent throughout each change in temperature. By that continuous feedback, which the Vapor Pressure Sensor allows the purge valves to open when the pressure is low, cutting hydrocarbon production down and allowing the catalytic converter to remain clear and active. All Toyotas are equipped with a watchful Vapor Pressure Sensor which protects fuel economy, emission regulations and has the engine running without intervention by the driver.
Toyota Vapor Pressure Sensor Parts and Q&A
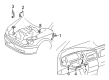
- Q: How to install the Vapor Pressure Sensor on Toyota Camry?A:A proper Fuel Tank Pressure Sensor installation begins with installing the vapor pressure sensor assembly and its tube joint clip and cover while following these crucial requirements: leaving no foreign matter or scratches on the connecting area alongside complete assembly insertion and proper placement of the tube joint clip on the vapor pressure sensor assembly collar. Check that the fuel tube joint is properly attached after the installation of the tube joint clip. Next, connect the connector. The first step is to install the rear floor service hole cover while finishing with the rear seat cushion assembly before placing the fuel tank cap assembly.
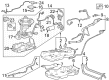
- Q: How to service the Vapor Pressure Sensor on Toyota Prius?A:The Fuel Tank Pressure Sensor service begins with removing the rear No. 2 floor board, rear deck floor box, rear No. 3 floor board while unconnecting the negative battery cable for at least 90 seconds to stop Air Bag and seat belt pretensioner activation. The service requires the removal of seven components including lower center instrument panel finish, rear seat cushion, rear floor service hole cover, front floor brace and front exhaust pipe and fuel tank sub-assembly. To extract the fuel tank pressure sensor out of the fuel tank retainer locate the sensor connector plug then release its tube joint clip while maintaining the sensor O-ring seal Install the new fuel tank pressure sensor by pushing it into the fuel tank retainer plug while positioning the tube joint clip securely without foreign materials inside. First, reconnect the fuel tank pressure sensor connector and complete installation of the fuel tank sub-assembly, front exhaust pipe and negative battery cable before reinstallation. The work sequence includes inspection for fuel and exhaust leaks followed by front floor panel brace and rear floor service hole cover installation after which you should install the rear seat cushion assembly, lower center instrument panel finish panel and rear No. 3 floor board and rear deck floor box and rear No. 2 floor board. Specific product requirements demand initialization steps after reconnecting the negative side of the power supply.


Related Toyota Parts
 Toyota Catalytic Converter
 Toyota PCV Valve
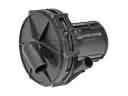 Toyota Air Injection Pump
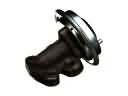 Toyota EGR Valve
 Toyota Canister Purge Valve
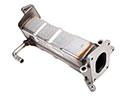 Toyota EGR Cooler
 Toyota Exhaust Manifold Gasket
 Toyota Vapor Canister
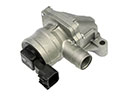 Toyota Air Pump Check Valve
 Toyota Diverter Valve
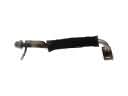 Toyota EGR Tube
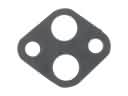 Toyota EGR Valve Gasket