×
ToyotaParts- Hello
- Login or Register
- Quick Links
- Live Chat
- Track Order
- Parts Availability
- RMA
- Help Center
- Contact Us
- Shop for
- Toyota Parts
- Scion Parts
My Garage
My Account
Cart
OEM Toyota FJ Cruiser Exhaust Pipe
Exhaust Tail Pipe- Select Vehicle by Model
- Select Vehicle by VIN
Select Vehicle by Model
orMake
Model
Year
Select Vehicle by VIN
For the most accurate results, select vehicle by your VIN (Vehicle Identification Number).
8 Exhaust Pipes found


Toyota FJ Cruiser Front Pipe Part Number: 17410-31A10
$987.33 MSRP: $1325.28You Save: $337.95 (26%)Ships in 1-3 Business Days
Toyota FJ Cruiser Front Pipe Part Number: 17410-31450
$1197.53 MSRP: $1607.43You Save: $409.90 (26%)Ships in 1-3 Business Days
Toyota FJ Cruiser Intermediate Pipe, Center Part Number: 17420-31370
$338.65 MSRP: $442.87You Save: $104.22 (24%)Ships in 1-2 Business DaysToyota FJ Cruiser Front Pipe Part Number: 17410-31F60
$915.03 MSRP: $1228.23You Save: $313.20 (26%)Ships in 1-3 Business Days
Toyota FJ Cruiser Front Pipe, Driver Side Part Number: 17450-31190
$985.17 MSRP: $1322.38You Save: $337.21 (26%)Ships in 1-3 Business Days
Toyota FJ Cruiser Front Pipe, Driver Side Part Number: 17450-31111
$1080.74 MSRP: $1450.66You Save: $369.92 (26%)Ships in 1-3 Business DaysToyota FJ Cruiser Front Pipe, Driver Side Part Number: 17450-31030
$1322.60 MSRP: $1775.32You Save: $452.72 (26%)Ships in 1-3 Business Days
Toyota FJ Cruiser Tail Pipe Part Number: 17430-30041
$207.82 MSRP: $271.78You Save: $63.96 (24%)Ships in 1-2 Business Days
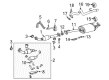
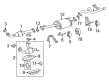
Toyota FJ Cruiser Exhaust Pipe
Choose genuine Exhaust Pipe that pass strict quality control tests. You can trust the top quality and lasting durability. Shopping for OEM Exhaust Pipe for your Toyota FJ Cruiser? Our website is your one-stop destination. We stock an extensive selection of genuine Toyota FJ Cruiser parts. The price is affordable so you can save more. It only takes minutes to browse and find the exact fit. Easily add to cart and check out fast. Our hassle-free return policy will keep you stress-free. We process orders quickly for swift delivery. Your parts will arrive faster, so you can get back on the road sooner.
The Toyota FJ Cruiser Exhaust Pipe is an example of some of the parts that are important in the vehicle as it depicts the brand's reliability. Ensuring that the unwanted gases such as carbon monoxide produced in the engine do not find their way into the cabin is the work of the exhaust pipe hence improves on the safety of all passengers. To be compatible with the FJ Cruiser TRD special edition as well as the Trail Teams Special Edition the Toyota FJ Cruiser Exhaust Pipe is indispensable when it comes to keeping up the efficiency and performance of the vehicle. As positioned on the side of the vehicle, this protects it from direct impacts of road debris, and its construction allows it to remain sturdy and no easily corroded or wear out to quick. Exhaust pipe design also has the objective of allowing safe emission of engine fumes and style that complements the FJ Cruiser's sound which makes the ride enjoyable. Also, the Toyota FJ Cruiser Exhaust Pipe will fit well with other exhaust system parts like the muffler and the catalytic converter; therefore, promoting efficiency in the performance of the automobile's engine. As one of Toyota's special customized FJ Cruiser Exhaust Pipe has some distinguished characteristics as well as solidity of construction this car is favorable to become a symbol of toughness and sustainability. In conclusion, considering all the pros and cons, this exhaust pipe can be called the part of the vehicle, which contributes positively to its off-road and on-road qualities, making it loved both by the fans of the FJ Cruiser and regular drivers.
Toyota FJ Cruiser Exhaust Pipe Parts and Q&A
- Q: How to install the exhaust pipe on Toyota FJ Cruiser?A:Begin by installing a new gasket onto the exhaust manifold RH before installing the front exhaust pipe with its two new nuts torqued to 54 Nm (554 kgf-cm, 40 ft-lbf). Next apply a new gasket to the front exhaust pipe and use a wooden block with plastic-faced hammer to firmly tap it into place while checking the gasket orientation and never using the removed gasket. The installation of the No. 2 front exhaust pipe begins by adding new gaskets to the exhaust manifold LH and the No. 2 front exhaust pipe then securing them with two new bolts and nuts before applying torque to each component according to specified values. Follow this step by installing the exhaust pipe stopper bracket using 2 bolts (for 4WD) at the required torque setting. Test the compression spring free length in the center exhaust pipe with vernier calipers to verify it exceeds 40.5mm (1.594 in.); if the measurement is insufficient, replace the spring with a new one. The center exhaust pipe installation requires secure attachment to 4 exhaust pipe supports which consists of 2 bolts and 2 springs tightened to 43 Nm (438 kgf-cm, 32 ft-lbf). The procedure continues with installation of a new gasket on the center exhaust pipe which then requires attachment of the tail exhaust pipe by two bolts and an exhaust pipe support that needs torque at 48 Nm (489 kgf-cm, 35 ft-lbf). The Oxygen Sensor installation starts with attaching it to the exhaust system and connecting the cable to the negative battery terminal before final torque application reaches 3.9 Nm (40 kgf-cm, 35 in-lbf). The inspection should include a check for exhaust gas leaks as the last step.
- Q: How to remove the exhaust pipe on Toyota FJ Cruiser?A:The first step to remove the exhaust pipe requires you to disconnect the negative battery terminal cable. The heated Oxygen Sensor should be detached during the following step of the procedure. The first step for tail exhaust pipe assembly includes removing two bolts from the exhaust pipe support to disconnect it. Then retrieve the tail exhaust pipe. The process to remove the center exhaust pipe assembly requires removing 2 bolts and 2 compression springs which separates the center exhaust pipe before detaching the 4 exhaust pipe supports from the center exhaust pipe. First detach the No. 2 front exhaust pipe assembly by removing two bolts alongside the exhaust pipe stopper bracket (if 4WD) and subsequently unfastening the two bolts and two nuts that secure the exhaust pipe support before pipeline removal. The front exhaust pipe assembly requires removal of its 2 nuts and subsequent separation into the front exhaust pipe and front exhaust pipe gasket.


Related Toyota FJ Cruiser Parts
 Toyota FJ Cruiser Catalytic Converter
 Toyota FJ Cruiser PCV Valve
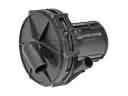 Toyota FJ Cruiser Air Injection Pump
 Toyota FJ Cruiser Canister Purge Valve
 Toyota FJ Cruiser Diverter Valve
 Toyota FJ Cruiser Exhaust Flange Gasket
 Toyota FJ Cruiser Exhaust Hanger
 Toyota FJ Cruiser Exhaust Heat Shield
 Toyota FJ Cruiser Exhaust Manifold
 Toyota FJ Cruiser Exhaust Manifold Gasket
 Toyota FJ Cruiser Vapor Canister