×
ToyotaParts- Hello
- Login or Register
- Quick Links
- Live Chat
- Track Order
- Parts Availability
- RMA
- Help Center
- Contact Us
- Shop for
- Toyota Parts
- Scion Parts
My Garage
My Account
Cart
OEM 2009 Toyota FJ Cruiser Exhaust Pipe
Exhaust Tail Pipe- Select Vehicle by Model
- Select Vehicle by VIN
Select Vehicle by Model
orMake
Model
Year
Select Vehicle by VIN
For the most accurate results, select vehicle by your VIN (Vehicle Identification Number).
4 Exhaust Pipes found

2009 Toyota FJ Cruiser Intermediate Pipe, Center
Part Number: 17420-31370$338.65 MSRP: $442.87You Save: $104.22 (24%)Ships in 1-2 Business DaysProduct Specifications- Other Name: Pipe Assembly, Exhaust; Muffler Assembly; Direct-Fit Exhaust; System Kit; Tail Pipe; Muffler & Pipe; Pipe Assembly, Exhaust, Center; Muffler
- Position: Center
- Replaces: 17420-31110
- Part Name Code: 17420
- Item Weight: 1.40 Pounds
- Item Dimensions: 50.9 x 20.2 x 9.3 inches
- Condition: New
- Fitment Type: Direct Replacement
- SKU: 17420-31370
- Warranty: This genuine part is guaranteed by Toyota's factory warranty.

2009 Toyota FJ Cruiser Tail Pipe
Part Number: 17430-30041$207.82 MSRP: $271.78You Save: $63.96 (24%)Ships in 1-2 Business DaysProduct Specifications- Other Name: Pipe Assembly, Exhaust Tail; Exhaust Tail Pipe; Exhaust Pipe; Direct-Fit Exhaust; Exhaust System Kit; Tailpipe; Pipe Assembly, Exhaust, Tail
- Replaces: 17430-30040
- Part Name Code: 17430
- Item Weight: 8.60 Pounds
- Item Dimensions: 45.3 x 12.8 x 9.6 inches
- Condition: New
- Fitment Type: Direct Replacement
- SKU: 17430-30041
- Warranty: This genuine part is guaranteed by Toyota's factory warranty.

2009 Toyota FJ Cruiser Front Pipe, Driver Side
Part Number: 17450-31030$1284.01 MSRP: $1723.52You Save: $439.51 (26%)Ships in 1-3 Business DaysProduct Specifications- Other Name: Pipe Assembly, Exhaust Front; Catalytic Converter, Left, Rear Left; Exhaust Pipe; Converter & Pipe; Pipe Assembly, Exhaust, Front; Catalytic Converter
- Manufacturer Note: *114=TOYOTA/T38/Y
- Position: Front Driver Side
- Part Name Code: 17450B
- Item Weight: 7.30 Pounds
- Item Dimensions: 35.4 x 5.1 x 17.4 inches
- Condition: New
- Fitment Type: Direct Replacement
- SKU: 17450-31030
- Warranty: This genuine part is guaranteed by Toyota's factory warranty.

2009 Toyota FJ Cruiser Front Pipe
Part Number: 17410-31450$1197.53 MSRP: $1607.43You Save: $409.90 (26%)Ships in 1-3 Business DaysProduct Specifications- Other Name: Pipe Assembly, Exhaust; Catalytic Converter, Rear Right, Right; Exhaust Pipe; Converter & Pipe; Pipe Assembly, Exhaust, Front; Catalytic Converter
- Manufacturer Note: *114=TOYOTA/T37/Y
- Position: Front
- Part Name Code: 17410
- Item Weight: 10.00 Pounds
- Item Dimensions: 35.0 x 5.3 x 19.8 inches
- Condition: New
- Fitment Type: Direct Replacement
- SKU: 17410-31450
- Warranty: This genuine part is guaranteed by Toyota's factory warranty.
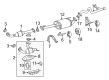
2009 Toyota FJ Cruiser Exhaust Pipe
Looking for affordable OEM 2009 Toyota FJ Cruiser Exhaust Pipe? Explore our comprehensive catalogue of genuine 2009 Toyota FJ Cruiser Exhaust Pipe. All our parts are covered by the manufacturer's warranty. Plus, our straightforward return policy and speedy delivery service ensure an unparalleled shopping experience. We look forward to your visit!
2009 Toyota FJ Cruiser Exhaust Pipe Parts Q&A
- Q: How to remove the exhaust pipe on 2009 Toyota FJ Cruiser?A: The first step to remove the exhaust pipe includes disconnecting the negative battery terminal cable. The heated oxygen sensor must be removed following the first step. The tail exhaust pipe assembly requires removal of its 2 bolts for separating the exhaust pipe support followed by pulling out the tail exhaust pipe. The center exhaust pipe removal process begins with removing two bolts and two compression springs which separates the center exhaust pipe from the other components. After that, detach the four exhaust pipe supports from the center exhaust pipe to finish removing it. The removal of the No. 2 front exhaust pipe assembly requires unwinding two bolts and removing the exhaust pipe stopper bracket (if equipped with 4WD) before continuing with the removal procedure. To separate the exhaust pipe support use two bolts and two nuts until the support can be taken out. To remove the front exhaust pipe assembly start by uninstalling its two nuts followed by the exhaust pipe itself and ultimately taking off the front exhaust pipe gasket.
Related 2009 Toyota FJ Cruiser Parts
 2009 Toyota FJ Cruiser Catalytic Converter
 2009 Toyota FJ Cruiser PCV Valve
 2009 Toyota FJ Cruiser Canister Purge Valve
 2009 Toyota FJ Cruiser Exhaust Flange Gasket
 2009 Toyota FJ Cruiser Exhaust Hanger
 2009 Toyota FJ Cruiser Exhaust Manifold
 2009 Toyota FJ Cruiser Exhaust Manifold Gasket
 2009 Toyota FJ Cruiser Vapor Canister