×
ToyotaParts- Hello
- Login or Register
- Quick Links
- Live Chat
- Track Order
- Parts Availability
- RMA
- Help Center
- Contact Us
- Shop for
- Toyota Parts
- Scion Parts
My Garage
My Account
Cart
OEM Toyota Radiator
Cooling Radiator- Select Vehicle by Model
- Select Vehicle by VIN
Select Vehicle by Model
orMake
Model
Year
Select Vehicle by VIN
For the most accurate results, select vehicle by your VIN (Vehicle Identification Number).
371 Radiators found


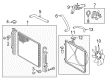
Toyota Radiator Assembly Part Number: 16410-AZ012
$164.29 MSRP: $232.20You Save: $67.91 (30%)Ships in 1-3 Business DaysProduct Specifications- Other Name: Radiator Assembly, L/Cap; Radiator


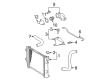
Toyota Radiator Assembly Part Number: 16400-F0010
$249.29 MSRP: $355.93You Save: $106.64 (30%)Ships in 1-2 Business DaysProduct Specifications- Other Name: Radiator


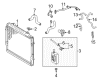
Toyota Radiator Assembly Part Number: 16400-50360
$372.53 MSRP: $545.95You Save: $173.42 (32%)Ships in 1 Business DayProduct Specifications- Other Name: Radiator
- Replaces: 16400-50210, 16400-50212, 16400-50211


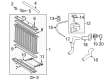
Toyota Radiator Assembly Part Number: 16410-AZ018
$173.58 MSRP: $245.34You Save: $71.76 (30%)Product Specifications- Other Name: Radiator Assembly, L/Cap; Radiator
- Replaces: 16400-0F020


Toyota Radiator Part Number: 16410-0P300
$280.52 MSRP: $400.52You Save: $120.00 (30%)Ships in 1-3 Business DaysProduct Specifications- Other Name: Radiator Assembly, L/Cap; Radiator Assembly


Toyota Radiator Assembly Part Number: 16400-31354
$301.41 MSRP: $430.34You Save: $128.93 (30%)Ships in 1-2 Business DaysProduct Specifications- Other Name: Radiator
- Replaces: 16400-31352, 16400-31353, 16400-31351


Toyota Radiator Assembly Part Number: 16400-50290
$490.55 MSRP: $718.90You Save: $228.35 (32%)Ships in 1-3 Business DaysProduct Specifications- Other Name: Radiator


Toyota Radiator Assembly Part Number: 16410-AZ011
$128.10 MSRP: $181.05You Save: $52.95 (30%)Product Specifications- Other Name: Radiator Assembly, L/Cap; Radiator
- Replaces: 16400-75160, 16410-YZZAJ, 16400-75180


Toyota Radiator Assembly Part Number: 16410-AZ024
$131.09 MSRP: $185.29You Save: $54.20 (30%)Ships in 1-3 Business DaysProduct Specifications- Other Name: Radiator Assembly, L/Cap; Radiator


Toyota Radiator Assembly Part Number: 16410-AZ027
$147.69 MSRP: $208.74You Save: $61.05 (30%)Ships in 1-3 Business DaysProduct Specifications- Other Name: Radiator Assembly, L/Cap; Radiator
- Replaces: 16410-YZZAM


Toyota Radiator Assembly Part Number: 16400-37311
$233.80 MSRP: $333.82You Save: $100.02 (30%)Ships in 1-3 Business DaysProduct Specifications- Other Name: Radiator
- Replaces: 16400-37310


Toyota Radiator Assembly Part Number: 16400-AD020
$295.76 MSRP: $422.28You Save: $126.52 (30%)Ships in 1-3 Business DaysProduct Specifications- Other Name: Radiator


Toyota Radiator Part Number: 16400-F0080
$257.73 MSRP: $367.99You Save: $110.26 (30%)Ships in 1-3 Business DaysProduct Specifications- Other Name: Radiator Assembly


Toyota Radiator Assembly Part Number: 16410-AZ025
$154.08 MSRP: $217.77You Save: $63.69 (30%)Product Specifications- Other Name: Radiator Assembly, L/Cap; Radiator


Toyota Radiator Part Number: 16041-0A380
$347.15 MSRP: $508.75You Save: $161.60 (32%)Ships in 1-3 Business DaysProduct Specifications- Other Name: Radiator Sub-Assembly, L; Radiator Assembly

Toyota Radiator Part Number: 16410-0C071
$360.18 MSRP: $527.85You Save: $167.67 (32%)Product Specifications- Other Name: RADIATOR ASSY, L/CAP; Radiator Assembly
- Replaced by: 16400-75181


Toyota Radiator Assembly Part Number: 16410-AZ015
$158.77 MSRP: $224.39You Save: $65.62 (30%)Ships in 1-3 Business DaysProduct Specifications- Other Name: Radiator Assembly, L/Cap; Radiator


Toyota Radiator Part Number: 16400-0T350
$251.28 MSRP: $358.77You Save: $107.49 (30%)Ships in 1-3 Business DaysProduct Specifications- Other Name: Radiator Assembly


Toyota Radiator Assembly Part Number: 16400-28570
$255.62 MSRP: $364.97You Save: $109.35 (30%)Ships in 1-3 Business DaysProduct Specifications- Other Name: Radiator

Toyota Radiator Assembly Part Number: 16400-0V030
$257.02 MSRP: $366.97You Save: $109.95 (30%)Ships in 1-3 Business DaysProduct Specifications- Other Name: Radiator
| Page 1 of 19 |Next >
1-20 of 371 Results
Toyota Radiator
OEM parts deliver unmatched quality you can rely on. They pass extensive quality control inspections. Toyota produces them to the official factory specifications. This process helps prevent defects and imperfections. So you can get exceptional lifespan and a flawless fit. Need new OEM Toyota Radiator? You'll love our wide selection of genuine options. Shop in minutes and skip the hunt. Our prices are unbeatable, you'll save time and money. It's easy to shop and find the right piece. Our committed customer service team gives professional help from start to finish. Every part includes a manufacturer's warranty. We ship quickly, your parts will arrive fast at your door.
Toyota Radiator maintains the heat so that it does not lose power and damage is inexpensive in any one of the drives. Toyota was a 1937 Japanese startup that expanded to a force that manufactures cars whose reliability is enjoyed on every continent. The lean production eliminates waste, gives the teams in the factory power, and delivers dependable cars on the roads at an impressive rate. Over the last few years, the Hybrid Synergy Drive system became more refined and the TNGA platform offered better handling, safety, and a bigger cabin. Toyota has expanded the hybrid options in sedans, SUVs, and pickups and the new plug-in RAV4 displays 42 miles of electric range. The issue of durability grounds the brand image since customers record large mileage regularly without seeking repairs due to strong powertrains and strict quality control. It is true that Toyota continues to keep improving each platform and this is evidence that innovation is only important when drivers experience the difference behind the wheel. Radiator leaks appear as pink sludge in the area of the core and are a bother way before the temp gauge goes off. The Radiator becomes clogged and cracks or the heat accumulates, coolant foams, head gaskets break, and horsepower disappears. Avoid the spiral by flushing the overflow tank, scrubbing the overflow tank, and installing an external transmission cooler to facilitate thermal loading during towing or hill climbs. A clean Radiator maintains a constant flow rate in order to allow the fan to draw air and the engine to remain in its sweet spot. Owners of Toyota who regard this procedure do not experience overheating drama and continue the road trip.
Toyota Radiator Parts and Q&A
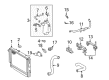
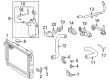
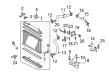
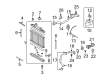
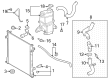
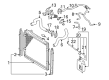
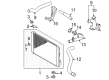
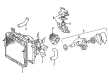
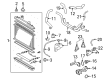
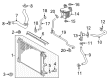
- Q: How to remove and replace the radiator on Toyota 4Runner?A:Draining engine coolant needs to be performed first before removing the radiator for replacement. Start by removing the engine under cover sub-assembly through the detachment of its 4 bolts. The radiator support seal upper should be removed by breaking the 11 clips. The radiator reserve tank assembly can be detached first by disconnecting its hose then removing the 3 bolts to extract it from the radiator. Disconnect the fan shroud by uninstalling the reserve tank hose and radiator hose No. 1 as well as the oil cooler inlet hose and oil cooler outlet hose and radiator hose No. 2 from the radiator and then remove the 2 bolts for fan shroud separation before placing it in an appropriate engine room spot. You should start by unfastening the 4 bolts securing the radiator assembly and then eliminate the radiator support No. 1 and No. 2 elements through their corresponding 2 bolts each while completing the process by taking out the 4 bolts from the radiator support No. 1 bush.
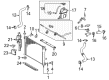
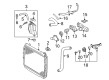
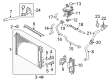
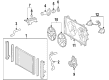
- Q: How to service the radiator on Toyota Tacoma?A:Service on the radiator requires the first step to be complete engine coolant drainage. The first step includes removing the radiator grille followed by disconnecting the air pipe by unfastening its 2 bolts. The service requires disconnecting the upper radiator hose and the radiator reservoir hose and lower radiator hose. Evacuate the No.2 fan shroud while automotive transmission models require disconnection of their oil cooler hoses. Reinstall the radiator by unscrewing its 4 bolts before applying torque of 12.5 Nm (125 kgf-cm, 9 ft. lbs.). To install the radiator support use the radiator service holes for inserting its tabs. Reverse operations are used for radiator installation.


Related Toyota Parts
 Toyota Water Pump Gasket
 Toyota Water Pump
 Toyota Radiator Cap
 Toyota Thermostat
 Toyota Coolant Reservoir
 Toyota Engine Oil Cooler
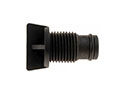 Toyota Radiator Drain Plug
 Toyota Thermostat Housing
 Toyota Cooling Fan Assembly
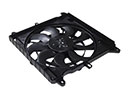 Toyota Cooling Fan Module
 Toyota Fan Shroud
 Toyota Thermostat Gasket
Browse Toyota Radiator by Models
Tacoma 4Runner Camry Tundra Corolla RAV4 Highlander Prius Sienna Land Cruiser Pickup FJ Cruiser 86 Sequoia T100 Avalon Celica Supra Yaris Matrix MR2 Solara Venza GR86 Echo C-HR Cressida Grand Highlander Paseo Previa Prius C Prius Prime bZ4X Corolla Cross Corolla iM Crown Crown Signia GR Corolla Mirai MR2 Spyder Prius V Starlet Tercel Van Yaris iA Prius Plug-In GR Supra Prius AWD-e RAV4 Prime