×
ToyotaParts- Hello
- Login or Register
- Quick Links
- Live Chat
- Track Order
- Parts Availability
- RMA
- Help Center
- Contact Us
- Shop for
- Toyota Parts
- Scion Parts
My Garage
My Account
Cart
OEM Toyota Land Cruiser Radiator
Cooling Radiator- Select Vehicle by Model
- Select Vehicle by VIN
Select Vehicle by Model
orMake
Model
Year
Select Vehicle by VIN
For the most accurate results, select vehicle by your VIN (Vehicle Identification Number).
10 Radiators found


Toyota Land Cruiser Radiator Assembly Part Number: 16400-50360
$372.53 MSRP: $545.95You Save: $173.42 (32%)Ships in 1 Business Day


Toyota Land Cruiser Radiator Assembly Part Number: 16400-50290
$490.55 MSRP: $718.90You Save: $228.35 (32%)Ships in 1-3 Business Days

Toyota Land Cruiser Radiator Assembly Part Number: 16400-66081
$404.09 MSRP: $592.21You Save: $188.12 (32%)

Toyota Land Cruiser Radiator Assembly Part Number: 16400-50384
$334.11 MSRP: $477.03You Save: $142.92 (30%)Ships in 1-3 Business Days

Toyota Land Cruiser Radiator Part Number: 16400-66040
$342.85 MSRP: $489.51You Save: $146.66 (30%)Ships in 1-3 Business Days
Toyota Land Cruiser Radiator Assembly Part Number: 16400-25260
$336.99 MSRP: $481.14You Save: $144.15 (30%)Ships in 1-2 Business Days
Toyota Land Cruiser Radiator Assembly Part Number: 16400-50380
Toyota Land Cruiser Radiator Part Number: 16400-61140
Toyota Land Cruiser Radiator Assembly Part Number: 16400-61240
Toyota Land Cruiser Radiator Part Number: 16400-61051
Toyota Land Cruiser Radiator
Choose genuine Radiator that pass strict quality control tests. You can trust the top quality and lasting durability. Shopping for OEM Radiator for your Toyota Land Cruiser? Our website is your one-stop destination. We stock an extensive selection of genuine Toyota Land Cruiser parts. The price is affordable so you can save more. It only takes minutes to browse and find the exact fit. Easily add to cart and check out fast. Our hassle-free return policy will keep you stress-free. We process orders quickly for swift delivery. Your parts will arrive faster, so you can get back on the road sooner.
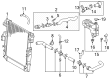
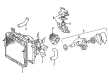
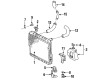
Radiator is one of the main parts of the car that fulfills the utmost function of regulating the temperature of the engine and the Toyota Land Cruiser Radiator is no exception to the rule. The coolant is circulated through very thin walls of the metal, hence it cools off the engine without overheating it. Manufactured predominantly of aluminum, the radiator has sufficient area for the heat exchange with the existent air. Some of the evident clues you may require the help of a car Radiator repair include noticing standing coolant, high temperature, and coloration of the coolant that shows signs of contamination. This means that there is need to provide general maintenance often and in case of change of some components or system, prompt replacement to avoid reactance of the engine.
Toyota Land Cruiser Radiator Parts and Q&A
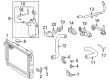
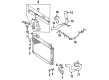
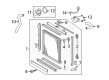
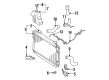
- Q: How to service and repair the radiator on Toyota Land Cruiser?A:Service and repair of the radiator requires starting with removal of the side support through unfastening the 4 nuts and 2 brackets then unfastening the 8 nuts combined with removal of the 2 side supports. You must remove the drain plug together with its O-ring from the radiator. Use Special Service Tool: 09230-01010 (09231-01010, 09231-01030) to install the claw on part A of the overhaul handle while adjusting the stopper bolt to reach dimension B between 0.2 to 0.3 mm (0.008 to 0.012 inch). Then squeeze the handle until the stopper bolt stops. A plastic-faced hammer should be used to tap the radiator bracket gently for removing the tank along with the O-ring. Check the lock plate for damage by inspecting its groove sides; use pliers to correct uneven areas but replace it if the bottom shows damage since recaulking the radiator is permitted only two times before requiring core replacement. Mount the tank onto its assembly position while being careful not to harm the O-ring and use a new O-ring placed into the lock plate groove with no foreign materials inside. Use Special Service Tool: 09230-01010 (09231-01010, 09231-01020) with the punch assembly to install on part A of the overhaul handle. Adjust the stopper bolt to dimension B to 8.4 mm (0.331 inch). Bar the lock plate using a Special Service Tool which must avoid the ports A and bracket B projection zones while checking that it reaches 8.8 mm (0.346 inch) height H after caulking. Start by installing a fresh O-ring to the drain plug followed by installation of the drain plug itself. The diagnostic process involves using Special Service Tool: 09230-01010 to close inlet and outlet pipes. This allows application of 177 kPa (1.8 kgf/cm2, 26 psi) test pressure through a radiator cap tester while immersing the radiator in water to detect any leaks by shaking it before inspection. You should complete the installation by installing the 2 side supports with 8 nuts then torquing them to 12.7 Nm (130 kgf-cm, 9 ft. lbs.) before torquing the 2 brackets with 4 nuts to 20 Nm (204 kgf-cm, 15 ft. lbs.).
- Q: How to remove and install the radiator on Toyota Land Cruiser?A:The radiator requires removal by starting with Engine Under Cover No.1 removal followed by draining the engine coolant. Detach both radiator upper and lower hoses together with the A/T oil cooler hoses from the radiator. The reservoir must be removed by separating the wire clamp from both reservoir hose and its fitting alongside the 2 bolts that mount the reservoir to the grommet. The first step in radiator removal involves disconnecting two clamps on the A/C discharge tube from its bracket and removing two bolts and separating the two brackets on the wire while disconnecting the A/T oil cooler hoses from the fan shroud clamp followed by loosening fan pulley mounting nuts. Then remove the generator Drive Belt together with the 3 bolts securing the fan shroud to the radiator. You start by removing the 4 fan pulley mounting nuts before extracting the fan with fluid coupling and fan pulley together with fan shroud. Next install the 2 nuts and 2 bolts to remove the radiator assembly. To remove the radiator side supports start by uninstalling first the 2 brackets using 4 nuts then continue by taking out the 2 side supports with 8 nuts. To start the installation add the side supports first using eight nuts which should be torqued to 12.7 Nm (130 kgf-cm, 9 ft. lbs.), after that add the brackets with four nuts torquing them to 20 Nm (200 kgf-cm, 13 ft. lbs.). Position the radiator assembly on the body before installing 2 nuts which should receive torques of 20 Nm (200 kgf-cm, 15 ft. lbs.). Afterward, bolt it in place with 2 bolts torqued to 18 Nm (185 kgf-cm, 13 ft. lbs.). Install the fan shroud by tightening its 3 bolts to 5.0 Nm (50 kgf-cm, 43 inch lbs.). After that, secure the fan pulley mounting nuts and mount the fluid coupling, fan pulley and fan shroud in position. Install the generator drive belt followed by tightening the 4 fan pulley mounting nuts while attaching the 2 brackets on wire to the radiator wire with 2 bolts. Then install the 2 clamps on the A/C discharge tube to the brackets on the wire through 2 nuts. The radiator reservoir installation requires a grommet placement followed by connecting the lower reservoir section to the fan shroud while securing it with two bolts and attaching the reservoir hose to the radiator before clamping the wire to the radiator. The next procedure includes connecting A/T oil cooler hoses and radiator upper and lower hoses while filling the system with engine coolant before starting the engine and examining for leaks with an additional recheck of engine coolant level and final installation of Engine Under Cover No.1.


Related Toyota Land Cruiser Parts
 Toyota Land Cruiser Water Pump
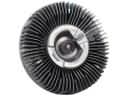 Toyota Land Cruiser Fan Clutch
 Toyota Land Cruiser Radiator Cap
 Toyota Land Cruiser Coolant Reservoir
 Toyota Land Cruiser Coolant Reservoir Hose
 Toyota Land Cruiser Fan Blade
 Toyota Land Cruiser Fan Motor
 Toyota Land Cruiser Thermostat Gasket
 Toyota Land Cruiser Thermostat Housing
 Toyota Land Cruiser Water Hose
 Toyota Land Cruiser Water Pump Gasket
 Toyota Land Cruiser Water Pump Pulley