×
ToyotaParts- Hello
- Login or Register
- Quick Links
- Live Chat
- Track Order
- Parts Availability
- RMA
- Help Center
- Contact Us
- Shop for
- Toyota Parts
- Scion Parts
My Garage
My Account
Cart
OEM Toyota Water Pump
H2O Pump- Select Vehicle by Model
- Select Vehicle by VIN
Select Vehicle by Model
orMake
Model
Year
Select Vehicle by VIN
For the most accurate results, select vehicle by your VIN (Vehicle Identification Number).
127 Water Pumps found


Toyota Water Pump Part Number: 161A0-29015
$257.56 MSRP: $367.74You Save: $110.18 (30%)Product Specifications- Other Name: Pump Assembly, Electrical; Engine Water Pump; Electric Engine Water Pump; Electric Water Pump; Water Pump Assembly; Pump Assembly, Engine Water
- Replaces: 161A0-39015


Toyota Water Pump Part Number: 16100-09491
$146.04 MSRP: $206.74You Save: $60.70 (30%)Ships in 1-3 Business DaysProduct Specifications- Other Name: Pump Assembly, Water; Engine Water Pump; Water Pump Assembly; Pump Assembly, Engine Water
- Replaces: 16100-39495, 16100-39496, 16100-09490


Toyota Water Pump Part Number: 16100-09471
$132.53 MSRP: $187.61You Save: $55.08 (30%)Product Specifications- Other Name: Pump Assembly, Water; Engine Water Pump; Water Pump Assembly; Pump Assembly, Engine Water
- Replaces: 16100-39405, 16100-39406, 16100-09470


Toyota Water Pump Part Number: 16100-29085
$75.09 MSRP: $105.41You Save: $30.32 (29%)Ships in 1-3 Business DaysProduct Specifications- Other Name: Pump Assembly, Water; Engine Water Pump; Water Pump Assembly; Pump Assembly, Engine Water
- Replaces: 16100-09070


Toyota Water Pump Part Number: 16100-28041
$109.60 MSRP: $153.85You Save: $44.25 (29%)Ships in 1-2 Business DaysProduct Specifications- Other Name: Pump Assembly, Water; Engine Water Pump; Water Pump Assembly; Pump Assembly, Engine Water
- Replaces: 16100-28040


Toyota Water Pump Part Number: 16100-09515
$117.72 MSRP: $166.65You Save: $48.93 (30%)Ships in 1-3 Business DaysProduct Specifications- Other Name: Pump Assembly, Water; Engine Water Pump; Water Pump Assembly; Pump Assembly, Engine Water


Toyota Water Pump Part Number: 16100-09442
$148.04 MSRP: $209.57You Save: $61.53 (30%)Product Specifications- Other Name: Pump Assembly, Water; Engine Water Pump; Water Pump Assembly; Pump Assembly, Engine Water
- Manufacturer Note: (L)
- Replaces: 16100-39456, 16100-09440, 16100-09441, 16100-39455


Toyota Motor Assembly Part Number: G9020-47031
$162.93 MSRP: $230.63You Save: $67.70 (30%)Ships in 1-3 Business DaysProduct Specifications- Other Name: Pump Assembly, Water W/M; Drive Motor Inverter Cooler; Engine Auxiliary; Electric; Engine Water Pump; Pump; Pump Assembly, Water W/Motor & Bracket
- Replaces: G9020-47030


Toyota Water Pump Part Number: 16100-09201
$142.87 MSRP: $202.25You Save: $59.38 (30%)Ships in 1-3 Business DaysProduct Specifications- Other Name: Pump Assembly, Water; Engine Water Pump; Water Pump Assembly; Pump Assembly, Engine Water
- Replaces: 16100-09200, 16100-59276, 16100-59275


Toyota Water Pump Part Number: 16100-79185-83
$80.81 MSRP: $113.42You Save: $32.61 (29%)Product Specifications- Other Name: Water Pump Assembly; Engine Water Pump Assembly; Engine Water Pump
- Replaces: 16100-09040, 16100-79186, 16100-09041, 16100-79075, 16100-79075-84, 16100-79185, 16100-79075-77


Toyota Water Pump Part Number: 16100-0H010
$94.67 MSRP: $132.88You Save: $38.21 (29%)Ships in 1-3 Business DaysProduct Specifications- Other Name: Pump Assembly, Water; Engine Water Pump; Pump Assembly, Engine Water


Toyota Pump Assembly, Engine Water Part Number: 16100-09690
$135.58 MSRP: $191.93You Save: $56.35 (30%)Ships in 1-3 Business DaysProduct Specifications- Other Name: Pump Assembly, Water; Engine Water Pump; Water Pump


Toyota Water Pump Part Number: 16100-09170
$109.36 MSRP: $153.51You Save: $44.15 (29%)Ships in 1-3 Business DaysProduct Specifications- Other Name: Pump Assembly, Water; Engine Water Pump; Pump Assembly, Engine Water
- Replaces: 16100-29175, 16100-09310, 16100-09080, 16100-09230, 16100-29415


Toyota Water Pump Part Number: 16100-69398-83
$100.36 MSRP: $140.87You Save: $40.51 (29%)Ships in 1-2 Business DaysProduct Specifications- Other Name: Water Pump Assembly; Engine Water Pump
- Replaces: 16100-69397, 16100-69396, 16100-69395-83, 16100-69398, 16100-69395


Toyota Water Pump Part Number: 16290-21011
$234.50 MSRP: $334.82You Save: $100.32 (30%)Ships in 1-3 Business DaysProduct Specifications- Other Name: Pump Assembly, Water W/M; Electric Water Pump; Engine Water Pump; Pump; Pump Assembly, Water W/Motor & Bracket
- Replaces: 16290-21010


Toyota Water Pump Part Number: 16100-29157-83
$55.91 MSRP: $77.83You Save: $21.92 (29%)Ships in 1-3 Business DaysProduct Specifications- Other Name: Pump Assembly, Water; Engine Water Pump
- Replaces: 16100-29156-83, 16100-29156, 16100-29155, 16100-29155-83


Toyota Pump Assembly, Water Part Number: 16100-59275-83
$104.86 MSRP: $147.19You Save: $42.33 (29%)Ships in 1-3 Business DaysProduct Specifications- Other Name: PUMP ASSY, WATER; Engine Water Pump; Water Pump

Toyota Water Pump Part Number: 16100-39545
$144.16 MSRP: $204.08You Save: $59.92 (30%)Ships in 1-3 Business DaysProduct Specifications- Other Name: Pump Assembly, Water; Engine Water Pump; Water Pump Assembly; Pump Assembly, Engine Water


Toyota Water Pump Part Number: 16100-09560
$97.99 MSRP: $137.54You Save: $39.55 (29%)Ships in 1-2 Business DaysProduct Specifications- Other Name: Pump Assembly, Water; Engine Water Pump; Pump Assembly, Engine Water
- Manufacturer Note: (L)


Toyota Water Pump Part Number: 16100-79445-83
$90.17 MSRP: $126.56You Save: $36.39 (29%)Ships in 1-3 Business DaysProduct Specifications- Other Name: Pump Assembly, Water; Engine Water Pump; Water Pump Assembly
- Replaces: 16100-79245, 16100-79445, 16100-09460, 16100-79255
| Page 1 of 7 |Next >
1-20 of 127 Results
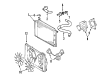
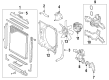
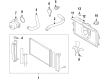
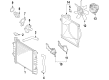
Toyota Water Pump
OEM parts deliver unmatched quality you can rely on. They pass extensive quality control inspections. Toyota produces them to the official factory specifications. This process helps prevent defects and imperfections. So you can get exceptional lifespan and a flawless fit. Need new OEM Toyota Water Pump? You'll love our wide selection of genuine options. Shop in minutes and skip the hunt. Our prices are unbeatable, you'll save time and money. It's easy to shop and find the right piece. Our committed customer service team gives professional help from start to finish. Every part includes a manufacturer's warranty. We ship quickly, your parts will arrive fast at your door.
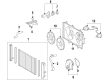
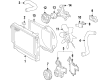
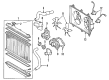
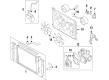
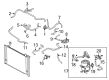
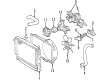
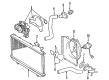
Toyota Water Pump maintains the temperatures of the engines at a stable level to ensure that drivers are on the road and not on the shoulder. Toyota established in 1937 and currently manufacturing vehicles on all continents balances waste with lean manufacturing and provides the teams with the power to stop the line as soon as a defect is detected. Incessant improvement resulted in the Hybrid Synergy Drive and Toyota disseminated plug-in as well as conventional hybrids in compact hatchbacks, sedans, and even SUVs. Real improvements in fuel economy have been felt by drivers without losing the punch when the traffic lights change to green. The TNGA platform reduces center of gravity and stiffener chassis, which allow Toyota vehicles to corner with composed accuracy. With decades of longevity under its belt, odometers are rolling long after they should have with values remaining steadfastly high. That history of reliability has entrenched Toyota as a family brand that families can rely on during long drives and even longer journeys. Within the engine bay, the Water Pump is attached to the block and rotates around an impeller that forces the coolant into long tubes and sends it through the radiator again. A Water Pump wears, and the car is covered with coolant, the bearings squeal, and the temperature needle is rising in a few minutes. Contemporary designs are replacing the use of heavy cast iron with light aluminum and high flow Water Pump with re-channel shapes increases circulation to drivers in pursuit of greater power. Electric Water Pump options completely abandon the use of belts which releases space and reduces drag in order to provide additional efficiency in the tight engine compartments.
Toyota Water Pump Parts and Q&A
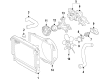
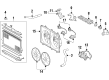
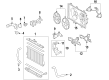
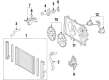
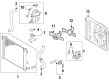
- Q: How to Service and Repair a Water Pump on Toyota 4Runner?A:The water pump service requires timing belt removal followed by water inlet and thermostat detachment and afterward disconnecting the No.2 oil cooler hose before extracting the water pump. A water pump replacement should be performed when leaks are present at the water and air holes. In case coolant seeps onto the timing belt you must replace this component as well. A smooth and quiet operation of the pulley during bearing check indicates that you should replace the water pump. When inspecting the fluid coupling, start by taking off four nuts and the fan before examining for any signs of damage and silicon oil leaks. Replace the fluid coupling if necessary before reattaching the fan with 4 nuts which need to be torqued to 7.4 Nm (75 kgf-cm, 65 inch lbs.). During inspection of the fan pulley bracket check for its ability to turn smoothly and replace if needed while inspecting the timing belt as well. Installation starts with putting on the water pump while disposing the old packing material (FIPG) then verifying the surfaces stay free from oil contamination. Clean the gasket surfaces and sealing groove with a gasket scraper combined with a razor blade followed by a non-residue solvent for all components. Seal packing (Part No. 08826-00100 or equivalent) requires application to the water pump groove through a nozzle with a 2 - 3 mm (0.08 - 0.12 inch) opening during the installation process. The parts need to be assembled within 5 minutes after applying seal packing but replacement of packing material is needed if the application period exceeds 5 minutes. Immediately detach the nozzle from the tube before reinstalling the cap along with resecuring the water pump using seven bolts tightened to 20 Nm (200 kgf-cm, 14 ft. lbs.). Finish the work by connecting the No.2 oil cooler hose while installing the water inlet and thermostat and the timing belt.
- Q: How to service and repair the water pump on Toyota Tacoma?A:Repair of the water pump begins with timing belt removal before proceeding with the water inlet and thermostat. First disconnect the No.2 oil cooler hose from the water pump followed by complete removal of the water pump after unbolt its 7 fasteners and performing light prying to extract it. A replacement water pump must be installed if you detect drips at the drain hole. At the same time, replace the timing belt when coolant leakage is detected on it. The check and replacement of the water pump depend on whether its bearing moves happily and soundlessly through the pulley. The fluid coupling needs the removal of four nuts followed by the fan before assessment for damage and oil leaks. A replacement may be necessary before reinstalling the fan with 7.4 Nm (75 kgf-cm, 65 inch lbs.) torque on the four nuts. Check for smooth turning of the fan pulley bracket while inspecting for replacement only when necessary then inspect timing belt components. When performing installation work remove old packing (FIPG) material with caution to prevent oil contamination of water pump and cylinder block contact surfaces. The process of components cleaning includes using a razor blade with a gasket scraper to remove all old packing material from gasket surfaces and sealing groove. Components must be thoroughly clean of loose materials before performing solvent cleaning on both sealing surfaces with a non-residue solvent. To install the water pump groove utilize the specified seal packing (Part No. 08826-00100 or equivalent) through a nozzle cut to 2 - 3 mm (0.08 - 0.12 inch) opening but do it within 5 minutes of application or else remove and reapply the material. Reinstall the nozzle cap before placing the water pump into position using 7 bolts and completing the torque at 20 Nm (200 kgf-cm, 14 ft. lbs.). The last installation steps involve fitting the No.2 oil cooler hose before attaching the thermostat followed by the water inlet and re-mounting the timing belt.


Related Toyota Parts
 Toyota Radiator
 Toyota Drive Belt
 Toyota Coolant Reservoir
 Toyota Engine Oil Cooler
 Toyota Fan Clutch
 Toyota Fan Motor
 Toyota Water Pump Pulley
 Toyota Coolant Reservoir Hose
 Toyota Cooling Fan Assembly
 Toyota Fan Shroud
 Toyota Thermostat Gasket
 Toyota Water Hose
Browse Toyota Water Pump by Models
Tacoma 4Runner Camry Tundra Corolla RAV4 Highlander Prius Sienna Land Cruiser Pickup FJ Cruiser 86 Sequoia T100 Avalon Celica Supra Yaris Matrix MR2 Solara Venza GR86 Echo C-HR Cressida Grand Highlander Paseo Previa Prius C Prius Prime bZ4X Corolla Cross Corolla iM Crown Crown Signia GR Corolla Mirai MR2 Spyder Prius V Starlet Tercel Van Yaris iA Prius Plug-In GR Supra Prius AWD-e RAV4 Prime