×
ToyotaParts- Hello
- Login or Register
- Quick Links
- Live Chat
- Track Order
- Parts Availability
- RMA
- Help Center
- Contact Us
- Shop for
- Toyota Parts
- Scion Parts
My Garage
My Account
Cart
OEM Toyota Avalon Water Pump
H2O Pump- Select Vehicle by Model
- Select Vehicle by VIN
Select Vehicle by Model
orMake
Model
Year
Select Vehicle by VIN
For the most accurate results, select vehicle by your VIN (Vehicle Identification Number).
6 Water Pumps found


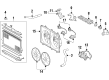
Toyota Avalon Water Pump Part Number: 16100-29085
$75.09 MSRP: $105.41You Save: $30.32 (29%)Ships in 1-3 Business Days


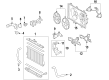
Toyota Avalon Water Pump Part Number: 16100-09442
$148.04 MSRP: $209.57You Save: $61.53 (30%)

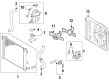
Toyota Avalon Pump Assembly, Engine Water Part Number: 16100-09690
$135.58 MSRP: $191.93You Save: $56.35 (30%)Ships in 1-3 Business Days
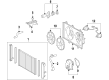
Toyota Avalon Water Pump Part Number: 161A0-39025
$327.57 MSRP: $467.71You Save: $140.14 (30%)Ships in 1-3 Business Days
Toyota Avalon Auxiliary Pump Part Number: G9040-33050
$557.27 MSRP: $816.69You Save: $259.42 (32%)Ships in 1-3 Business Days
Toyota Avalon Water Pump Part Number: G9040-33030
$330.65 MSRP: $472.10You Save: $141.45 (30%)Ships in 1-3 Business Days
Toyota Avalon Water Pump
Choose genuine Water Pump that pass strict quality control tests. You can trust the top quality and lasting durability. Shopping for OEM Water Pump for your Toyota Avalon? Our website is your one-stop destination. We stock an extensive selection of genuine Toyota Avalon parts. The price is affordable so you can save more. It only takes minutes to browse and find the exact fit. Easily add to cart and check out fast. Our hassle-free return policy will keep you stress-free. We process orders quickly for swift delivery. Your parts will arrive faster, so you can get back on the road sooner.
The Water Pump in Toyota Avalon cars is a functional AC pump that pumps coolant from the radiator to the engine where heat produced by the burning of fuel is absorbed. All Avalon Water Pumps should be driven by a belt from the crankshaft which may come as a shock to some owners as latter models have turned to incorporate an electric water pump. These pumps common used are aluminum castings with rotating shaft, belt driven pulley, and impeller, to pump the coolant in the system. Some signs of a faulty Water Pump are- coolant leakage, some noises coming from its bearings and SUV overheating. Performance Water Pumps are of a range that is developed to accommodate high-performance engines; it comes with a higher ratings of coolant flow and lower power usage as compared to regular pumps. Other variations include Electric Water Pumps which offer features like; coolant circulation that is not dependent on the engine RPM for circulation, and post shutdown cooling.
Toyota Avalon Water Pump Parts and Q&A
- Q: How to install the water pump assembly and related components on Toyota Avalon?A:Start by applying a brand new water pump gasket on the assembly before tightening it with sixteen bolts; Bolt A requires 21 Nm (214 kgf-cm, 15 ft-lbf) torque yet the B and C bolts need a force of 11 Nm (112 kgf-cm, 8 in-lbf). For safety, maintain the A bolt threads free of oil and renew the two C bolts or preserve previously used ones with adhesive 1344 which can be Toyota Genuine Adhesive 1344, Three Bond 1344, or an equivalent product. The vane pump assembly should follow installation of the No. 2 idler pulley sub-assembly by securely tightening left-hand threaded bolts to a torque value of 43 Nm (438 kgf-cm, 32 ft-lbf). Both sides of the vehicle must receive bolts for the idler pulley cover plate and No. 2 idler pulley cover plate, with torques set to 54 Nm (550 kgf-cm, 40 ft-lbf), while recording the plate diameters that measure 33.6 mm (1.32 in.) for idler pulley cover plate and 37.8 mm (1.49 in.) for No. 2 idler pulley cover plate. After fitting 4 bolts onto the water pump pulley you must apply Special Service Tool: 09960-10010, 09962-01000, 09963-00700 when tightening bolts to 21 Nm (214 kgf-cm, 15 ft-lbf). When installing the crankshaft pulley use Special Service Tools that include 09213-70020, 09213-70011, 09950-50013, 09330-00021, 09951-05010, 09952-05010, 09953-05020 and 09954-05021. Reinstall the water inlet housing No.1 gasket and apply a new water outlet pipe O-ring before securing it with 2 bolts and a nut that requires 10 Nm (102 kgf-cm, 7 ft-lbf) torque. Make sure the O-ring remains uncompressed. Fasten the radiator hose outlet followed by the fan and generator V belt before installing the engine mounting bracket front No.1 LH alongside the engine mounting control bracket and engine moving control rod and V-bank cover sub-assembly. As a final step complete the tasks of adding engine coolant and verifying leak points before installing the engine under cover right side and right side front wheel.
- Q: How to service and repair the water pump on Toyota Avalon?A:The repair and servicing of a water pump should start with coolant draining from the engine. Before extracting the water pump remove the Timing Belt, camshaft timing pulleys and No.2 idler pulley and No.3 timing belt cover by taking out the four bolts and two nuts along with the gasket. The water pump should undergo inspection of the drain hole for coolant leakage; when leakage is detected the water pump replacement becomes necessary. Check the water pump bearing movement by rotating the pulley because a faulty bearing requires a water pump replacement. Secure the water pump with a new gasket through installation of 4 bolts and 2 nuts to a torque strength of 8 Nm (80 kgf.cm, 69 inch lbs.) while keeping the gasket free of oil residue. The installation process must follow with the No.3 timing belt cover accompanied by the No.2 idler pulley and the camshaft timing pulleys and timing belt. Check engine function by adding coolant before starting the system then verify leakages and gauge engine coolant levels.


Related Toyota Avalon Parts
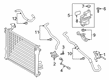
 Toyota Avalon Radiator
 Toyota Avalon Thermostat
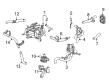
 Toyota Avalon Cooling Fan Assembly
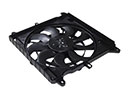 Toyota Avalon Cooling Fan Module
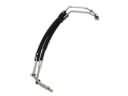 Toyota Avalon Oil Cooler Hose
 Toyota Avalon Radiator Cap
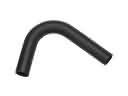 Toyota Avalon Radiator Hose
 Toyota Avalon Thermostat Gasket
 Toyota Avalon Thermostat Housing
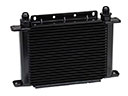 Toyota Avalon Transmission Oil Cooler
 Toyota Avalon Water Hose
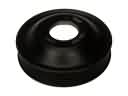 Toyota Avalon Water Pump Pulley