×
ToyotaParts- Hello
- Login or Register
- Quick Links
- Live Chat
- Track Order
- Parts Availability
- RMA
- Help Center
- Contact Us
- Shop for
- Toyota Parts
- Scion Parts
My Garage
My Account
Cart
OEM Toyota Avalon Timing Belt
Engine Timing Belt- Select Vehicle by Model
- Select Vehicle by VIN
Select Vehicle by Model
orMake
Model
Year
Select Vehicle by VIN
For the most accurate results, select vehicle by your VIN (Vehicle Identification Number).
1 Timing Belt found


Toyota Avalon Timing Belt Part Number: 13568-09080
$60.54 MSRP: $84.98You Save: $24.44 (29%)Ships in 1-2 Business Days
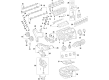
Toyota Avalon Timing Belt
Choose genuine Timing Belt that pass strict quality control tests. You can trust the top quality and lasting durability. Shopping for OEM Timing Belt for your Toyota Avalon? Our website is your one-stop destination. We stock an extensive selection of genuine Toyota Avalon parts. The price is affordable so you can save more. It only takes minutes to browse and find the exact fit. Easily add to cart and check out fast. Our hassle-free return policy will keep you stress-free. We process orders quickly for swift delivery. Your parts will arrive faster, so you can get back on the road sooner.
The Timing Belt in Toyota Avalon vehicles is responsible for keeping the crankshaft and the camshaft in order to help ensure a car's engine runs right. These belts usually originate from rubber and coated with fibers; the pros associated with these belts include; cheaper, minimal friction, and less noise. Periodically, they are replaced because they wear out, being components like water and oil pumps driven by others. Designs with curved teeth are relatively newer and provide enhanced sturdiness and less noise. There are also varieties of timing belts including chains or gears but the most complex and frequently used is the belt type especially in overhead camshaft types of engines as theycover longer distances and are efficient.
Toyota Avalon Timing Belt Parts and Q&A
- Q: How to remove and install the timing belt on Toyota Avalon?A:You need to begin timing belt removal by taking off the fender apron seal on the right-hand front wheel and the generator Drive Belt and PS pump drive belt needs separation by unbolting the 2 connecting points. Begin by detaching the water outlet hose from the engine coolant reservoir followed by removing engine moving control rod, No.2 right-hand engine mounting bracket, and finally detach the generator pivot bolt to remove the bracket. Remove the crankshaft pulley employing the Special Service Tools: 09213-54015 (91651-60855), 09330-00021 and 09950-50012 (09951-05010, 09952-05010, 09953-05010, 09953-05020, 09954-05020) to unfasten the pulley bolt. Begin by removing the 4 bolts from the No.1 timing belt cover and then remove the timing belt guide before continuing with the No.2 timing belt cover after disconnecting the engine wire protector clamps and taking off the 5 bolts. Set the No.1 cylinder at TDC/compression by installing the crankshaft pulley bolt then turning the crankshaft to match the timing marks and verifying the camshaft timing pulleys and No.3 timing belt cover alignment. Afterward, detach the right-hand mounting bracket by removing the two bolts and nut and bracket. Perform a check for all the installation marks including front mark on the timing belt before belt removal; initiate fresh marks if any existing ones are absent. Use Special Service Tool: 09249-63010, 09960-10010 (09962-01000, 09963-01000) for the right-hand timing pulley and Special Service Tool: 09960-10010 (09962-01000, 09963-01000) for the left-hand timing pulley to remove the timing belt tensioner by alternately loosening the 2 bolts and finally remove the timing belt and camshaft timing pulleys. Use a 10 mm hexagon wrench to remove the No.2 idler pulley and No.1 idler pulley before you remove the crankshaft timing pulley by dismounting the bolt and timing belt plate while using Special Service Tool: 09950-50012 (09951-05010, 09952-05010, 09953-05010, 09953-05020, 09954-05010) to prevent damaging the sensor part. Check the timing belt for defects that include bends, twists or oil exposure or exposure to water or steam while ensuring correct installation without damage. Check that idler pulleys operate smoothly while inspecting for oil leakage and test the timing belt tensioner by examining its push rod operation along with oil leakage assessment. The first step of installation requires placing the crankshaft timing pulley then aligning its set key before attaching the timing pulley to the timing belt plate while using adhesive Part No.08833-00080 with Three Bond 1344 or Loctite 242 equivalent for the No.1 idler pulley installation followed by the No.2 idler pulley. First install the right-hand camshaft timing pulley while positioning its flange side toward the outside but set the left-hand pulley inside with knock pins aligned. Mount the timing belt after setting the No.1 cylinder at TDC/compression and maintain a cold engine temperature when the pulleys show clean conditions while keeping the installation marks aligned with the timing marks. To set the timing belt tensioner push in the push rod before securing it with a 1.27 mm hexagon wrench and then install the timing belt tensioner followed by checking valve timing alignment by turning the crankshaft. Install the right-hand engine mounting bracket, No.2 timing belt cover, timing belt guide, No.1 timing belt cover, crankshaft pulley, and No.2 generator bracket, followed by the right-hand engine mounting bracket and engine moving control rod, reconnecting the ground strap connectors and engine coolant reservoir hose, and finally installing the PS pump drive belt, generator drive belt, right-hand fender apron seal, and right-hand front wheel before conducting a vehicle road test to check for abnormal noise, shock, slippage, correct shift points, and smooth operation.

Related Toyota Avalon Parts
 Toyota Avalon Cam Gear
 Toyota Avalon Camshaft
 Toyota Avalon Crankshaft Seal
 Toyota Avalon Cylinder Head
 Toyota Avalon Dipstick
 Toyota Avalon Engine Mount Torque Strut
 Toyota Avalon Oil Drain Plug Gasket
 Toyota Avalon Oil Pump Gasket
 Toyota Avalon Rod Bearing
 Toyota Avalon Timing Chain Tensioner
 Toyota Avalon Valve Stem Seal
 Toyota Avalon Variable Timing Sprocket