×
ToyotaParts- Hello
- Login or Register
- Quick Links
- Live Chat
- Track Order
- Parts Availability
- RMA
- Help Center
- Contact Us
- Shop for
- Toyota Parts
- Scion Parts
My Garage
My Account
Cart
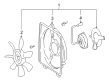
OEM Toyota Fan Motor
Cooling Fan Motor- Select Vehicle by Model
- Select Vehicle by VIN
Select Vehicle by Model
orMake
Model
Year
Select Vehicle by VIN
For the most accurate results, select vehicle by your VIN (Vehicle Identification Number).
203 Fan Motors found


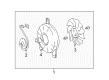
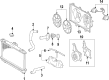
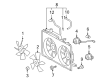
Toyota Fan Assembly Part Number: 88590-60030
$512.30 MSRP: $750.80You Save: $238.50 (32%)Product Specifications- Other Name: Blower Assembly, With Shroud; A/C Condenser Fan Assembly; Radiator Fan Assembly; Fan Blade; Blower Assembly; Blower Assembly, W/Shroud


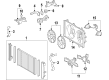
Toyota Fan Motor Part Number: 16363-64080
$175.67 MSRP: $250.82You Save: $75.15 (30%)Product Specifications- Other Name: Motor, Cooling Fan; A/C Condenser Fan Motor; Motor Assembly; Motor; Motor Assembly, Blower (For Condenser)


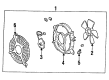
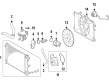
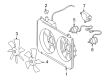
Toyota Fan Motor Part Number: 88550-12160
$143.46 MSRP: $203.08You Save: $59.62 (30%)Ships in 1-3 Business DaysProduct Specifications- Other Name: Motor Assembly, Cooling; Motor; Motor Assembly, Blower (For Condenser)
- Replaces: 88550-02030


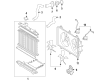
Toyota Motor Assembly, Blower (For Condenser) Part Number: 88550-60110
$155.79 MSRP: $220.54You Save: $64.75 (30%)Ships in 1-3 Business DaysProduct Specifications- Other Name: Motor Assembly, Printed


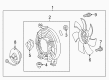
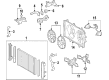
Toyota Fan Motor Part Number: 88550-34010
$181.26 MSRP: $258.80You Save: $77.54 (30%)Ships in 1-3 Business DaysProduct Specifications- Other Name: Motor Assembly, Cooling; A/C Condenser Fan Motor; Motor; Motor Assembly, Blower (For Condenser)


Toyota Fan Motor Part Number: 16363-23010
$186.85 MSRP: $266.79You Save: $79.94 (30%)Ships in 1-2 Business DaysProduct Specifications- Other Name: Motor, Cooling Fan; Dual Radiator Condenser Fan Assembly; Motor
- Replaced by: 16363-0H010


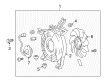
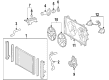
Toyota Fan Motor, Passenger Side Part Number: 16363-36110
$187.09 MSRP: $267.11You Save: $80.02 (30%)Ships in 1-3 Business DaysProduct Specifications- Other Name: Motor, Cooling Fan; Engine Cooling Fan Motor, Right; Dual Radiator Condenser Fan Assembly; Cooling Fan Assembly; Motor
- Position: Passenger Side


Toyota Fan Motor Part Number: 16363-0T210
$192.80 MSRP: $275.27You Save: $82.47 (30%)Ships in 1-3 Business DaysProduct Specifications- Other Name: Motor, Cooling Fan; Engine Cooling Fan Motor; Cooling Fan Assembly


Toyota Fan Motor Part Number: 16363-31130
$202.47 MSRP: $289.07You Save: $86.60 (30%)Ships in 1-2 Business DaysProduct Specifications- Other Name: Motor, Cooling Fan; Engine Cooling Fan Motor, Left, Right; Motor
- Manufacturer Note: WITH(TOWING PACKAGE)


Toyota Fan Motor, Driver Side Part Number: 16363-36100
$196.76 MSRP: $280.92You Save: $84.16 (30%)Ships in 1-3 Business DaysProduct Specifications- Other Name: Motor, Cooling Fan; Engine Cooling Fan Motor, Left; Dual Radiator Condenser Fan Assembly; Cooling Fan Assembly; Motor
- Position: Driver Side


Toyota Motor, Cooling Fan, Driver Side Part Number: 16363-28170
$204.45 MSRP: $291.90You Save: $87.45 (30%)Ships in 1-3 Business DaysProduct Specifications- Other Name: Fan Motor
- Position: Driver Side
- Replaces: 16363-0V030, 16363-28030


Toyota Fan Motor, Driver Side Part Number: 16363-21030
$199.44 MSRP: $284.75You Save: $85.31 (30%)Ships in 1-3 Business DaysProduct Specifications- Other Name: Motor, Cooling Fan; Engine Cooling Fan Motor, Left; Dual Radiator Condenser Fan Assembly; Cooling Fan Assembly
- Position: Driver Side


Toyota Motor, Cooling Fan, Passenger Side Part Number: 16363-31090
$221.45 MSRP: $316.19You Save: $94.74 (30%)Ships in 1-3 Business DaysProduct Specifications- Other Name: Fan Motor
- Position: Passenger Side


Toyota Fan Motor, Passenger Side Part Number: 16363-0A210
$239.16 MSRP: $341.47You Save: $102.31 (30%)Ships in 1-3 Business DaysProduct Specifications- Other Name: Motor, Cooling Fan; Engine Cooling Fan Motor, Right; Cooling Fan Assembly
- Manufacturer Note: TOWING PACKAGE-FOR 3500LBS
- Position: Passenger Side

Toyota Fan Motor Part Number: 16363-74370
$266.07 MSRP: $379.89You Save: $113.82 (30%)Ships in 1-2 Business DaysProduct Specifications- Other Name: Motor, Cooling Fan; Engine Cooling Fan Motor, Left, Right; Dual Radiator Condenser Fan Assembly; Cooling Fan Assembly; Motor; Engine Cooling Fan Motor; Cooling Fan Motor
- Manufacturer Note: MARK 16363-74370
- Replaces: 16363-03100


Toyota Fan Motor, Driver Side Part Number: 16363-31270
$260.13 MSRP: $371.41You Save: $111.28 (30%)Ships in 1-3 Business DaysProduct Specifications- Other Name: Motor, Cooling Fan; Engine Cooling Fan Motor, Left; Dual Radiator Condenser Fan Assembly; Cooling Fan Assembly
- Position: Driver Side
- Replaces: 16363-0P220


Toyota Motor, Cooling Fan, Passenger Side Part Number: 16363-36190
$270.04 MSRP: $385.55You Save: $115.51 (30%)Ships in 1-2 Business DaysProduct Specifications- Other Name: Motor, Cooling Fan; Fan Motor
- Position: Passenger Side


Toyota Motor, Cooling Fan, Driver Side Part Number: 16363-36180
$270.04 MSRP: $385.55You Save: $115.51 (30%)Ships in 1-2 Business DaysProduct Specifications- Other Name: Motor, Cooling Fan; Fan Motor
- Position: Driver Side


Toyota Motor, Cooling Fan Part Number: 16363-20400
$309.65 MSRP: $442.10You Save: $132.45 (30%)Ships in 1-2 Business Days

Toyota Fan Motor Part Number: 16363-74190
Product Specifications- Other Name: Motor, Cooling Fan; A/C Condenser Fan Motor; Motor; Motor Assembly, Blower (For Condenser)
| Page 1 of 11 |Next >
1-20 of 203 Results
Toyota Fan Motor
OEM parts deliver unmatched quality you can rely on. They pass extensive quality control inspections. Toyota produces them to the official factory specifications. This process helps prevent defects and imperfections. So you can get exceptional lifespan and a flawless fit. Need new OEM Toyota Fan Motor? You'll love our wide selection of genuine options. Shop in minutes and skip the hunt. Our prices are unbeatable, you'll save time and money. It's easy to shop and find the right piece. Our committed customer service team gives professional help from start to finish. Every part includes a manufacturer's warranty. We ship quickly, your parts will arrive fast at your door.
Toyota Fan Motor ensures that engine temperatures do not exceed levels that would cause the car to run hard. Toyota, becoming a global brand, has expanded out of a lean factory in 1937 Japan into a global brand that values waste-cutting, constant improvement, and quick problem-solving. Toyota refined its renowned Hybrid Synergy Drive and introduced plug-in options on sedans, crossovers, and trucks in order to increase efficiency and reduce emissions globally. Another chassis developed by Toyota was the TNGA to reduce weight, stiffen the body, expand cabins, and provide steering with a quick, confident feel on twisty roads. Toyota retains its customers since its machines are durable mile after mile, consuming a small amount of fuel, resistant to bad climatic conditions, and also to unexpected repair bills. Customers will like simple dashboards, noise-reduced cabins, and hybrid choices that cost less money each time they fill up. The Fan Motor operates a high-torque blade assembly that pulls cool air between closely spaced aluminum fins, extinguishes hot spots near cylinders, covers gaskets on hill climbs, and maintains consistent coolant pressures when traffic crawls on hot days. Fan Motor is easy to fit to several generations, so drivers can change the units rapidly and maintain performance uninterrupted over the years. Fan Motor applies dry bearings and closed circuits to shake off road spray, vibration, voltage spikes, and protracted periods of idling that demolish cheaper components.
Toyota Fan Motor Parts and Q&A
- Q: How to Service and Repair the Fan Motor for Radiator Cooling on Toyota Camry?A:The radiators cooling fan service requires you to begin with removal of the No.1 cooling fan after draining engine coolant and disconnecting upper radiator hose along with cooling fan connector and ECT switch connector. Detach the cooling fan from the radiator by removing its two bolts and disconnect the ECT switch wire holder and connector from the fan shroud before removing the cooling fan. Detach the cooling fan connector then remove the two bolts which allow the No.2 cooling fan to exit. The disassembly starts with unfastening the fan and nut before moving to the No.2 cooling fan where the two screws release the motor cover followed by disconnection of wire and connector holder from the fan shroud then removal of the three screws to extract the fan motor. To reinstall replace the fan motor first using three screws before putting the wire and connector holder on the fan shroud followed by setting the motor cover with two screws and finally attaching the fan with its nut. To install the No.1 cooling fan begin by mounting its lower side on the radiator bracket and tightening two bolts to 5.0 Nm torque while also installing the wire and connector holder on the fan shroud, connecting the fan and ECT switch connectors and reattaching the upper radiator hose followed by filling with engine coolant and starting the engine to search for leakage. Position the lower section of the No.2 cooling fan onto the radiator bracket before fastening both bolts with Torque: 5.0 Nm while connecting the fan connector.
- Q: How to service the Radiator Cooling Fan Motor on Toyota Corolla?A:Service of the Radiator Cooling Fan Motor for the 2ZR-FE starts by taking off the radiator assembly. To detach the fan start by removing its retaining nut. First disconnect the connector and two clamps from the fan shroud then extract the cooling fan motor by taking out its three screws.


Related Toyota Parts
 Toyota Water Pump Gasket
 Toyota Radiator
 Toyota Water Pump
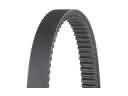 Toyota Drive Belt
 Toyota Coolant Reservoir
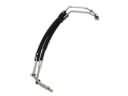 Toyota Oil Cooler Hose
 Toyota Radiator Drain Plug
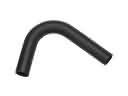 Toyota Radiator Hose
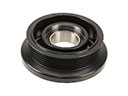 Toyota A/C Idler Pulley
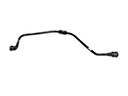 Toyota Coolant Reservoir Hose
 Toyota Cooling Fan Assembly
 Toyota Fan Blade