×
ToyotaParts- Hello
- Login or Register
- Quick Links
- Live Chat
- Track Order
- Parts Availability
- RMA
- Help Center
- Contact Us
- Shop for
- Toyota Parts
- Scion Parts
My Garage
My Account
Cart
OEM Toyota Prius Fan Motor
Cooling Fan Motor- Select Vehicle by Model
- Select Vehicle by VIN
Select Vehicle by Model
orMake
Model
Year
Select Vehicle by VIN
For the most accurate results, select vehicle by your VIN (Vehicle Identification Number).
11 Fan Motors found


Toyota Prius Fan Motor, Driver Side Part Number: 16363-21030
$199.44 MSRP: $284.75You Save: $85.31 (30%)Ships in 1-3 Business Days

Toyota Prius Fan Motor, Passenger Side Part Number: 16363-24160
$211.44 MSRP: $301.88You Save: $90.44 (30%)Ships in 1-2 Business Days
Toyota Prius Motor, Cooling Fan Part Number: 16363-25020
$549.18 MSRP: $804.83You Save: $255.65 (32%)Ships in 1-2 Business DaysToyota Prius Fan Motor, Driver Side Part Number: 16363-24170
$211.44 MSRP: $301.88You Save: $90.44 (30%)Ships in 1-2 Business Days
Toyota Prius Fan Motor Part Number: 16363-46060
$214.93 MSRP: $306.88You Save: $91.95 (30%)Ships in 1-3 Business Days
Toyota Prius Motor, Cooling Fan, Driver Side Part Number: 16363-37020
$233.92 MSRP: $333.99You Save: $100.07 (30%)Ships in 1-3 Business Days
Toyota Prius Fan Motor, Passenger Side Part Number: 16363-37010
$233.92 MSRP: $333.99You Save: $100.07 (30%)Ships in 1-3 Business Days
Toyota Prius Fan Motor, Driver Side Part Number: 16363-24140
$233.92 MSRP: $333.99You Save: $100.07 (30%)Ships in 1-2 Business Days
Toyota Prius Fan Motor, Passenger Side Part Number: 16363-24130
$233.92 MSRP: $333.99You Save: $100.07 (30%)Ships in 1-2 Business Days
Toyota Prius Fan Motor, Passenger Side Part Number: 16363-21040
$252.33 MSRP: $360.27You Save: $107.94 (30%)Ships in 1-3 Business Days
Toyota Prius Fan Motor, Driver Side Part Number: 16363-21010
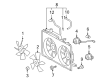
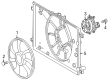
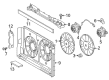
Toyota Prius Fan Motor
Choose genuine Fan Motor that pass strict quality control tests. You can trust the top quality and lasting durability. Shopping for OEM Fan Motor for your Toyota Prius? Our website is your one-stop destination. We stock an extensive selection of genuine Toyota Prius parts. The price is affordable so you can save more. It only takes minutes to browse and find the exact fit. Easily add to cart and check out fast. Our hassle-free return policy will keep you stress-free. We process orders quickly for swift delivery. Your parts will arrive faster, so you can get back on the road sooner.
Fan Motor plays a significant role that defines the dependability and efficiency of the Toyota Prius models. This Fan Motor is responsible for the power of the cooling fan and guarantees that the blades work effectively for helping reach the proper temperature of the engine and improving the cooling process. This is very important for the durability and efficiency of the Prius which has embraced hybrid systems when it was started in 1997. For the continuing generations of the Toyota Prius, the Fan Motor is quite versatile, providing strength and utility for every generation. In relation to efficiency, engine temperatures have to be well regulated; with the help of the Fan Motor, this can be achieved and safe driving experienced. For instance, Toyota Prius comes with features like, user selectable driving modes or the optional solar panels which are elements of innovation. Another advantage applied to the Fan Motor specifies its enhanced compatibility with the different variations of the Prius models while providing high performance rates in the automotive market. Therefore, the Fan Motor of which reliability is well known, plays a significant role not only in the cooling system of the vehicle but also in the environmental friendlessness, and superior performance of the Toyota Prius. Therefore, it could be concluded that the Fan Motor is yet a component that has to contribute to the driving advantages and at the same time reflect the major values of Toyota automotive empire.
Toyota Prius Fan Motor Parts and Q&A
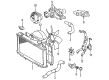
- Q: How to replace the Radiator Cooling Fan Motor on Toyota Prius?A:You should start your Radiator Cooling Fan Motor fan (1NZ-FXE) replacement by taking off the listed components starting with rear floor board NO.2 then deck floor box rear and ending with rear floor board NO.3. The first procedure is to disconnect the battery negative terminal before removing the radiator support opening cover and engine under cover LH along with engine under cover RH. Engine coolant must be drained by starting with the engine side radiator coolant removal followed by the removal of the drain cock plug then completing the drainage from the hybrid side radiator. The front bumper cover and fan assembly w/motor require their connectors and hoses to be disconnected with clamps removed before technicians can unfasten inverter and cooler brackets and hood lock assembly and radiator support. Secure the new fan using two nuts before putting back the fan assembly w/motor with four bolts by torqueing them at 7.5 Nm (76 kgf-cm, 66 inch lbs.). Put radiator support into place by fastening 5 bolts to 5.0 Nm (51 kgf-cm, 44 inch lbs.) and reinstall hood lock assembly and horn connector. Install the cooling unit brackets by applying the required bolt torque metrics. Service technicians should reconnect the battery negative terminal to the vehicle while tightening it up to 6.0 Nm (61 kgf-cm, 53 inch lbs.). The rear floor board NO.3, deck floor box rear, and rear floor board NO.2 should be reinstalled before filling both radiator sides with engine coolant. The system concludes with a check for coolant leaks conducted on the hybrid and engine sections followed by installation of the engine under cover RH and LH components and radiator support opening cover. Lastly, initialize the power window control system.
- Q: How to service and repair the Radiator Cooling Fan Motor on Toyota Prius?A:As the first step in repairing the Radiator Cooling Fan Motor you need to pull refrigerant from the refrigeration system followed by evacuating air then charging the system with 500 plus or minus 50 g (17.64 plus or minus 1.76 oz.) of refrigerant and leak inspection. The process of draining engine coolant from the radiator requires completing only a partial removal while noting the procedure. Start by removing the fan shroud water hose before you detach the 5 bolts and 2 brackets. The installation process requires 2 bolts to be removed from each hose while torque settings should be set to 10 Nm (100 kgf-cm, 7 ft. lbs.). Compressor oil should be used to lubricate 2 new O-rings before completing the installation. The first step involves loosening both nuts and removing both hoses afterwards. Suction hose torque requirement stands at 32 Nm (330 kgf-cm, 24 ft. lbs.) and 22 Nm (225 kgf-cm, 16 ft. lbs.) for discharge hose torque. New O-rings need compressor oil for lubrication before installation. Dispose the radiator hoses from the radiator and condenser module through hose clip removal followed by hose removal. Disassembly of the electric cooling fan assembly requires 2 connector removal then detaching 2 bolts before lifting and lowering the assembly for complete detachment. The process for disassembly begins with removing the 6 screws followed by the 2 fans before disconnecting the connector and taking out the 6 screws and 2 motors from the fan shroud. To reinstall parts the assembly process follows the steps that were used for part removal but in opposite order.


Related Toyota Prius Parts
 Toyota Prius Water Pump
 Toyota Prius Coolant Reservoir
 Toyota Prius Radiator
 Toyota Prius Coolant Reservoir Hose
 Toyota Prius Cooling Fan Assembly
 Toyota Prius Fan Blade
 Toyota Prius Fan Shroud
 Toyota Prius Radiator Cap
 Toyota Prius Thermostat Gasket
 Toyota Prius Thermostat Housing
 Toyota Prius Water Hose
 Toyota Prius Water Pump Gasket