×
ToyotaParts- Hello
- Login or Register
- Quick Links
- Live Chat
- Track Order
- Parts Availability
- RMA
- Help Center
- Contact Us
- Shop for
- Toyota Parts
- Scion Parts
My Garage
My Account
Cart
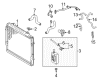
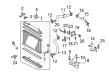
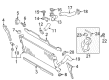
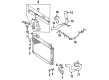
OEM Toyota Coolant Reservoir
Coolant Tank Reservoir- Select Vehicle by Model
- Select Vehicle by VIN
Select Vehicle by Model
orMake
Model
Year
Select Vehicle by VIN
For the most accurate results, select vehicle by your VIN (Vehicle Identification Number).
183 Coolant Reservoirs found


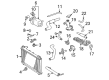
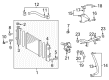
Toyota Reservoir Assembly Part Number: 16470-03062
$63.39 MSRP: $88.97You Save: $25.58 (29%)Ships in 1-2 Business DaysProduct Specifications- Other Name: Reserve Tank Assembly, Radiator Reserve; Engine Coolant Reservoir; Tank Assembly, Radiator Reserve; Coolant Reservoir


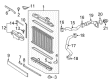
Toyota Reservoir Assembly Part Number: 16470-03061
$63.39 MSRP: $88.97You Save: $25.58 (29%)Product Specifications- Other Name: Engine Coolant Reservoir; Tank Assembly, Radiator Reserve; Coolant Reservoir
- Replaced by: 16470-03062


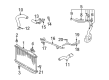
Toyota Reservoir Part Number: 164A2-0T030
$78.20 MSRP: $109.76You Save: $31.56 (29%)Ships in 1-3 Business DaysProduct Specifications- Other Name: Tank, Reserve Sealed Without Cap; Engine Coolant Reservoir; Tank, Reserve Sealed W/O Cap; Coolant Reservoir


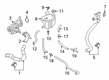
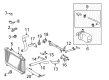
Toyota Reservoir Assembly Part Number: 16470-50100
$104.15 MSRP: $146.19You Save: $42.04 (29%)Ships in 1-3 Business DaysProduct Specifications- Other Name: Reserve Tank Assembly, Radiator Reserve; Engine Coolant Reservoir; Tank Assembly, Radiator Reserve; Coolant Reservoir


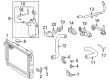
Toyota Reservoir Assembly Part Number: 16470-0C011
$118.01 MSRP: $165.65You Save: $47.64 (29%)Ships in 1 Business DayProduct Specifications- Other Name: Reserve Tank Assembly, Radiator Reserve; Engine Coolant Reservoir; Tank Assembly, Radiator Reserve; Coolant Reservoir
- Replaces: 16470-0C010

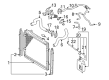
Toyota Reservoir Assembly Part Number: 16470-03081
$62.79 MSRP: $88.14You Save: $25.35 (29%)Ships in 1-3 Business DaysProduct Specifications- Other Name: Reserve Tank Assembly, Radiator Reserve; Engine Coolant Reservoir; Tank Assembly, Radiator Reserve; Coolant Reservoir


Toyota Reservoir Part Number: 16480-22020
$272.37 MSRP: $388.88You Save: $116.51 (30%)Ships in 1-3 Business DaysProduct Specifications- Other Name: Reserve Tank Assembly, Radiator Reserve; Engine Coolant Reservoir; Tank Sub-Assembly, Radiator Reserve; Coolant Reservoir


Toyota Reservoir Part Number: 16480-22050
$279.24 MSRP: $398.69You Save: $119.45 (30%)Ships in 1-3 Business DaysProduct Specifications- Other Name: Reserve Tank Assembly, Radiator Reserve; Engine Coolant Reservoir; Tank Sub-Assembly, Radiator Reserve; Coolant Reservoir


Toyota Reservoir Assembly Part Number: 16470-AA020
$56.15 MSRP: $78.16You Save: $22.01 (29%)Ships in 1-2 Business DaysProduct Specifications- Other Name: Reserve Tank Assembly, Radiator Reserve; Engine Coolant Reservoir; Tank Assembly, Radiator Reserve; Coolant Reservoir
- Replaces: 16470-AA010


Toyota Expansion Tank Part Number: 164A2-37012
$78.20 MSRP: $109.76You Save: $31.56 (29%)Ships in 1-2 Business DaysProduct Specifications- Other Name: Tank, Reserve Sealed Without Cap; Engine Coolant Reservoir; Reservoir; Tank, Reserve Sealed W/O Cap; Coolant Reservoir
- Replaces: 164A2-0T021


Toyota Recovery Tank Part Number: 16470-31130
$83.53 MSRP: $117.25You Save: $33.72 (29%)Ships in 1-3 Business DaysProduct Specifications- Other Name: Reserve Tank Assembly, Radiator Reserve; Engine Coolant Reservoir; Tank Assembly, Radiator Reserve; Coolant Reservoir


Toyota Tank Assembly, Radiator Reserve Part Number: 16470-0V020
$83.53 MSRP: $117.25You Save: $33.72 (29%)Ships in 1-2 Business DaysProduct Specifications- Other Name: Reserve Tank Assembly, Radiator Reserve; Coolant Reservoir


Toyota Reservoir Part Number: 16470-28050
$90.40 MSRP: $126.90You Save: $36.50 (29%)Ships in 1-2 Business DaysProduct Specifications- Other Name: Reserve Tank Assembly, Radiator Reserve; Engine Coolant Reservoir; Tank Assembly, Radiator Reserve; Coolant Reservoir


Toyota Reservoir Assembly Part Number: 16470-74360
$88.27 MSRP: $123.91You Save: $35.64 (29%)Ships in 1-3 Business DaysProduct Specifications- Other Name: Reserve Tank Assembly, Radiator Reserve; Engine Coolant Reservoir; Tank Assembly, Radiator Reserve; Coolant Reservoir
- Manufacturer Note: TYPE B:REFER TO ILLUSTRATION
- Replaces: 16470-74311


Toyota Tank Assembly, Radiator Reserve Part Number: 16470-50140
$104.39 MSRP: $146.53You Save: $42.14 (29%)Ships in 1-2 Business DaysProduct Specifications- Other Name: Reserve Tank Assembly, Radiator Reserve; Engine Coolant Reservoir; Coolant Reservoir


Toyota Recovery Tank Part Number: 16470-75030
$118.01 MSRP: $165.65You Save: $47.64 (29%)Ships in 1 Business DayProduct Specifications- Other Name: Reserve Tank Assembly, Radiator Reserve; Engine Coolant Reservoir; Tank Assembly, Radiator Reserve; Coolant Reservoir


Toyota Reservoir Part Number: 16470-20100
$118.01 MSRP: $165.65You Save: $47.64 (29%)Ships in 1-3 Business DaysProduct Specifications- Other Name: Reserve Tank Assembly, Radiator Reserve; Engine Coolant Reservoir; Tank Assembly, Radiator Reserve; Coolant Reservoir


Toyota Expansion Tank Part Number: SU003-01185
$43.52 MSRP: $56.34You Save: $12.82 (23%)Ships in 1-2 Business DaysProduct Specifications- Other Name: Tank Reserve; Engine Coolant Reservoir; Cooling Fan Assembly; Reservoir Assembly; Tank Assembly, Radiator Reserve; Coolant Reservoir


Toyota Tank Assembly, Radiator Reserve Part Number: 16470-66020
$130.41 MSRP: $184.62You Save: $54.21 (30%)Ships in 1-3 Business DaysProduct Specifications- Other Name: Reserve Tank Assembly, Radiator Reserve; Coolant Reservoir


Toyota Expansion Tank Part Number: 16470-03050
$172.36 MSRP: $244.00You Save: $71.64 (30%)Ships in 1-3 Business DaysProduct Specifications- Other Name: Reserve Tank Assembly, Radiator Reserve; Engine Coolant Reservoir; Coolant Reservoir; Tank Assembly, Radiator Reserve
| Page 1 of 10 |Next >
1-20 of 183 Results
Toyota Coolant Reservoir
OEM parts deliver unmatched quality you can rely on. They pass extensive quality control inspections. Toyota produces them to the official factory specifications. This process helps prevent defects and imperfections. So you can get exceptional lifespan and a flawless fit. Need new OEM Toyota Coolant Reservoir? You'll love our wide selection of genuine options. Shop in minutes and skip the hunt. Our prices are unbeatable, you'll save time and money. It's easy to shop and find the right piece. Our committed customer service team gives professional help from start to finish. Every part includes a manufacturer's warranty. We ship quickly, your parts will arrive fast at your door.
Toyota Coolant Reservoir maintains engine temperatures constant by trapping overflow and pumping coolant back into the engine. Toyota is building its global reputation on unremitting waste-cutting, fast problem-solving, and continuous hybrid innovation and gives drivers cars that drink less fuel, shake off years of hard driver life, and turn corners with unshaken steadiness courtesy of the modular TNGA platform that allows lowering the center of gravity, stiffening the frame, and sharpening the suspension geometry. The updated Hybrid Synergy Drive and the extended-range plug-in models since Prius through RAV4 have demonstrated that the company does not rest, and battery efficiency and smoother regenerative performance have propelled Toyota by progress. The Coolant Reservoir on all gasoline or hybrid engines serves as a breathing space for heated antifreeze, preventing the occurrence of air pockets and coolant loss. On many systems, the pressure-cap expansion design prevents the cracking of the pressure cap that would otherwise be caused by vibration, thus the Toyota owner is not subject to boil-over on mountain passes and the gauge readings are consistent despite stop-go traffic. A well-integrated Coolant Reservoir does not crack under vibration, which would otherwise cause pressure loss. Regular inspections of cracks, low fluid level, or discoloring mix in the Coolant Reservoir detect problems early, and filling to the cold fill line keeps the closed Coolant Reservoir in readiness to undergo thermal expansion, allowing Toyota cooling circuits to circulate liquid with no sucked-in air or untidy spillage.
Toyota Coolant Reservoir Parts and Q&A
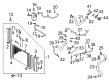
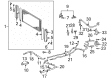
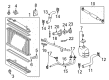
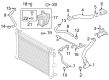
- Q: How to service the Coolant Reservoir system on Toyota Prius?A:Service of the coolant reservoir system requires first removing three panels: the rear No. 2 floor board, rear deck floor box, and rear No. 3 floor board. Remove the battery cable negative terminal before letting at least 90 seconds pass to avoid Air Bag and seat belt pretensioner activation. Start by removing the radiator support opening cover followed by engine under covers (LH and RH) together with front bumper cover yet retaining part of the front fender liner LH. Drain the engine coolant through the drain cock plug while being cautious since heat from the reservoir has not fully cooled down. Disassembling the coolant reservoir requires removing two hoses followed by disconnecting water pump motor and temperature sensor connectors before removing the nut and four bolts when securing the Coolant Reservoir tightly to avert bracket deformation. When installing the coolant reservoir assembly begin by clamping the two claws and stud bolt onto the vehicle side and fasten with four bolts and a nut before torquing to 19 Nm (194 kgf-cm, 14 ft. lbs.) while ensuring to press the bracket in front of the vehicle during bolt tightening of 1 and 2. The water pump motor and temperature sensor connectors need to be attached before joining both hoses. Replace all parts by reattaching the negative battery terminal connection then reinstalling the rear No. 3 floor board plus rear deck floor box and rear No. 2 floor board. The service completion includes adding engine coolant and leak detection while placing back the front fender liner LH followed by front bumper cover and engine under covers (RH and LH) and radiator support opening cover. After removing the battery perform initialization because several systems need this step before reconnecting the power supply.

Related Toyota Parts
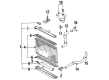
 Toyota Radiator
 Toyota Thermostat
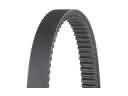 Toyota Drive Belt
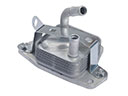 Toyota Engine Oil Cooler
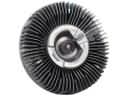 Toyota Fan Clutch
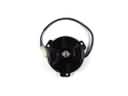 Toyota Fan Motor
 Toyota Thermostat Housing
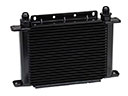 Toyota Transmission Oil Cooler
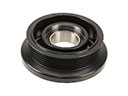 Toyota A/C Idler Pulley
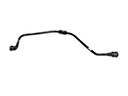 Toyota Coolant Reservoir Hose
 Toyota Fan Shroud
 Toyota Thermostat Gasket
Browse Toyota Coolant Reservoir by Models
Tacoma 4Runner Camry Tundra Corolla RAV4 Highlander Prius Sienna Land Cruiser Pickup FJ Cruiser 86 Sequoia T100 Avalon Celica Supra Yaris Matrix MR2 Solara Venza GR86 Echo C-HR Cressida Grand Highlander Paseo Previa Prius Prime bZ4X Corolla Cross Corolla iM Crown Crown Signia GR Corolla Mirai MR2 Spyder Prius V Starlet Tercel Van Yaris iA Prius Plug-In GR Supra Prius AWD-e RAV4 Prime