×
ToyotaParts- Hello
- Login or Register
- Quick Links
- Live Chat
- Track Order
- Parts Availability
- RMA
- Help Center
- Contact Us
- Shop for
- Toyota Parts
- Scion Parts
My Garage
My Account
Cart
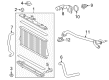
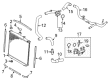
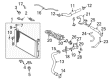
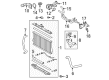
OEM Toyota Highlander Radiator
Cooling Radiator- Select Vehicle by Model
- Select Vehicle by VIN
Select Vehicle by Model
orMake
Model
Year
Select Vehicle by VIN
For the most accurate results, select vehicle by your VIN (Vehicle Identification Number).
38 Radiators found


Toyota Highlander Radiator Assembly Part Number: 16410-AZ027
$147.69 MSRP: $208.74You Save: $61.05 (30%)Ships in 1-3 Business Days

Toyota Highlander Radiator Part Number: 16400-F0080
$257.73 MSRP: $367.99You Save: $110.26 (30%)Ships in 1-3 Business Days
Toyota Highlander Radiator Assembly Part Number: 16400-20330
$347.83 MSRP: $509.75You Save: $161.92 (32%)Ships in 1-3 Business Days

Toyota Highlander Radiator Assembly Part Number: 16400-28240
$359.51 MSRP: $526.87You Save: $167.36 (32%)Ships in 1-3 Business Days


Toyota Highlander Inverter Cooler Part Number: G9010-48060
$527.99 MSRP: $773.78You Save: $245.79 (32%)Ships in 1-3 Business Days


Toyota Highlander Radiator Assembly Part Number: 16410-AZ046
$226.55 MSRP: $322.94You Save: $96.39 (30%)Ships in 1-3 Business Days


Toyota Highlander Radiator Assembly Part Number: 16400-0V230
$250.00 MSRP: $356.94You Save: $106.94 (30%)Ships in 1-3 Business Days

Toyota Highlander Radiator Assembly Part Number: 16400-0P440
$268.87 MSRP: $383.89You Save: $115.02 (30%)Ships in 1-3 Business Days

Toyota Highlander Radiator Assembly Part Number: 16041-20354
$314.54 MSRP: $449.09You Save: $134.55 (30%)Ships in 1 Business Day

Toyota Highlander Radiator Assembly Part Number: 16041-0P240
$321.49 MSRP: $459.02You Save: $137.53 (30%)Ships in 1-3 Business Days
Toyota Highlander Radiator Assembly Part Number: 16041-0P251
$329.18 MSRP: $470.00You Save: $140.82 (30%)Ships in 1-3 Business Days

Toyota Highlander Radiator Assembly Part Number: 16041-20410
$329.87 MSRP: $470.98You Save: $141.11 (30%)Ships in 1-3 Business DaysToyota Highlander Radiator Assembly Part Number: 16400-20340
$365.69 MSRP: $535.92You Save: $170.23 (32%)Ships in 1-3 Business Days

Toyota Highlander Radiator Assembly Part Number: 16400-0P410
$298.46 MSRP: $426.14You Save: $127.68 (30%)Ships in 1-3 Business DaysToyota Highlander Radiator Assembly Part Number: 16410-AZ047
$133.69 MSRP: $188.95You Save: $55.26 (30%)Ships in 1-3 Business DaysToyota Highlander Radiator Assembly Part Number: 16410-AZ026
$147.04 MSRP: $207.82You Save: $60.78 (30%)Ships in 1-3 Business Days

Toyota Highlander Radiator Assembly Part Number: 16400-0P540
$269.57 MSRP: $384.89You Save: $115.32 (30%)Ships in 1-3 Business Days
Toyota Highlander Radiator Assembly Part Number: 16041-36050
$353.43 MSRP: $517.96You Save: $164.53 (32%)Ships in 1-3 Business Days
Toyota Highlander Radiator Assembly Part Number: 16041-31540
$347.20 MSRP: $508.82You Save: $161.62 (32%)


Toyota Highlander Radiator Assembly Part Number: 16400-0P420
$297.87 MSRP: $425.29You Save: $127.42 (30%)
| Page 1 of 2 |Next >
1-20 of 38 Results
Toyota Highlander Radiator
Choose genuine Radiator that pass strict quality control tests. You can trust the top quality and lasting durability. Shopping for OEM Radiator for your Toyota Highlander? Our website is your one-stop destination. We stock an extensive selection of genuine Toyota Highlander parts. The price is affordable so you can save more. It only takes minutes to browse and find the exact fit. Easily add to cart and check out fast. Our hassle-free return policy will keep you stress-free. We process orders quickly for swift delivery. Your parts will arrive faster, so you can get back on the road sooner.
Toyota Highlander Radiator Parts and Q&A
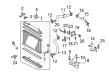
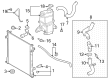
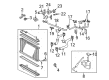
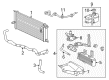
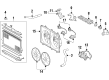
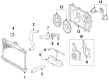
- Q: How to install the radiator on Toyota Highlander?A:The radiator installation begins with 2 lower radiator supports before moving onto 2 radiator support cushions. The fan assembly should be placed inside the radiator assembly after which the three bolts should be tightened to 7.8 Nm (80 kgf-cm, 69 in-lbf). This step should be followed by connecting the radiator reserve tank hose or pipe. Secure the radiator assembly by attaching the fan assembly with motor while avoiding unnecessary force on the cooler condenser assembly and pipe. Use 4 bolts to install the cooler condenser assembly while torquing them to 6.0 Nm (61 kgf-cm, 53 in-lbf). The rheological assembly requires installation using 5 bolts along with a hood lock control cable clamp attachment to the radiator support while reaching 12 Nm (122 kgf-cm, 9 ft-lbf) torque specification before installing the discharge hose sub-assembly through a bolt torqued to 9.8 Nm (100 kgf-cm, 87 in-lbf). Fasten the hood lock control cable clamp before securing the wire harness clamp and hookup the low pitched Horn and high pitched horn connectors. Use the cooling fan ECU connector to link the wire harness clamps which will be fastened securely on either side of the fan shroud. fasten the outlet No. 1 oil cooler hose and inlet No. 1 oil cooler hose along with the No. 2 radiator hose and No. 1 radiator hose directly at the radiator. Set into place the No. 1 inlet air cleaner and No. 2 inlet air cleaner with the cool air intake duct seal. The radiator grille needs to be installed when adding engine coolant to inspect automatic transaxle fluid and check for oil and coolant leaks. The installation of the No. 1 engine under cover marks the completion of the radiator installation tasks.
- Q: How to remove and replace the radiator on Toyota Highlander?A:Initiating the replacement procedure for a 2GR-FE radiator begins by removing both engine under covers followed by the No. 1 engine under cover. Star the engine coolant before taking out the V-bank cover sub-assembly and the cool air intake duct seal together with the battery coupled with the No. 2 air cleaner inlet and No. 1 air cleaner inlet. Rearranging the radiator work requires the detachment of No. 1 radiator hose and No. 2 radiator hose and oil cooler hoses from the radiator. The first step involves detaching all wire harness clamps from each side of the fan shroud before disconnecting the cooling fan ECU connector. First detach the radiator grille before attempting removal of the hood lock assembly which may or may not contain an engine hood courtesy switch. Proceed by disconnecting low pitched Horn and high pitched horn connectors as well as detaching hood lock control cable clamp before removing the six bolts from the upper radiator support sub-assembly. In this step divide the cooler condenser assembly by removing its four bolts before removing the radiator assembly and fan assembly along with the motor. You must first disconnect the radiator reserve tank hose or pipe from the radiator assembly before removing its three bolts to pull up the fan assembly with motor from the radiator assembly. Two radiator support cushions along with the two lower radiator supports need removal.


Related Toyota Highlander Parts
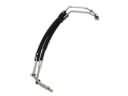 Toyota Highlander Oil Cooler Hose
 Toyota Highlander Thermostat
 Toyota Highlander Cooling Fan Assembly
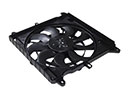 Toyota Highlander Cooling Fan Module
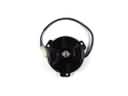 Toyota Highlander Fan Motor
 Toyota Highlander Fan Shroud
 Toyota Highlander Radiator Cap
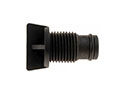 Toyota Highlander Radiator Drain Plug
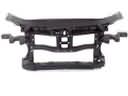 Toyota Highlander Radiator Support
 Toyota Highlander Thermostat Housing
 Toyota Highlander Water Hose
 Toyota Highlander Water Pump Gasket