×
ToyotaParts- Hello
- Login or Register
- Quick Links
- Live Chat
- Track Order
- Parts Availability
- RMA
- Help Center
- Contact Us
- Shop for
- Toyota Parts
- Scion Parts
My Garage
My Account
Cart
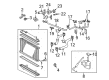
OEM 2005 Toyota Highlander Radiator
Cooling Radiator- Select Vehicle by Model
- Select Vehicle by VIN
Select Vehicle by Model
orMake
Model
Year
Select Vehicle by VIN
For the most accurate results, select vehicle by your VIN (Vehicle Identification Number).
7 Radiators found


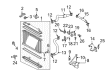
2005 Toyota Highlander Radiator Assembly
Part Number: 16410-AZ027$147.69 MSRP: $208.74You Save: $61.05 (30%)Ships in 1-3 Business DaysProduct Specifications- Other Name: Radiator Assembly, L/Cap; Radiator
- Replaces: 16410-YZZAM
- Item Weight: 8.60 Pounds
- Item Dimensions: 36.4 x 27.3 x 7.3 inches
- Condition: New
- SKU: 16410-AZ027
- Warranty: This genuine part is guaranteed by Toyota's factory warranty.


2005 Toyota Highlander Radiator Assembly
Part Number: 16400-28240$359.51 MSRP: $526.87You Save: $167.36 (32%)Ships in 1-3 Business DaysProduct Specifications- Other Name: Radiator
- Manufacturer Note: TYPE A:REFER TO ILLUSTRATION
- Part Name Code: 16400
- Item Weight: 14.90 Pounds
- Item Dimensions: 35.2 x 26.8 x 8.5 inches
- Condition: New
- Fitment Type: Direct Replacement
- SKU: 16400-28240
- Warranty: This genuine part is guaranteed by Toyota's factory warranty.

2005 Toyota Highlander Radiator Assembly
Part Number: 16400-20330$347.83 MSRP: $509.75You Save: $161.92 (32%)Ships in 1-3 Business DaysProduct Specifications- Other Name: Radiator
- Part Name Code: 16400
- Item Weight: 15.60 Pounds
- Item Dimensions: 35.4 x 6.1 x 24.7 inches
- Condition: New
- Fitment Type: Direct Replacement
- SKU: 16400-20330
- Warranty: This genuine part is guaranteed by Toyota's factory warranty.
2005 Toyota Highlander Radiator Assembly
Part Number: 16410-AZ026$147.04 MSRP: $207.82You Save: $60.78 (30%)Ships in 1-3 Business DaysProduct Specifications- Other Name: Radiator Assembly, L/Cap; Radiator
- Replaces: 16410-YZZAL
- Item Weight: 13.30 Pounds
- Item Dimensions: 34.7 x 26.3 x 5.2 inches
- Condition: New
- SKU: 16410-AZ026
- Warranty: This genuine part is guaranteed by Toyota's factory warranty.
2005 Toyota Highlander Radiator Assembly
Part Number: 16410-AZ047$133.69 MSRP: $188.95You Save: $55.26 (30%)Ships in 1-3 Business DaysProduct Specifications- Other Name: Radiator Assembly, L/Cap; Radiator
- Condition: New
- SKU: 16410-AZ047
- Warranty: This genuine part is guaranteed by Toyota's factory warranty.
2005 Toyota Highlander Radiator Assembly
Part Number: 16400-28260$397.24 MSRP: $582.16You Save: $184.92 (32%)Ships in 1-3 Business DaysProduct Specifications- Other Name: Radiator
- Manufacturer Note: TYPE B:REFER TO ILLUSTRATION
- Part Name Code: 16400
- Item Weight: 8.20 Pounds
- Item Dimensions: 33.3 x 27.6 x 7.1 inches
- Condition: New
- Fitment Type: Direct Replacement
- SKU: 16400-28260
- Warranty: This genuine part is guaranteed by Toyota's factory warranty.
2005 Toyota Highlander Radiator Assembly
Part Number: 16400-20340$365.69 MSRP: $535.92You Save: $170.23 (32%)Ships in 1-3 Business DaysProduct Specifications- Other Name: Radiator
- Manufacturer Note: TOWING PACKAGE
- Part Name Code: 16400
- Item Weight: 15.30 Pounds
- Item Dimensions: 35.7 x 6.1 x 25.2 inches
- Condition: New
- Fitment Type: Direct Replacement
- SKU: 16400-20340
- Warranty: This genuine part is guaranteed by Toyota's factory warranty.
2005 Toyota Highlander Radiator
Looking for affordable OEM 2005 Toyota Highlander Radiator? Explore our comprehensive catalogue of genuine 2005 Toyota Highlander Radiator. All our parts are covered by the manufacturer's warranty. Plus, our straightforward return policy and speedy delivery service ensure an unparalleled shopping experience. We look forward to your visit!
2005 Toyota Highlander Radiator Parts Q&A
- Q: How to service and repair the heater core and air conditioning radiator assembly on 2005 Toyota Highlander?A: The service and repair of the heater core and air conditioning radiator assembly begins with refrigerant discharge through Special Service Tool: 07110-58060 and its sub-tools: 07117-58080, 07117-58090, 07117-78050, 07117-88060, 07117-88070 and 07117-88080. Special Service Tool: 09870-00015 enables removal of cooler refrigerant suction pipe No.1 by installing Special Service Tool: 09870-00015 on the piping clamp then releasing the clamp lock with downward force so users can remove the piping clamp without tube deformation. Users need to disconnect the cooler refrigerant suction hose No.1 while removing its 2 O-rings. The pipeline disconnection process for cooler refrigerant liquid pipe A requires utilization of Special Service Tool: 09870-00025. Follow safety protocols when disconnecting the heater outlet and inlet water hoses by avoiding strong wrenching force while having coolant leakage preparedness. Use Special Service Tool: 09950-50013 (09951-05010, 09952-05010, 09953-05020, 09954-05021) to remove the instrument panel safety pad sub-assembly which will allow the separation of steering column assembly and floor shift assembly through necessary bolts and nuts removal. The service order begins by removing air duct rear No.2 and No.1 and continues with instrument panel brace sub-assemblies No.1 and No.2 before moving on to the air conditioner amplifier assembly installation when Lexus navigation is present. Disconnection of electrical connectors and bolt and nut removal enables separation of the ECM, multiplex network body ECU, instrument panel junction block assembly and skid control ECU assembly along with instrument panel reinforcement assembly. The next step involves taking out the air conditioner unit assembly along with the air conditioning radiator assembly, air duct No.1, heater to register duct center, mode damper servo sub-assembly, wiring air conditioning harness sub-assembly, airmix damper servo sub-assembly, and heater radiator unit sub-assembly, cooler thermistor No.1, blower motor control, blower resistor, and wiring air indicator harness sub-assembly No.2. The 4 mm hexagon wrench can be used to remove the cooler expansion valve and the cooler evaporator sub-assembly No.1 together with its O-rings. New O-rings need compressor oil ND-OIL 8 (or equivalent) treatment before installing the cooler evaporator sub-assembly No.1 and the cooler expansion valve following assembly torque direction. The vehicle requires installation of air conditioner unit assembly, instrument panel reinforcement assembly, skid control ECU assembly, instrument panel junction block assembly, ECM and both instrument panel brace sub-assemblies following the specified torque requirements. Assemble the floor shift assembly together with the steering column assembly while making sure that all fittings remain properly connected. In the final step install cooler refrigerant suction pipe No.1 and cooler refrigerant liquid pipe A followed by coolant addition and leak inspection before charging refrigerant to the required 650 plus or minus 50 g (22.93 plus or minus 1.76 oz.) amount then warm up the engine and check for refrigerant leaks.
Related 2005 Toyota Highlander Parts
 2005 Toyota Highlander Water Pump
 2005 Toyota Highlander Coolant Reservoir
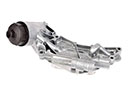 2005 Toyota Highlander Oil Cooler
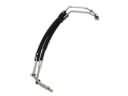 2005 Toyota Highlander Oil Cooler Hose
 2005 Toyota Highlander Thermostat
 2005 Toyota Highlander Coolant Reservoir Hose
 2005 Toyota Highlander Cooling Fan Assembly
 2005 Toyota Highlander Fan Shroud
 2005 Toyota Highlander Radiator Cap
 2005 Toyota Highlander Radiator Hose
 2005 Toyota Highlander Thermostat Gasket
 2005 Toyota Highlander Water Pump Gasket