×
ToyotaParts- Hello
- Login or Register
- Quick Links
- Live Chat
- Track Order
- Parts Availability
- RMA
- Help Center
- Contact Us
- Shop for
- Toyota Parts
- Scion Parts
My Garage
My Account
Cart
OEM Scion Crankshaft Seal
- Select Vehicle by Model
- Select Vehicle by VIN
Select Vehicle by Model
orMake
Model
Year
Select Vehicle by VIN
For the most accurate results, select vehicle by your VIN (Vehicle Identification Number).
17 Crankshaft Seals found


Scion Crankshaft Seal, Front Part Number: 90311-A0015
$8.11 MSRP: $11.29You Save: $3.18 (29%)Ships in 1-3 Business DaysProduct Specifications- Other Name: Seal, Type T Oil; Engine Crankshaft Seal, Front; Timing Cover Gasket; Timing Cover Seal; Front Crank Seal; Oil Seal for Timing Gear or Chain Case; Engine Crankshaft Seal
- Position: Front
- Replaces: 90311-A0019, 90311-42043


Scion Rear Main Seal Part Number: 90311-A0020
$29.15 MSRP: $40.57You Save: $11.42 (29%)Ships in 1-2 Business DaysProduct Specifications- Other Name: Seal, Type T Oil; Engine Crankshaft Seal, Rear; Rear Seal; Seal, Engine Rear Oil; Engine Crankshaft Seal; Crankshaft Seal
- Position: Rear
- Replaces: 90311-A0016, 90311-89006


Scion Oil Seal, Front Part Number: 90080-31049
$10.27 MSRP: $14.29You Save: $4.02 (29%)Ships in 1-3 Business DaysProduct Specifications- Other Name: Seal, Type T Oil; Engine Crankshaft Seal, Front; Timing Cover Gasket; Multi-Purpose Seal; Timing Cover Seal; Crankshaft Seal; Front Seal; Timing Cover Oil Seal; Cover Seal; Oil Seal for Timing Chain/Belt.
- Manufacturer Note: (L)
- Position: Front
- Replaces: 90311-38059, 90080-31060


Scion Front Crank Seal Part Number: 90311-25032
$9.67 MSRP: $13.46You Save: $3.79 (29%)Ships in 1 Business DayProduct Specifications- Other Name: Seal, Type T Oil; Engine Crankshaft Seal, Front; Timing Cover Gasket; Multi-Purpose Seal; Timing Cover Seal; Oil Seal; Front Seal; Oil Seal for Timing Chain/Belt Cover & Oil Pump; Engine Crankshaft Seal
- Position: Front
- Replaces: 90311-25020, 90311-25021

Scion Oil Seal, Front Part Number: 90311-A0018
$12.18 MSRP: $16.95You Save: $4.77 (29%)Ships in 1-2 Business DaysProduct Specifications- Other Name: Seal, Type T Oil; Engine Crankshaft Seal, Front; Timing Cover Gasket; Multi-Purpose Seal; Timing Cover Seal; Crankshaft Seal; Front Crank Seal; Front Seal; Front Cover Seal; Seal, Oil(For Timing Chain Or Belt Cover)
- Position: Front
- Replaces: 90311-T0024, 90311-38078, 90311-38096, 90311-A0014, 90080-31072, 90311-38080, 90311-38089


Scion Crankshaft Seal, Front Part Number: 90311-38098
$12.18 MSRP: $16.95You Save: $4.77 (29%)Ships in 1-3 Business DaysProduct Specifications- Other Name: Seal, Type T Oil; Engine Crankshaft Seal, Front; Seal, Oil(For Timing Gear Case Or Timing Chain Case)
- Position: Front
- Replaces: 90311-C0025

Scion Seal, Engine Rear Oil Part Number: 90311-89015
$29.27 MSRP: $40.74You Save: $11.47 (29%)Ships in 1 Business DayProduct Specifications- Other Name: Seal, Type T Oil; Engine Crankshaft Seal
- Position: Rear
- Replaces: 90311-89005, 90311-89013, 90311-C0023


Scion Rear Main Seal Part Number: 90311-89010
$41.57 MSRP: $57.87You Save: $16.30 (29%)Ships in 1-3 Business DaysProduct Specifications- Other Name: Seal, Type T Oil; Engine Crankshaft Seal, Rear; Crankshaft Pulley Seal; Seal, Engine Rear Oil; Engine Crankshaft Seal; Crankshaft Seal
- Manufacturer Note: 2AZ-FE,*195
- Position: Rear
- Replaces: 90311-89002, 90311-89001, 90080-31073, 90311-89007, 90311-89003, 90311-89004, 90311-C0001


Scion Rear Main Seal Part Number: 90311-75022
$41.57 MSRP: $57.87You Save: $16.30 (29%)Ships in 1 Business DayProduct Specifications- Other Name: Seal, Type T Oil; Engine Crankshaft Seal, Rear; Seal, Engine Rear Oil; Engine Crankshaft Seal; Crankshaft Seal
- Position: Rear
- Replaces: 90311-75015, 90311-75019, 90311-75016

Scion Front Cover Seal Part Number: SU003-02180
$15.81 MSRP: $20.46You Save: $4.65 (23%)Ships in 1-2 Business DaysProduct Specifications- Other Name: Oil Seal-50X62X7; Timing Cover Gasket; Timing Cover Seal; Crankshaft Seal


Scion Rear Main Seal Part Number: SU003-02181
$21.14 MSRP: $27.37You Save: $6.23 (23%)Ships in 1-3 Business DaysProduct Specifications- Other Name: Oil Seal-92X109X8; Engine Crankshaft Seal; Crankshaft Seal; Seal, Engine Rear Oil

Scion Rear Main Seal Part Number: 90311-A0013
$50.78 MSRP: $70.68You Save: $19.90 (29%)Ships in 1 Business DayProduct Specifications- Other Name: Seal, Type T Oil; Engine Crankshaft Seal, Rear; Seal, Engine Rear Oil; Engine Crankshaft Seal; Crankshaft Seal
- Manufacturer Note: (L)
- Replaces: 90311-76002

Scion Crankshaft Seal, Front Part Number: 90118-WB427
$11.11 MSRP: $15.48You Save: $4.37 (29%)Ships in 1-3 Business DaysProduct Specifications- Other Name: Seal, Oil; Engine Crankshaft Seal, Front; Timing Cover Gasket; Timing Cover Seal; Front Cover Seal; Seal, Oil(For Timing Gear Case Or Timing Chain Case)
- Position: Front


Scion Crankshaft Seal, Front Part Number: 90311-42061
$12.06 MSRP: $16.78You Save: $4.72 (29%)Ships in 1-3 Business DaysProduct Specifications- Other Name: Seal, Type T Oil; Engine Crankshaft Seal, Front; Timing Cover Gasket; Timing Cover Seal; Front Cover Seal; Seal, Oil(For Timing Gear Case Or Timing Chain Case)
- Manufacturer Note: *524
- Position: Front
- Replaces: 90311-40042
Scion Rear Main Seal Part Number: 90311-78008
$45.88 MSRP: $63.86You Save: $17.98 (29%)Ships in 1-3 Business DaysProduct Specifications- Other Name: Seal, Type T Oil; Engine Crankshaft Seal, Rear; Rear Seal; Seal, Engine Rear Oil; Engine Crankshaft Seal; Crankshaft Seal
- Manufacturer Note: *119
- Position: Rear
- Replaces: 90311-76004

Scion Rear Main Seal Part Number: 90311-78005
$102.25 MSRP: $143.53You Save: $41.28 (29%)Ships in 1-3 Business DaysProduct Specifications- Other Name: Seal, Type T Oil; Engine Crankshaft Seal, Rear; Rear Seal; Seal, Engine Rear Oil; Crankshaft Seal
- Position: Rear
- Replaces: 90311-78003

Scion Rear Main Seal Part Number: 90118-WB428
$28.73 MSRP: $39.99You Save: $11.26 (29%)Ships in 1-3 Business DaysProduct Specifications- Other Name: Seal, Oil; Engine Crankshaft Seal, Rear; Seal, Engine Rear Oil
- Position: Rear
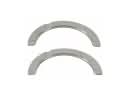
Scion Crankshaft Seal
OEM parts deliver unmatched quality you can rely on. They pass extensive quality control inspections. Scion produces them to the official factory specifications. This process helps prevent defects and imperfections. So you can get exceptional lifespan and a flawless fit. Need new OEM Scion Crankshaft Seal? You'll love our wide selection of genuine options. Shop in minutes and skip the hunt. Our prices are unbeatable, you'll save time and money. It's easy to shop and find the right piece. Our committed customer service team gives professional help from start to finish. Every part includes a manufacturer's warranty. We ship quickly, your parts will arrive fast at your door.
Scion Crankshaft Seal prevents oil drips that are always sneaky and is known to keep the engine running happy and with little friction. In 2003, Scion had entered the streets with tiny rides that required personal paint and playlists. Purchasing one was as easy as sneakers, one price, no bargaining, take the keys and roll. Virtual Scion City was virally publicized which allowed its players to drive down neon streets before they ever laid their hand on a steering wheel. Limited Release Series fueled the fear of missing out and induced young drivers to queue up. Scion applied all the showrooms as experiments to test radical technology, color combinations, and much more that the parent brand was too risky to do. By the time the badge was retired in 2016, Scion had already caught a new generation just to Toyota power. The experiment vindicated that youth desire voice, and not vendor spiel. Color names came out like graffiti and remained in memory after the drive. Crankshaft Seal is fitted at the junction of the crank nose and the block with a rubber lip and hard metal shell to ensure that oil is trapped in place despite the engine getting to redline. Crankshaft Seal also protects bearings against dirt, hence rings, pistons, and timing gear do not experience dry heat. Crankshaft Seal swaps are fast to install, inexpensive, and will reward the entire lineup with more stable idle and cleaner driveways. Crankshaft Seal is susceptible to heat, and thus drivers monitor the appearance of weeps at high miles and replace it before the mess becomes huge.
Scion Crankshaft Seal Parts and Q&A
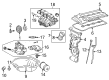
- Q: How to replace the Crankshaft Seal on the 2AZ-FE engine on Scion tC?A:When swapping the timing chain cover oil seal on the 2AZ-FE engine begin by removing the old oil seal through screwdriver tapping and hammer hammering. The oil seal retainer must be placed on wooden blocks before using Special Service Tool: 09223-22010 with a hammer to install the new oil seal until its surface matches the timing gear case edge. The lip of the oil seal has to be clean from foreign substances during this process and you should avoid hitting it with a hammer at a slanted angle. Oiling the outer border of the new oil seal with MP grease serves as a recommended step before putting it into place.
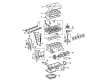
- Q: How to remove the front Crankshaft Seal on Scion xB?A:The 2AZ-FE engine requires you to begin front crankshaft oil seal repair by taking off the front right wheel as well as the right side rear engine under cover. You must first remove the fan and generator V belt before taking off the crankshaft pulley. Special Service Tool 09213-54015 91651-60855 will hold the pulley in place for loosening its bolt. The removal requires employees to use Special Service Tools: 09950-50013 and 09951-05010 to eliminate the crankshaft pulley after which Special Service Tools 09957-04010 and 09950-40011 are employed if necessary to extract the pulley and bolt assembly. Use a screwdriver to extract the oil seal while protecting the crankshaft and oil seal press fit surface by taping the screwdriver tip before starting and removing the oil seal lip using a knife.