×
ToyotaParts- Hello
- Login or Register
- Quick Links
- Live Chat
- Track Order
- Parts Availability
- RMA
- Help Center
- Contact Us
- Shop for
- Toyota Parts
- Scion Parts
My Garage
My Account
Cart
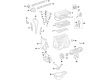
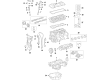
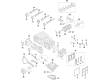
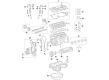
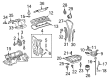
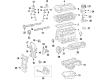
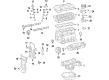
OEM Scion Timing Chain
Engine Timing Chain- Select Vehicle by Model
- Select Vehicle by VIN
Select Vehicle by Model
orMake
Model
Year
Select Vehicle by VIN
For the most accurate results, select vehicle by your VIN (Vehicle Identification Number).
11 Timing Chains found


Scion Timing Chain Part Number: 13506-0T020
$217.84 MSRP: $311.03You Save: $93.19 (30%)Product Specifications- Other Name: Chain Sub-Assembly; Engine Timing Chain
- Manufacturer Note: (L)
- Replaces: 13506-37010


Scion Timing Chain Part Number: 13507-28010
$92.18 MSRP: $129.39You Save: $37.21 (29%)Ships in 1-2 Business DaysProduct Specifications- Other Name: Chain Sub-Assembly, Oil; Engine Timing Chain; Chain; Chain Sub-Assembly
- Replaces: 13507-0H020


Scion Timing Chain Part Number: 13506-0V010
$210.74 MSRP: $300.88You Save: $90.14 (30%)Ships in 1-2 Business DaysProduct Specifications- Other Name: Chain Sub-Assembly; Engine Timing Chain
- Replaces: 13506-0V020, 13506-36010


Scion Timing Chain Part Number: 13506-0H011
$268.87 MSRP: $383.89You Save: $115.02 (30%)Ships in 1-2 Business DaysProduct Specifications- Other Name: Chain Sub-Assembly, Timing; Engine Timing Chain; Chain Sub-Assembly
- Replaces: 13506-28020, 13506-0H031, 13506-28010, 13506-28011, 13506-28021, 13506-0H010


Scion Timing Chain Part Number: SU003-00193
$72.53 MSRP: $94.68You Save: $22.15 (24%)Ships in 1 Business DayProduct Specifications- Other Name: Chain-Timing; Engine Timing Chain; Chain Sub-Assembly


Scion Timing Chain Part Number: 13506-47030
$217.84 MSRP: $311.03You Save: $93.19 (30%)Ships in 1-3 Business DaysProduct Specifications- Other Name: Chain Sub-Assembly, Timing; Chain Sub-Assembly
- Replaces: 13506-47010, 13506-0Y040

Scion Timing Chain Part Number: 13506-21050
$209.11 MSRP: $298.55You Save: $89.44 (30%)Ships in 1-3 Business DaysProduct Specifications- Other Name: Chain Sub-Assembly, Timing; Chain Sub-Assembly

Scion Timing Chain Part Number: 13506-36030
$209.11 MSRP: $298.55You Save: $89.44 (30%)Ships in 1-3 Business DaysProduct Specifications- Other Name: Chain Sub-Assembly; Engine Timing Chain
Scion Timing Chain Part Number: 13506-0T070
$209.11 MSRP: $298.55You Save: $89.44 (30%)Ships in 1-3 Business DaysProduct Specifications- Other Name: Chain Sub-Assembly
- Manufacturer Note: (L)
- Replaces: 13506-37050

Scion Timing Chain Part Number: 13506-WB001
$69.69 MSRP: $97.82You Save: $28.13 (29%)Ships in 1-3 Business DaysProduct Specifications- Other Name: Chain Sub-Assembly, Timing; Chain Sub-Assembly

Scion Chain Part Number: 13507-WB001
$37.95 MSRP: $52.82You Save: $14.87 (29%)Product Specifications- Other Name: Chain Sub-Assembly; Timing Chain
Scion Timing Chain
OEM parts deliver unmatched quality you can rely on. They pass extensive quality control inspections. Scion produces them to the official factory specifications. This process helps prevent defects and imperfections. So you can get exceptional lifespan and a flawless fit. Need new OEM Scion Timing Chain? You'll love our wide selection of genuine options. Shop in minutes and skip the hunt. Our prices are unbeatable, you'll save time and money. It's easy to shop and find the right piece. Our committed customer service team gives professional help from start to finish. Every part includes a manufacturer's warranty. We ship quickly, your parts will arrive fast at your door.
Scion Timing Chain ensures that the engine pistons and the valves move in perfect synchronization to ensure long-term power. Scion began in 2003 directly targeting young drivers who preferred fast bargains and loud paint, and it delivered it to them online within a virtual city before they ever laid their eyes on a showroom. Scion abandoned the art of the haggle and put up a single price, which the purchaser could either walk in, sign, roll out and use the saved brainpower on selecting turquoise dash lights or neon decals. Scion also abandoned cookie-cutter styling, choosing instead to launch regular Release Series runs which maintained buzz because they altered wheels, upholstery and badging after every few thousand units then never repeated the combination. Scion became the trial area of Toyota, experimenting with new technology, color schemes that would be rolled out later in the product range, and it even attracted over 1,000,000 first-time buyers to the family before the badge retired in 2016. Timing Chain involves hardened steel links which have been dipped in oil and they shrug off heat and stretching when rubber belts fail. The crankshaft and twin cams are synchronized with each other by snapped-on sprockets that ensure that the valve timing is within a few degrees at any given opening and blast taking 7,400 rpm, every spark ignites a mixture of air and fuel at precisely the instant it produces maximum torque rather than 1 millisecond later. Timing Chain is dependent on continuous oil pressure and thus omission of changes encourages rattling and skipped teeth which demolish valves. Timing Chain has the first word, and clatters on cold starts to alert you first before nothing goes amiss within the block.
Scion Timing Chain Parts and Q&A
- Q: How to inspect the timing chain and what steps should be taken for replacement on Scion tC?A:Start by checking the No.1 chain tensioner through an inspection of plunger movement and pawl ratchet function before and after release. Vernier caliper measurements of 16 chain links should be taken to determine replacement based on 122.6 mm (4.827 inch) elongation limit. Measure the tensioner slipper wear because replacement should occur when the wear threshold reaches 1.0 mm (0.039 inch). The measurement of wear on the No.1 chain vibration damper should be conducted for replacement when it reaches above 1.0 mm (0.039 inch). A diameter measurement of the crankshaft timing sprocket with the chain wrapped should be less than 51.6 mm (2.031 inches) to require a replacement of the chain sub-assembly and crankshaft timing sprocket. When measuring the oil pump drive gear diameter with a chain it should be replaced if the measurement comes out to less than 48.2 mm (1.898 inch). Replace the oil pump drive shaft gear together with the No. 2 chain sub-assembly when the shaft gear diameter measures below 48.2 mm (1.898 inch). The procedure for replacement requires tapping out the timing chain cover oil seal with a screwdriver and a hammer. Use the retainer on wooden blocks as you drive the new oil seal into place with Special Service Tool: 09223-22010 and a hammer until it reaches full flush with the timing gear case edge. Clean the lip before installation and appropriate MP grease should be applied on the lip surface.
- Q: How to replace the timing chain on Scion xB?A:You must start replacement of the timing chain by first taking out the front wheel RH and subsequently removing the 4 nuts from the cylinder head cover No. 2. Start by disconnecting ignition coil No.1 by pulling out its 4 ignition coils after removing their 4 securing bolts. The cylinder head cover sub-assembly can be taken out after removing 9 bolts combined with 2 nuts and disconnecting the ventilation hoses from both sides of the cover. The next step requires elimination of the fan and generator V-belt then removal of the generator assembly before proceeding with draining engine oil and coolant and removing engine under cover RH. The worker needs to align the timing marks and use Special Service Tools 09213-58012 (91111-50845), 09330-00021 to remove the crankshaft damper sub-assembly pulley bolt. The damper can be taken off with Special Service Tool: 09950-50013 (09951-05010, 09952-05010, 09953-05020, 09954-05021). Remove the oil control valve connector and its bolt and the valve along with the O-ring. Detach the crankshaft position sensor and engine mounting insulator sub-assembly RH by setting a wooden block on a jack under the engine before removing the bolt securing the liquid tube followed by taking 5 bolts and a nut along with the bolt fixing the mount pad. Start by removing the 4 bolts securing the transverse engine mounting bracket then proceed with taking out the oil pump assembly together with its seal. First rotate the camshaft counterclockwise 40 degrees from TDC before proceeding with removing chain tensioner assembly No. 1 while keeping the crankshaft from rotating due to the missing tensioner. Insert the plunger of the tensioner while using a 2.5 mm (0.098 inch) diameter bar for stable holding. The chain tensioner slipper and chain vibration damper Number One needs removal so you can pull out the disjointed chain components. Installation requires positioning the crankshaft to ATDC 40 to 140 degrees then correctly positioning the intake and exhaust timing sprockets at ATDC 20 degrees before resetting the crankshaft to ATDC 20 degrees. The chain vibration damper receives 2 bolts implemented with a torque of 9.0 Nm. Subsequently, align the matchmarks between the camshaft timing sprocket, camshaft timing gear, and crankshaft timing sprocket before installing the chain tensioner slipper and chain tensioner through bolts tightened to 9.0 Nm. Use the bar removed from the chain tensioner to measure the proper tension of the timing sprockets between intake and exhaust camshafts. Before installing the oil pump seal with Special Service Tool: 09950-60010 (09951-00250, 09951-00380, 09952-06010), 09950-70010 (09951-07100) you should place the oil pump assembly then the water pump assembly. Fit the transverse engine mounting bracket using 4 bolts at 55 Nm torque value followed by engine mounting insulator sub-assembly RH with 5 bolts and a nut where Bolt A receives 45 Nm torque and Bolt B achieves 52 Nm torque while Nut acquires 52 Nm torque then finish with a bolt installation of the liquid tube at 9.8 Nm torque value. Lay down the camshaft timing oil control valve assembly with its new O-ring first (Torque: 7.5 Nm) and afterward set the crankshaft position sensor and water pump pulley and crankshaft damper sub-assembly (Torque: 128 Nm). Seal packing (Part No. 08826-00080 or equivalent) needs application to the cylinder head cover sub-assembly before installation with 9 bolts and 2 seal washers and 2 nuts (Torque: 10 Nm). Reinstallation of ignition coil No. 1 (Torque: 9.0 Nm) and cylinder head cover No. 2 (Torque: 7.0 Nm) follows. Allow the generator assembly and the vane pump V-belt and the fan and generator V-belt to mount back into the system, conducting adjustments when required on both belts. The first step requires inspection of drive belt deflection and tension before installing the new gasket on the oil pan drain plug (Torque: 38 Nm) followed by engine under cover RH installation (Using 5.0 Nm torque for bolt and nut). After completing the tasks end with engine oil addition and leak inspection before adding engine coolant and confirming no coolant leakage.


