×
ToyotaParts- Hello
- Login or Register
- Quick Links
- Live Chat
- Track Order
- Parts Availability
- RMA
- Help Center
- Contact Us
- Shop for
- Toyota Parts
- Scion Parts
My Garage
My Account
Cart
OEM Scion tC Crankshaft Seal
- Select Vehicle by Model
- Select Vehicle by VIN
Select Vehicle by Model
orMake
Model
Year
Select Vehicle by VIN
For the most accurate results, select vehicle by your VIN (Vehicle Identification Number).
6 Crankshaft Seals found


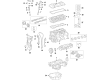
Scion tC Crankshaft Seal, Front Part Number: 90311-A0015
$8.11 MSRP: $11.29You Save: $3.18 (29%)Ships in 1-3 Business Days

Scion tC Rear Main Seal Part Number: 90311-A0020
$29.15 MSRP: $40.57You Save: $11.42 (29%)Ships in 1-2 Business Days

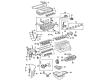
Scion tC Oil Seal, Front Part Number: 90080-31049
$10.27 MSRP: $14.29You Save: $4.02 (29%)Ships in 1-3 Business Days
Scion tC Seal, Engine Rear Oil Part Number: 90311-89015
$29.27 MSRP: $40.74You Save: $11.47 (29%)Ships in 1 Business Day


Scion tC Rear Main Seal Part Number: 90311-89010
$41.57 MSRP: $57.87You Save: $16.30 (29%)Ships in 1-3 Business Days

Scion tC Crankshaft Seal, Front Part Number: 90311-42061
$12.06 MSRP: $16.78You Save: $4.72 (29%)Ships in 1-3 Business Days
Scion tC Crankshaft Seal
Choose genuine Crankshaft Seal that pass strict quality control tests. You can trust the top quality and lasting durability. Shopping for OEM Crankshaft Seal for your Scion tC? Our website is your one-stop destination. We stock an extensive selection of genuine Scion tC parts. The price is affordable so you can save more. It only takes minutes to browse and find the exact fit. Easily add to cart and check out fast. Our hassle-free return policy will keep you stress-free. We process orders quickly for swift delivery. Your parts will arrive faster, so you can get back on the road sooner.
Crankshaft seal is one part used in Scion tC cars that has great significance in affecting the functionality of these automobiles. This Crankshaft Seal is positioned in front of the engine; it is responsible for minimizing leaks in the crankcase hence enhancing the circulation of oil in the engines. Because of the materials used in the Scion tC Crankshaft Seal, which is a blend of metal and rubber, friction and wear and tear on the engine bit parts are reduced and the vehicle becomes more efficient and safe. Compatibility with different tC models is evident and preserves the cars' general integrity since sealing's core purpose remains unchanged in subsequent models. With increasing rankings of the Scion tC particularly with young clients the necessity of a good Crankshaft Seal emerged particularly in automobiles with higher mileage where a worn out crankshaft seal notifies the owners with dire consequences. Any signs of the failure of a Crankshaft Seal should be acted on right away lest other engine issues occur. Interestingly, in the spectrum of automotive spare parts, the Scion tC Crankshaft Seal sets itself as almost invincible and solid part that could be relied on if one owns a Scion tC. This is a worthy investment for anyone who desires to achieve enhanced performance and safety of his/her engine; and at the same time, trickle down benefits of a durable Scion tC Crankshaft Seal.
Scion tC Crankshaft Seal Parts and Q&A
- Q: How to replace the Crankshaft Seal on Scion tC?A:The replacement process for engine rear oil seal (2az-fe) begins by eliminating both manual transaxle assembly and automatic transaxle assembly. use special service tool: 09213-54015 (91651-60855), 09330-00021 to hold the crankshaft during removal of the 8 bolts from the clutch cover assembly while taking away the clutch disc assembly and flywheel sub-assembly. to replace the engine rear oil seal (2az-fe) in automatic transaxles operators should first use their tools to secure the crankshaft before they discard the 8 bolts and rear spacer along with the drive plate and front spacer. the engine rear oil seal removal process begins with knife-cutting the seal lip before insertion of a tipped screwdriver to pry it out. perform damage assessment on the crankshaft and apply 400 grit sandpaper to smooth any rough surfaces. after ensuring the new oil seal lip contains no foreign particles, apply multipurpose grease to it. then use special service tool: 09223-15030, 09950-70010 (09951-07100) along with a hammer to drive the new oil seal until it reaches the rear oil seal retainer edge before wiping off any leftover grease. reinstall the drive plate & ring gear sub-assembly using special service tool: 09213-54015 (91651-60855), 09330-00021 while holding the crankshaft to clean and apply adhesive (part NO. 08833-00070, three bond or equivalent) to 2 or 3 threads of the bolts before uniform bolt tightening at 98 nm (1,000 kgf-cm, 72 ft. lbs.). replace the flywheel sub-assembly by following the earlier installation method while tightening each bolt to 130 nm (1,326 kgf-cm, 96 ft. lbs.). the process ends with installing the clutch disc assembly by using special service tool: 09301-00220 before installing the clutch cover assembly followed by restoring the automatic and manual transaxle assemblies.

Related Scion tC Parts
 Scion tC Engine Cover
 Scion tC Camshaft
 Scion tC Timing Chain Tensioner
 Scion tC Crankshaft Gear
 Scion tC Crankshaft Pulley
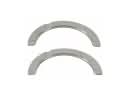 Scion tC Crankshaft Thrust Washer
 Scion tC Cylinder Head Gasket
 Scion tC Intake Valve
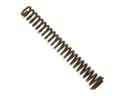 Scion tC Oil Pump Spring
 Scion tC Piston Ring Set
 Scion tC Rocker Arm
 Scion tC Variable Timing Sprocket