My Garage
Cart
Make sure this part fits

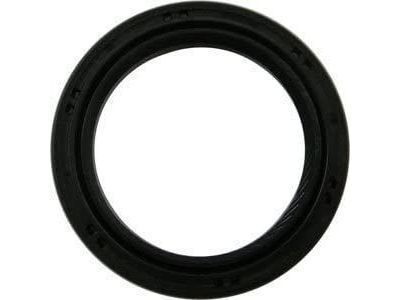
Toyota 90080-31049
Oil Seal, Front

1998-2015 Toyota 9008031049

Customer Questions & Expert Answers (55)
Toyota 90080-31049 Oil Seal, Front
  • Part Description
    Seal, Type T Oil; Engine Crankshaft Seal, Front; Timing Cover Gasket; Multi-Purpose Seal; Timing Cover Seal
  • Part Name Code
    11302A
  • Comment
    (FOR TIMING CHAIN OR BELT COVER)
  • Position
    Front
  • Replaces
    90311-38059, 90080-31060
  • Manufacturer
    Toyota
Make sure this part fits
$9.89 MSRP: $13.77
You Save: $3.88 (29%)
Ships in 1-3 Business Days
1
ADD TO CART
  • Related Parts
  • Product Specifications
  • Vehicle Fitment
  • Customer Questions & Expert Answers
  • Product Specifications

    BrandGenuine Toyota
    Part Name Code11302A
    Manufacturer Part Number90080-31049
    Part DescriptionSeal, Type T Oil; Engine Crankshaft Seal, Front; Timing Cover Gasket; Multi-Purpose Seal; Timing Cover Seal
    Other NamesCrankshaft Seal; Front Seal; Timing Cover Oil Seal; Cover Seal; Oil Seal for Timing Chain/Belt.
    Manufacturer Note(L)
    Item Dimensions2.2 x 2.2 x 0.5 inches
    Item Weight0.50 Pounds
    PositionFront
    ConditionNew
    Fitment TypeDirect Replacement
    Replaces90311-38059, 90080-31060
    ManufacturerToyota
    SKU90080-31049
    WarrantyThis genuine Toyota part is guaranteed by Toyota's factory warranty.
    Shipping & ReturnShipping Policy Return Policy
    Warning: California's Proposition 65
  • Vehicle Fitment

    Year Make Model Trim Engine
    2005-2010 Scion tCBase, Spec4 Cyl 2.4 L GAS
    2008-2015 Scion xBBase4 Cyl 2.4 L GAS
    2008-2014 Scion xDBase4 Cyl 1.8 L GAS
    2002-2011 Toyota CamryBase, CE, Hybrid, LE, SE, XLE4 Cyl 2.4 L FULL HYBRID EV-GAS (FHEV), 4 Cyl 2.4 L GAS
    2000-2005 Toyota CelicaGT, GTS4 Cyl 1.8 L GAS
    1998-2010 Toyota CorollaBase, CE, LE, S, VE, XLE, XRS4 Cyl 1.8 L GAS, 4 Cyl 2.4 L GAS
    2001-2007 Toyota HighlanderBase4 Cyl 2.4 L GAS
    2000-2005 Toyota MR2 SpyderBase4 Cyl 1.8 L GAS
    2003-2008 Toyota MatrixBase, XR, XRS4 Cyl 1.8 L GAS
    2010-2011 Toyota PriusBase4 Cyl 1.8 L FULL HYBRID EV-GAS (FHEV)
    View More
  • Customer Questions & Expert Answers

    Q:
    Will 90080-31049 fit my vehicle? Posted by ToyotaPartsNow Specialist
    A:
    Find out if part number 90080-31049 is the right fit for your car by Selecting Your Vehicle model.
    Posted by ToyotaPartsNow Specialist
    Q:
    How to install the front crankshaft seal on Toyota Camry? Posted by Customer
    A:
    Installing the front crankshaft seal on the 2AZ-FE engine begins with applying MP grease to the lip of a new oil seal that requires a foreign matter-free lip. Users should employ Special Service Tool: 09223-22010 with a hammer to drive the oil seal until its surface matches the rear oil seal retainer edge before cleaning off any remaining grease from the crankshaft. TMMK made engines require the pulley set key to align with the pulley key groove before using Special Service Tool: 09960-10010 and 09962-01000 to fasten and torque the bolt to 180 Nm measurement (1835 kgf-cm, 133 ft-lbf). To install a pulley on TMC made engines, first line up the pulley set key with the key groove before securing the pulley with Special Service Tool: 09213-54015 and 91651-60855 and tightening the bolt using Special Service Tool: 09330-00021 to the specified torque value. The proper sequence following pulley installation consists of V-ribbed belt and engine under cover LH and engine under cover RH installations followed by front fender apron seal RH and front wheel RH and finally an inspection for engine oil leaks.
    Posted by ToyotaPartsNow Specialist
    Q:
    How to replace the Crankshaft Seal on Scion tC? Posted by Customer
    A:
    The replacement process for ENGINE REAR OIL SEAL (2AZ-FE) begins by eliminating BOTH MANUAL TRANSAXLE ASSEMBLY and AUTOMATIC TRANSAXLE ASSEMBLY. Use Special Service Tool: 09213-54015 (91651-60855), 09330-00021 to hold the crankshaft during removal of the 8 bolts from the CLUTCH COVER ASSEMBLY while taking away the CLUTCH DISC ASSEMBLY and FLYWHEEL SUB-ASSEMBLY. To replace the ENGINE REAR OIL SEAL (2AZ-FE) in AUTOMATIC TRANSAXLES operators should first use their tools to secure the crankshaft before they discard the 8 bolts and rear spacer along with the drive plate and front spacer. The ENGINE REAR OIL SEAL removal process begins with knife-cutting the seal lip before insertion of a tipped screwdriver to pry it out. Perform damage assessment on the crankshaft and apply 400 grit sandpaper to smooth any rough surfaces. After ensuring the new oil seal lip contains no foreign particles, apply multipurpose grease to it. Then use Special Service Tool: 09223-15030, 09950-70010 (09951-07100) along with a hammer to drive the new oil seal until it reaches the rear oil seal retainer edge before wiping off any leftover grease. Reinstall the DRIVE PLATE & RING GEAR SUB-ASSEMBLY using Special Service Tool: 09213-54015 (91651-60855), 09330-00021 while holding the crankshaft to clean and apply adhesive (Part No. 08833-00070, THREE BOND or equivalent) to 2 or 3 threads of the bolts before uniform bolt tightening at 98 Nm (1,000 kgf-cm, 72 ft. lbs.). Replace the FLYWHEEL SUB-ASSEMBLY by following the earlier installation method while tightening each bolt to 130 Nm (1,326 kgf-cm, 96 ft. lbs.). The process ends with installing the CLUTCH DISC ASSEMBLY by using Special Service Tool: 09301-00220 before installing the CLUTCH COVER ASSEMBLY followed by restoring the AUTOMATIC and MANUAL TRANSAXLE ASSEMBLIES.
    Posted by ToyotaPartsNow Specialist
    Q:
    How to install the front Crankshaft Seal on Scion xD? Posted by Customer
    A:
    The installation of a new front crankshaft oil seal requires applications of MP grease on its lip for a 2ZR-FE engine. Install the new oil seal using Special Service Tool: 09223-22010 and a hammer until its surface reaches the timing chain cover edge while directing the blows perpendicular to the cover and maintaining the lip free of foreign materials; the pressing depth should stay between -1 mm and 1 mm from the cover edge. Insert the crankshaft pulley set key into its corresponding groove on the pulley while using Special Service Tool: 09213-58013 91651-60855 to secure the pulley before tightening the bolt to 190 Nm (1940 kgf-cm, 140 ft-lbf) using Special Service Tool: 09330-00021. First install the fan together with the generator V belt and check its tension afterward. You need to adjust its position correctly before finishing the inspection. The second step is to install the No. 2 cylinder head cover followed by leak inspection of the engine oil before completing the procedure with RH engine under cover installation.
    Posted by ToyotaPartsNow Specialist
    Q:
    How to remove the front crankshaft seal on Toyota Camry? Posted by Customer
    A:
    The procedure for front crankshaft seal replacement on 2AZ-FXE engines starts with removing the front wheel RH then continuing with removal of the front fender apron seal RH together with LH and RH engine under covers. The maintenance requires removal of both components: V-ribbed belt tensioner cover sub-assembly along with V-ribbed belt. Special Service Tools 09213-54015 91651-60855 and 09950-50013 09951-05010 should be employed to fix the crankshaft pulley in place and loosen the pulley bolt before using additional tools 09952-05010, 09953-05020 and 09954-05021 while also requiring Special Service Tool 09957-04010 09950-40011 as needed to remove the pulley bolt and pulley. Cutting the oil seal lip using a knife and prying it out using a taped screwdriver will enable removal of the timing chain case oil seal. Examine the crankshaft for damages and restore its surface smoothness by using 400-grit sandpaper as required.
    Posted by ToyotaPartsNow Specialist
    Q:
    How to service and repair the front crankshaft seal on Toyota Corolla? Posted by Customer
    A:
    The service and repair procedure for the front crankshaft seal begins by taking off the engine under cover RH and then the front wheel RH. Start by removing the V belt from the fan and generator and then the engine mounting insulator on the right before using Special Service Tool: 09960-10010 (09962-01000, 09963-01000) to remove the crankshaft pulley. You should start by cutting away the lip from the oil seal using a knife then push it out with a screwdriver tape-wrapped for removal of the timing chain or belt cover oil seal. When checking the crankshaft for damage follow by sanding rough areas with 400-grit sandpaper. To tap new oil seals into position use Special Service Tool: 09223-22010 together with a hammer until the surface reaches the timing chain cover edge in a vertical installation while wiping off excess grease from the crankshaft. Using Special Service Tool: 09960-10010 (09962-01000, 09963-01000) you must install the crankshaft pulley followed by the engine mounting insulator RH and then reattach the front wheel RH to the proper torque of 103 Nm (1,050 kgf-cm, 76 ft. lbs.). The last step entails checking for engine oil leakage.
    Posted by ToyotaPartsNow Specialist
    Q:
    How to remove the front Crankshaft Seal on Scion xB? Posted by Customer
    A:
    One should begin crankshaft front oil seal removal from the 2AZ-FE engine by taking away the front right wheel and the rear right engine under cover. You should remove both the fan and generator V belt from the setup. Apply Special Service Tool: 09213-54015 91651-60855 to secure the pulley while loosening its bolt before using Special Service Tool: 09950-50013 09951-05010 to extract the crankshaft pulley. The pulley along with bolt can be extracted through the use of Special Service Tool: 09957-04010: 09950-40011. You can extract the oil seal by using a screwdriver after removing the pulley while minimizing damages to both the press-fit hole and crankshaft; the screwdriver tip needs tape before usage.
    Posted by ToyotaPartsNow Specialist
    Q:
    How to install the front crankshaft seal on Toyota Matrix? Posted by Customer
    A:
    Installing the front crankshaft seal on a 1ZZ-FE engine requires applying multi-purpose grease to the lip of a new oil seal but the lip must stay free from any foreign objects. Through the use of Special Service Tool: 09223-22010 and a hammer users can tap the new oil seal into position until it reaches the timing chain cover edge in a proper vertical position. Additionally users should wipe off any excess grease that accumulated on the crankshaft. The installation of crankshaft pulley requires Special Service Tools: 09962-01000, 09960-10010, and 09963-01000. You should proceed to install the engine mounting insulator RH. The front RH wheel must be installed afterward with a torque setting of 103 Nm (1,050 kgf-cm, 76 ft-lbf). Examine the engine for possible oil leaks during the last inspection procedure.
    Posted by ToyotaPartsNow Specialist
    Q:
    How to properly install a Crankshaft Seal and its associated components on Toyota Solara? Posted by Customer
    A:
    The installation process of the engine rear oil seal requires MP grease application to the lip of a new oil seal followed by maintenance of its purity from foreign substances. You must use Special Service Tool: 09223-15030 09950-70010 and a hammer to tap the oil seal inside until its surface reaches flush with the rear oil seal retainer edge before wiping off excess grease from the crankshaft. Fix the crankshaft with Special Service Tool: 09960-10010 09962-01000 09963-01000 then clean the bolt hole and adhesive the first three threads of the bolt end using Toyota Genuine Adhesive 1324 or Three Bond 1324 or equivalent product before installing the front spacer followed by drive plate and rear spacer with 8 bolts tightened to 98 Nm (1,000 kgf-cm, 72 ft-lbf) in specified bolt sequence. Again fix the crankshaft using Special Service Tools: 09960-10010 09962-01000 09963-01000 before cleaning the bolt and bolt hole and applying adhesive to 2 or 3 bolt threads at its end. Secure the flywheel with eight bolts while tightening them uniformly to 130 Nm (1,330 kgf-cm, 96 ft-lbf) torque using the specified sequence. Begin by placing in position the clutch disc assembly (M/T) and the clutch cover assembly (M/T) followed by the automatic transaxle assembly (A/T) or the manual transaxle assembly (M/T). Make sure to install the engine assembly with transaxle at a time after the transaxle.
    Posted by ToyotaPartsNow Specialist
    Q:
    What should be done after removing the crankshaft pulley for the 2005 Scion tC? Posted by Customer
    A:
    Remove the timing gear case or timing chain case oil seal by cutting off the oil seal lip with a knife and prying it out with a screwdriver wrapped in tape.
    Posted by ToyotaPartsNow Specialist
    See expert answers on similar Crankshaft Seal
    Q:
    What should be done for a manual transaxle (M/T) for the 2005 Toyota Camry? Posted by Customer
    A:
    For M/T, also remove the transaxle after the engine assembly.
    Posted by ToyotaPartsNow Specialist
    See expert answers on similar Crankshaft Seal
    Q:
    What is the next step after inspecting the V belt for the 2010 Scion xD? Posted by Customer
    A:
    Install the No. 2 cylinder head cover.
    Posted by ToyotaPartsNow Specialist
    See expert answers on similar Crankshaft Seal
    Q:
    What steps should be taken for the automatic transaxle for the 2008 Scion xB? Posted by Customer
    A:
    For the automatic transaxle, remove the drive plate and ring gear sub-assembly using Special Service Tool: 09213-54015 91651-60855 to hold the crankshaft, then remove the 8 bolts, rear drive plate spacer, drive plate, and front drive plate spacer.
    Posted by ToyotaPartsNow Specialist
    See expert answers on similar Crankshaft Seal
    Q:
    What should be done after removing the oil seal for the 2009 Scion xD? Posted by Customer
    A:
    Check the crankshaft for damage; if any is found, smooth the surface with 400-grit sandpaper.
    Posted by ToyotaPartsNow Specialist
    See expert answers on similar Crankshaft Seal
    Q:
    What is the next step after removing the engine mounting components for the 2006 Toyota Camry? Posted by Customer
    A:
    Take off the fan and generator V belt, followed by the crankshaft pulley.
    Posted by ToyotaPartsNow Specialist
    See expert answers on similar Crankshaft Seal
    Q:
    What is the procedure for the manual transaxle installation for the 2010 Scion xB? Posted by Customer
    A:
    Clean the 8 bolts and bolt holes, apply adhesive to 2 or 3 threads of the bolts, hold the crankshaft with Special Service Tool: 09213-54015 91651-60855, and uniformly install and tighten the 8 bolts in the specified sequence to a torque of 130 Nm (1326 kgf-cm, 96 ft-lbf).
    Posted by ToyotaPartsNow Specialist
    See expert answers on similar Crankshaft Seal
    Q:
    What is the first step to install the front crankshaft oil seal on a 2ZR-FE engine for the 2008 Scion xD? Posted by Customer
    A:
    Apply MP grease to the lip of a new oil seal.
    Posted by ToyotaPartsNow Specialist
    See expert answers on similar Crankshaft Seal
    Q:
    What tools are needed for the automatic transaxle removal for the 2007 Toyota Camry? Posted by Customer
    A:
    Special Service Tool: 09960-10010 (09962-01000, 09963-01000) for TMMK made or Special Service Tool: 09213-54015 (91651-60855), 09330-00021 for TMC made.
    Posted by ToyotaPartsNow Specialist
    See expert answers on similar Crankshaft Seal
    Q:
    How do you install the rear crankshaft oil seal for the 2009 Scion xB? Posted by Customer
    A:
    Apply MP grease to the lip of a new oil seal, then use Special Service Tool: 09223-15030 09950-70010 and a hammer to tap in the oil seal until its surface is flush with the rear oil seal retainer edge, ensuring the lip remains free from foreign matter and avoiding tapping at an angle.
    Posted by ToyotaPartsNow Specialist
    See expert answers on similar Crankshaft Seal
    Q:
    How do you install the new oil seal for the 2008 Scion tC? Posted by Customer
    A:
    Use a hammer to tap in the new oil seal until its surface is flush with the timing gear case edge.
    Posted by ToyotaPartsNow Specialist
    See expert answers on similar Crankshaft Seal
    Q:
    How do you remove the crankshaft pulley for TMC made for the 2003 Toyota Camry? Posted by Customer
    A:
    Use Special Service Tool: 09213-54015 (91651-60855), 09330-00021 to loosen the pulley bolt and Special Service Tool: 09950-50013 (09951-05010, 09952-05010, 09953-05020, 09954-05021) to remove it.
    Posted by ToyotaPartsNow Specialist
    See expert answers on similar Crankshaft Seal
    Q:
    What is the final step after installing the flywheel sub-assembly in a manual transaxle for the 2008 Scion xB? Posted by Customer
    A:
    Proceed to install the clutch disc assembly and clutch cover assembly for the manual transaxle, and finally, install the automatic transaxle assembly or manual transaxle assembly as applicable.
    Posted by ToyotaPartsNow Specialist
    See expert answers on similar Crankshaft Seal
    Q:
    What is the next step after reinstalling the flywheel for the 2004 Toyota Corolla? Posted by Customer
    A:
    Install the clutch disc assembly using Special Service Tool: 09301-00210, followed by the clutch cover assembly.
    Posted by ToyotaPartsNow Specialist
    See expert answers on similar Crankshaft Seal
    Q:
    What is the method for removing the timing gear cover oil seal for the 2003 Toyota Corolla? Posted by Customer
    A:
    Cut off the oil seal lip with a knife and pry it out using a screwdriver with a taped tip, checking the crankshaft for damage and repairing it with sandpaper (#400) if necessary.
    Posted by ToyotaPartsNow Specialist
    See expert answers on similar Crankshaft Seal
    Q:
    What should be done to the bolts before installing the flywheel for the 2010 Toyota Camry? Posted by Customer
    A:
    Clean the bolt and bolt hole, apply adhesive (Part No. 08833-00070, Three Bond or equivalent) to 2 or 3 threads of the bolt end.
    Posted by ToyotaPartsNow Specialist
    See expert answers on similar Crankshaft Seal
    Q:
    What is the torque specification for reinstalling the fan and generator V belt for the 2003 Toyota Highlander? Posted by Customer
    A:
    52 Nm (531 kgf-cm, 38 ft. lbs.).
    Posted by ToyotaPartsNow Specialist
    See expert answers on similar Crankshaft Seal
    Q:
    What is the procedure for reinstalling the DRIVE PLATE & RING GEAR SUB-ASSEMBLY for the 2005 Toyota Corolla? Posted by Customer
    A:
    Hold the crankshaft with Special Service Tool: 09960-10010, clean the bolts and bolt holes, apply adhesive to 2 or 3 threads of the 8 bolts, and tighten them uniformly to a torque of 88 Nm (897 kgf-cm, 65 ft. lbs.).
    Posted by ToyotaPartsNow Specialist
    See expert answers on similar Crankshaft Seal
    Q:
    What should be done if necessary after removing the pulley for the 2008 Toyota Camry? Posted by Customer
    A:
    Remove the pulley and pulley bolt using Special Service Tool.
    Posted by ToyotaPartsNow Specialist
    See expert answers on similar Crankshaft Seal
    Q:
    What is the next step after installing the crankshaft pulley for the 2008 Toyota Corolla? Posted by Customer
    A:
    Install the engine mounting insulator RH.
    Posted by ToyotaPartsNow Specialist
    See expert answers on similar Crankshaft Seal
    Q:
    What is the torque specification for installing engine mounting stay No. 2 RH for the 2006 Toyota Highlander? Posted by Customer
    A:
    Install engine mounting stay No. 2 RH with a torque of 64 Nm (653 kgf-cm, 47 ft. lbs.).
    Posted by ToyotaPartsNow Specialist
    See expert answers on similar Crankshaft Seal
    Q:
    What is the process for reinstalling the drive plate and ring gear sub-assembly for the 2002 Toyota Highlander? Posted by Customer
    A:
    Fix the crankshaft again with Special Service Tool: 09213-54015 (91651-60855), clean the bolts and bolt holes, apply adhesive (Part No. 08833-00070, THREE BOND or equivalent) to 2 or 3 threads of the bolt end, and then install and uniformly tighten the 8 bolts in the specified sequence to a torque of 98 Nm (1,000 kgf-cm, 72 ft. lbs.).
    Posted by ToyotaPartsNow Specialist
    See expert answers on similar Crankshaft Seal
    Q:
    What should be done for a manual transaxle for the 2009 Toyota Corolla? Posted by Customer
    A:
    Remove the manual transaxle assembly.
    Posted by ToyotaPartsNow Specialist
    See expert answers on similar Crankshaft Seal
    Q:
    What is the procedure for a crankshaft pulley made in TMC for the 2009 Toyota Camry? Posted by Customer
    A:
    Use Special Service Tool: 09213-54015 and 91651-60855 to secure the pulley and loosen the bolt, then use Special Service Tool: 09950-50013 and 09951-05010 to remove the pulley bolt and pulley.
    Posted by ToyotaPartsNow Specialist
    See expert answers on similar Crankshaft Seal
    Q:
    What should you do after installing the oil seal for the 2006 Toyota Corolla? Posted by Customer
    A:
    Wipe off any excess grease on the crankshaft.
    Posted by ToyotaPartsNow Specialist
    See expert answers on similar Crankshaft Seal
    Q:
    What is the first step to replace the engine rear oil seal for the 2004 Toyota Highlander? Posted by Customer
    A:
    First, remove the automatic transaxle assembly after taking out the engine assembly with the transaxle.
    Posted by ToyotaPartsNow Specialist
    See expert answers on similar Crankshaft Seal
    Q:
    How do you reinstall the flywheel sub-assembly for the 2005 Toyota Matrix? Posted by Customer
    A:
    Use the same procedure as the drive plate & ring gear sub-assembly, applying adhesive to the bolts, tightening them to 49 Nm (500 kgf-cm, 36 ft. lbs.), marking them with paint, and then retightening them 90° in the same sequence, ensuring the paint marks are at a 90° angle from the original position.
    Posted by ToyotaPartsNow Specialist
    See expert answers on similar Crankshaft Seal
    Q:
    How do you reinstall the drive plate and ring gear sub-assembly for the 2002 Toyota Camry? Posted by Customer
    A:
    Fix the crankshaft with the same special service tools, clean the bolts and holes, apply adhesive to 2 or 3 threads of the bolt end, and uniformly tighten the 8 bolts to a torque of 98 Nm.
    Posted by ToyotaPartsNow Specialist
    See expert answers on similar Crankshaft Seal
    Q:
    How do you remove the old oil seal for the 2004 Toyota Camry? Posted by Customer
    A:
    Cut off the oil seal lip with a knife and pry out the oil seal using a screwdriver with its tip wrapped in tape.
    Posted by ToyotaPartsNow Specialist
    See expert answers on similar Crankshaft Seal
    Q:
    What should be checked after removing the oil seal for the 2007 Toyota Corolla? Posted by Customer
    A:
    Check the crankshaft for damage and smooth any rough areas with 400-grit sandpaper.
    Posted by ToyotaPartsNow Specialist
    See expert answers on similar Crankshaft Seal
    Q:
    What needs to be done after removing the V-belt for the 2004 Toyota Matrix? Posted by Customer
    A:
    Remove the engine mounting insulator sub-assembly RH by taking out the PS oil pump reservoir and placing a wooden block between the jack and engine before setting the jack. Then, remove the 4 bolts and 2 nuts securing the engine mounting insulator RH.
    Posted by ToyotaPartsNow Specialist
    See expert answers on similar Crankshaft Seal
    Q:
    What should be done after removing the oil seal for the 2008 Toyota Matrix? Posted by Customer
    A:
    Check the crankshaft for any damage and, if necessary, smooth the surface with 400-grit sandpaper.
    Posted by ToyotaPartsNow Specialist
    See expert answers on similar Crankshaft Seal
    Q:
    What is the first step to replace the timing chain for the 2006 Toyota RAV4? Posted by Customer
    A:
    Remove the timing chain cover oil seal by tapping it out with a screwdriver and hammer.
    Posted by ToyotaPartsNow Specialist
    See expert answers on similar Crankshaft Seal
    Q:
    How do you remove the timing chain or belt cover oil seal for the 2006 Toyota Matrix? Posted by Customer
    A:
    Cut off the oil seal lip with a knife and pry it out with a screwdriver wrapped in tape.
    Posted by ToyotaPartsNow Specialist
    See expert answers on similar Crankshaft Seal
    Q:
    What is the first step to replace the timing chain cover oil seal for the 2008 Toyota RAV4? Posted by Customer
    A:
    Use a screwdriver and hammer to tap out the old oil seal.
    Posted by ToyotaPartsNow Specialist
    See expert answers on similar Crankshaft Seal
    Q:
    What is the final step after reinstalling the drive plate and ring gear subassembly for the 2007 Toyota Highlander? Posted by Customer
    A:
    Reinstall the automatic transaxle assembly.
    Posted by ToyotaPartsNow Specialist
    See expert answers on similar Crankshaft Seal
    Q:
    How do you prepare the new oil seal for installation for the 2003 Toyota Matrix? Posted by Customer
    A:
    Apply MP grease to the lip of the new oil seal, ensuring it is free from foreign materials.
    Posted by ToyotaPartsNow Specialist
    See expert answers on similar Crankshaft Seal
    Q:
    How do you install the new engine rear oil seal for the 2005 Toyota Highlander? Posted by Customer
    A:
    Apply MP grease to the oil seal lip, ensuring it is free from foreign matter, and use Special Service Tool: 09223-15030, 09950-70010 (09951-07100) and a hammer to tap in the oil seal until its surface is flush with the rear oil seal retainer edge, wiping off any extra grease from the crankshaft.
    Posted by ToyotaPartsNow Specialist
    See expert answers on similar Crankshaft Seal
    Q:
    What is the procedure to remove the engine rear oil seal for the 2001 Toyota Highlander? Posted by Customer
    A:
    Cut off the oil seal lip with a knife and pry out the oil seal using a screwdriver with its tip taped.
    Posted by ToyotaPartsNow Specialist
    See expert answers on similar Crankshaft Seal
    Q:
    What is the next step after installing the oil seal for the 2007 Toyota Matrix? Posted by Customer
    A:
    Install the crankshaft pulley using Special Service Tool: 09960-10010 (09962-01000, 09963-01000).
    Posted by ToyotaPartsNow Specialist
    See expert answers on similar Crankshaft Seal
    Q:
    What should be done if the timing chain cover is removed for the 2005 Toyota RAV4? Posted by Customer
    A:
    Use a screwdriver and a hammer to tap out the oil seal, then utilize Special Service Tool: 09309-37010 and a hammer to tap in a new oil seal until its surface is flush with the timing chain cover edge, followed by applying MP grease to the oil seal lip.
    Posted by ToyotaPartsNow Specialist
    See expert answers on similar Crankshaft Seal
    Q:
    How do you install a new oil seal for the 2006 Toyota Solara? Posted by Customer
    A:
    Apply MP grease to the lip of a new oil seal, ensuring it is free from foreign matter, and use Special Service Tool: 09223-15030, 09950-70010 (09951-07100) and a hammer to tap in the oil seal until flush with the rear oil seal retainer edge, wiping off any excess grease from the crankshaft.
    Posted by ToyotaPartsNow Specialist
    See expert answers on similar Crankshaft Seal
    Q:
    Is the procedure different for the manual transaxle assembly for the 2008 Toyota Solara? Posted by Customer
    A:
    No, follow the same procedure for the manual transaxle assembly.
    Posted by ToyotaPartsNow Specialist
    See expert answers on similar Crankshaft Seal
    Q:
    What is the process for reinstalling the flywheel sub-assembly for the 2007 Toyota Solara? Posted by Customer
    A:
    Repeat the process of fixing the crankshaft, cleaning the bolt and bolt hole, applying adhesive, and installing the flywheel with 8 bolts, uniformly tightening them to a torque of 130 Nm (1,330 kgf-cm, 96 ft. lbs.).
    Posted by ToyotaPartsNow Specialist
    See expert answers on similar Crankshaft Seal
    Q:
    What is the first step to replace the engine rear oil seal for the 2004 Toyota Solara? Posted by Customer
    A:
    First, separate the automatic transaxle assembly (A/T) or the manual transaxle assembly (M/T) after removing the engine assembly with the transaxle.
    Posted by ToyotaPartsNow Specialist
    See expert answers on similar Crankshaft Seal
    Q:
    What are the steps for A/T when removing the drive plate and ring gear sub-assembly for the 2005 Toyota Solara? Posted by Customer
    A:
    Remove the drive plate and ring gear sub-assembly by fixing the crankshaft with Special Service Tool: 09960-10010 (09962-01000, 09963-01000) and then remove the 8 bolts, rear spacer, drive plate, and front spacer.
    Posted by ToyotaPartsNow Specialist
    See expert answers on similar Crankshaft Seal
    If you have any questions about this product, please don't hesitate to ask us. We will be happy to help you!

OEM Toyota 90080-31049, Excellent Performance and Perfect Fitment

To ensure reliability, purchase Toyota part # 90080-31049 Oil Seal, Front. It is sometimes referred to as Toyota Crankshaft Seal. OEM parts are unrivaled in terms of quality. They go through extensive quality control inspections and are produced in accordance with Toyota's official factory specifications. All of these remove defects and imperfections. So you can relax knowing they promise exceptional lifespan and flawless fitment.

ToyotaPartsNow.com is a leading supplier of genuine Toyota parts such as Toyota 9008031049 Oil Seal, Front. At ToyotaPartsNow.com, we have a wide variety of OEM Toyota parts available at competitive prices. Our comprehensive range of genuine Toyota parts come with a manufacturer's warranty for peace of mind. We also prioritize customer satisfaction, providing a hassle-free return policy and expedited delivery for all our parts. For detailed Toyota parts information, click here.
Choose ToyotaPartsNow for discounted prices, exceptional service and fast delivery