×
ToyotaParts- Hello
- Login or Register
- Quick Links
- Live Chat
- Track Order
- Parts Availability
- RMA
- Help Center
- Contact Us
- Shop for
- Toyota Parts
- Scion Parts
My Garage
My Account
Cart
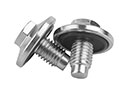
OEM Scion xD Crankshaft Seal
- Select Vehicle by Model
- Select Vehicle by VIN
Select Vehicle by Model
orMake
Model
Year
Select Vehicle by VIN
For the most accurate results, select vehicle by your VIN (Vehicle Identification Number).
3 Crankshaft Seals found


Scion xD Oil Seal, Front Part Number: 90080-31049
$10.27 MSRP: $14.29You Save: $4.02 (29%)Ships in 1-3 Business Days
Scion xD Oil Seal, Front Part Number: 90311-A0018
$12.18 MSRP: $16.95You Save: $4.77 (29%)Ships in 1-2 Business Days
Scion xD Rear Main Seal Part Number: 90311-A0013
$50.78 MSRP: $70.68You Save: $19.90 (29%)Ships in 1 Business Day
Scion xD Crankshaft Seal
Choose genuine Crankshaft Seal that pass strict quality control tests. You can trust the top quality and lasting durability. Shopping for OEM Crankshaft Seal for your Scion xD? Our website is your one-stop destination. We stock an extensive selection of genuine Scion xD parts. The price is affordable so you can save more. It only takes minutes to browse and find the exact fit. Easily add to cart and check out fast. Our hassle-free return policy will keep you stress-free. We process orders quickly for swift delivery. Your parts will arrive faster, so you can get back on the road sooner.
The Scion xD Crankshaft Seal is a very important part to acknowledge as it accentuates the dependability and power of the Scion xD series. Fitted in the front of the engine, this Crankshaft Seal is strategically developed in order to avoid excessive crank case oil leakage while lubricating the engine. Made from sturdy steel and synthetic rubber like material, this Scion xD Crankshaft Seal helps reduce the level of friction on the engine, thus improving its durability and performance. Because of its versatility in fitting different Scion xD models, the Scion access twist is an ideal car part for drivers, looking to keep their car performing optimally. In particular, the Crankshaft Seal must be checked on a regular basis, since its deterioration and, therefore, oil seepage can threaten engine reliability. The Scion xD with its good fuel economy of 27 mpg in the city and 33 mpg on the highway, it has a perfect Crankshaft Seal that adds to its smooth and great handling. Furthermore, the Scion xD Crankshaft Seal seems to be of more rigid construction as compared to other automobiles currently in the market, and one can be able to rely on his or her automobile under different aspects of driving. Thus Spekulatively, Consumers who would like to have improved performance of the Scion xD with attractive features such as anti-lock brakes and a 2ZR-FE DOHC engine can consider the Crankshaft Seal to be a commendable component that will give them both safety and an enjoyable driving experience to boot.
Scion xD Crankshaft Seal Parts and Q&A
- Q: How to install the front Crankshaft Seal on Scion xD?A:The installation of a new front crankshaft oil seal requires applications of MP grease on its lip for a 2ZR-FE engine. Install the new oil seal using Special Service Tool: 09223-22010 and a hammer until its surface reaches the timing chain cover edge while directing the blows perpendicular to the cover and maintaining the lip free of foreign materials; the pressing depth should stay between -1 mm and 1 mm from the cover edge. Insert the crankshaft pulley set key into its corresponding groove on the pulley while using Special Service Tool: 09213-58013 91651-60855 to secure the pulley before tightening the bolt to 190 Nm (1940 kgf-cm, 140 ft-lbf) using Special Service Tool: 09330-00021. First install the fan together with the generator V belt and check its tension afterward. You need to adjust its position correctly before finishing the inspection. The second step is to install the No. 2 cylinder head cover followed by leak inspection of the engine oil before completing the procedure with RH engine under cover installation.
- Q: How to remove the Crankshaft Seal on Scion xD?A:The Crankshaft Main Bearing Seal removal process for 2ZR-FE engines requires that operators begin with fuel system pressure discharge followed by battery removal combined with battery tray extraction before proceeding to take off front wheels and both engine under covers. The technician needs to drain engine fluid from all applicable systems including coolant and both transmission fluids. Begin repair work by taking off the front wiper arm head cap before removing both front wiper arm and blade assemblies as well as the hood to cowl top seal together with the cowl top ventilator louver sub-assembly and its left and right components. Remove the front Wiper Motor and link and the front air shutter seal on the right before taking out the outer cowl top panel, air cleaner assembly along with its bracket, and battery carrier. The service technician must disassemble seven components from the front of the engine: No. 2 Cylinder Head Cover, Fan-Generator V belt, No. 2 Radiator Hose, Front Bumper Cover, and Separating these components are the No. 1 Radiator Hose, No. 1 Oil Cooler Outlet Hose, No. 2 Oil Cooler Inlet Hose, Hood Lock Assembly and No. 1 Cooler Cover. The upper radiator support absorber then the upper radiator support sub-assembly and lastly the radiator assembly must be removed. This list includes the separation of pulley compressor assembly combined with transmission control cable assembly for both automatic and manual transaxles, union to check valve hose, No. 1 fuel vapor feed hose, engine wire, heater water outlet hose A, heater water inlet hose A, and fuel tube sub-assembly. The clutch release cylinder assembly must be separated and technicians should remove the column hole cover silencer sheet together with the steering sliding yoke sub-assembly and the No. 1 steering column hole cover sub-assembly. You must remove the shift lever knob sub-assembly for manual transaxle together with the console panel upper, console box rear cover, console box carpet and rear console box assembly and front console box. Perform front floor brace center removal alongside front Exhaust Pipe assembly extraction and left-hand front Axle Shaft nut separation then right-hand front axle shaft nut removal while keeping in mind the removal method for the right side mirrors the left. The technicians should separate Speed Sensors from both front sides as well as tie rod end sub-assemblies from both sides and front stabilizer link assemblies and front lower suspension arm sub-assemblies from both sides. Both sides require separating their front axle assemblies and removing their front drive shaft assemblies alongside the flywheel housing under cover for automatic transaxle and its drive plate with torque converter clutch setting bolt simultaneously with the engine assembly that includes the transaxle. To perform the removal operation the technician must take off the front suspension crossmember sub-assembly followed by the flywheel housing side cover, Starter assembly, No. 1 oil cooler inlet tube, No. 1 oil cooler outlet tube, and No. 2 oil cooler tube clamp for automatic transaxle. To proceed with automatic transaxle replacement begin by extracting the transmission oil level gauge sub-assembly then break apart the transmission oil filler tube sub-assembly before extracting the automatic transaxle assembly. The removal process starts with No. 1 transmission control cable bracket then manual transaxle assembly followed by clutch cover assembly, clutch disc assembly and drive plate with ring gear sub-assembly for automatic transaxle and the flywheel sub-assembly for manual transaxle. You should remove the engine rear oil seal by using a screwdriver to cut off the seal lip before prying it out while inspecting the crankshaft for damage and using 400-grit sandpaper to smooth the surface if required.