×
ToyotaParts- Hello
- Login or Register
- Quick Links
- Live Chat
- Track Order
- Parts Availability
- RMA
- Help Center
- Contact Us
- Shop for
- Toyota Parts
- Scion Parts
My Garage
My Account
Cart
OEM Scion Coil Springs
Strut Spring- Select Vehicle by Model
- Select Vehicle by VIN
Select Vehicle by Model
orMake
Model
Year
Select Vehicle by VIN
For the most accurate results, select vehicle by your VIN (Vehicle Identification Number).
32 Coil Springs found


Scion Coil Spring, Rear Part Number: 48231-52650
$123.72 MSRP: $175.13You Save: $51.41 (30%)Ships in 1-3 Business DaysProduct Specifications- Other Name: Spring, Coil, Rear; Coil Spring, Rear; Coil Springs; Spring; Spring, Coil, Rear Passenger Side; Spring, Coil, Rear Driver Side
- Position: Rear


Scion Coil Spring, Rear Part Number: 48231-12D70
$67.77 MSRP: $95.12You Save: $27.35 (29%)Ships in 1-3 Business DaysProduct Specifications- Other Name: Spring, Coil, Rear; Coil Spring, Rear; Coil Springs; Spring; Spring, Coil, Rear Passenger Side; Spring, Coil, Rear Driver Side
- Position: Rear


Scion Coil Spring, Rear Part Number: 48231-52D21
$106.16 MSRP: $149.02You Save: $42.86 (29%)Ships in 1-3 Business DaysProduct Specifications- Other Name: Spring, Coil, Rear; Coil Spring, Rear; Coil Springs; Spring; Spring, Coil, Rear Passenger Side; Spring, Coil, Rear Driver Side
- Position: Rear
- Replaces: 48231-52D20

Scion Coil Spring, Rear Part Number: 48231-52170
$125.24 MSRP: $177.30You Save: $52.06 (30%)Ships in 1-3 Business DaysProduct Specifications- Other Name: Spring, Coil, Rear; Coil Spring, Rear; Coil Spring Rear; Coil Springs; Spring; Spring, Coil, Rear Passenger Side; Spring, Coil, Rear Driver Side
- Position: Rear


Scion Spring, Lower Part Number: PTR07-74110
$300.43 MSRP: $428.94You Save: $128.51 (30%)Ships in 1-3 Business DaysProduct Specifications- Other Name: Trd Iq Lower Springs; Coil Spring, Front, Rear; Coil Springs
- Position: Lower


Scion Coil Spring, Rear Part Number: 48231-21241
$72.75 MSRP: $102.11You Save: $29.36 (29%)Ships in 1 Business DayProduct Specifications- Other Name: Spring, Coil, Rear; Coil Spring, Rear; Coil Springs; Spring; Spring, Coil, Rear Passenger Side; Spring, Coil, Rear Driver Side
- Position: Rear
- Replaces: 48231-21240


Scion Coil Spring, Front Part Number: 48131-21430
$72.75 MSRP: $102.11You Save: $29.36 (29%)Ships in 1-3 Business DaysProduct Specifications- Other Name: Spring, Coil, Front; Coil Spring, Front; Coil Springs; Spring; Spring, Front Coil, Passenger Side; Spring, Front Coil, Driver Side
- Position: Front


Scion Coil Spring, Front Part Number: 48131-52550
$94.31 MSRP: $132.39You Save: $38.08 (29%)Ships in 1-3 Business DaysProduct Specifications- Other Name: Spring, Coil, Front; Coil Spring, Front; Coil Springs; Spring; Spring, Front Coil, Passenger Side; Spring, Front Coil, Driver Side
- Position: Front


Scion Coil Spring, Rear Part Number: 48231-52640
$105.69 MSRP: $148.35You Save: $42.66 (29%)Ships in 1-2 Business DaysProduct Specifications- Other Name: Spring, Coil, Rear; Coil Spring, Rear; Coil Springs; Spring; Spring, Coil, Rear Passenger Side; Spring, Coil, Rear Driver Side
- Position: Rear


Scion Coil Spring, Rear Part Number: SU003-04147
$64.27 MSRP: $83.90You Save: $19.63 (24%)Ships in 1-3 Business DaysProduct Specifications- Other Name: Coil Spring Rear; Coil Spring, Rear; Coil Springs; Spring; Spring, Coil, Rear Passenger Side; Spring, Coil, Rear Driver Side
- Position: Rear


Scion Coil Spring, Rear Part Number: 48231-74080
$74.05 MSRP: $103.94You Save: $29.89 (29%)Ships in 1-3 Business DaysProduct Specifications- Other Name: Spring, Coil, Rear; Coil Spring, Rear; Coil Springs; Spring; Spring, Coil, Rear Passenger Side; Spring, Coil, Rear Driver Side
- Position: Rear

Scion Coil Spring, Front Part Number: 48131-12D20
$65.99 MSRP: $92.63You Save: $26.64 (29%)Ships in 1-3 Business DaysProduct Specifications- Other Name: Spring, Coil, Front; Coil Spring, Front; Coil Springs; Spring; Spring, Front Coil, Passenger Side; Spring, Front Coil, Driver Side
- Position: Front
Scion Spring, Front Part Number: 48131-12D40
$66.85 MSRP: $93.83You Save: $26.98 (29%)Ships in 1-3 Business DaysProduct Specifications- Other Name: Spring, Coil, Front; Coil Springs; Spring, Front Coil, Passenger Side; Spring, Front Coil, Driver Side
- Position: Front
Scion Coil Spring, Front Part Number: 48131-21410
$72.75 MSRP: $102.11You Save: $29.36 (29%)Ships in 1-3 Business DaysProduct Specifications- Other Name: Spring, Coil, Front; Coil Spring, Front; Coil Springs; Spring; Spring, Front Coil, Passenger Side; Spring, Front Coil, Driver Side
- Position: Front
Scion Coil Spring, Front Part Number: 48131-12D30
$76.66 MSRP: $107.60You Save: $30.94 (29%)Ships in 1-3 Business DaysProduct Specifications- Other Name: Spring, Coil, Front; Coil Spring, Front; Coil Springs; Spring; Spring, Front Coil, Passenger Side; Spring, Front Coil, Driver Side
- Position: Front

Scion Coil Spring, Front Part Number: 48131-WB004
$75.71 MSRP: $106.28You Save: $30.57 (29%)Ships in 1-3 Business DaysProduct Specifications- Other Name: Spring, Coil, Front; Coil Spring, Front; Coil Springs; Spring; Spring, Front Coil, Passenger Side; Spring, Front Coil, Driver Side
- Position: Front
- Replaces: 48131-WB002
Scion Spring, Front Part Number: 48131-12A70
$78.55 MSRP: $110.26You Save: $31.71 (29%)Ships in 1-3 Business DaysProduct Specifications- Other Name: Spring, Coil, Front; Coil Springs; Spring, Front Coil, Passenger Side; Spring, Front Coil, Driver Side
- Position: Front
Scion Coil Spring, Front Part Number: 48131-74080
$79.03 MSRP: $110.93You Save: $31.90 (29%)Ships in 1-3 Business DaysProduct Specifications- Other Name: Spring, Coil, Front; Coil Spring, Front; Coil Springs; Spring; Spring, Front Coil, Passenger Side; Spring, Front Coil, Driver Side
- Position: Front


Scion Coil Spring, Front Part Number: 48131-12F30
$83.89 MSRP: $117.75You Save: $33.86 (29%)Product Specifications- Other Name: Spring, Coil, Front; Coil Spring, Front; Coil Springs; Spring; Spring, Front Coil, Passenger Side; Spring, Front Coil, Driver Side
- Position: Front

Scion Coil Spring, Rear Part Number: 48231-WB006
$34.05 MSRP: $47.38You Save: $13.33 (29%)Product Specifications- Other Name: Spring, Coil, Rear; Coil Spring, Rear; Coil Springs; Spring; Spring, Coil, Rear Passenger Side; Spring, Coil, Rear Driver Side
- Position: Rear
- Replaces: 48231-WB001
| Page 1 of 2 |Next >
1-20 of 32 Results
Scion Coil Springs
OEM parts deliver unmatched quality you can rely on. They pass extensive quality control inspections. Scion produces them to the official factory specifications. This process helps prevent defects and imperfections. So you can get exceptional lifespan and a flawless fit. Need new OEM Scion Coil Springs? You'll love our wide selection of genuine options. Shop in minutes and skip the hunt. Our prices are unbeatable, you'll save time and money. It's easy to shop and find the right piece. Our committed customer service team gives professional help from start to finish. Every part includes a manufacturer's warranty. We ship quickly, your parts will arrive fast at your door.
Scion Coil Springs maintain all ride levels and control, making rough roads into smooth routes. In 2003, Scion came out with loud colors, one price, and Release Series, screaming individuality. Scion pursued young drivers online with the use of online cities and pop-ups, shifting more than 1,000,000 compact moves. Scion was also applied by Toyota as a laboratory for daring notions that eventually ended up in regular showrooms. In 2016, Scion retired, but its do-it-yourself spirit continues to guide car owners and tuners around the globe. Simplified trims and dealer-added items that made stock cars statements were a welcome addition for first-time buyers of the line. The fans continue to share stories of releases and hunting down rare paint codes and evidence that the badge created enduring bonds with the community. Coil Springs will be between the wheel and chassis, supporting the weight of the vehicle, absorbing blows from potholes, and storing back rebound energy that will glue tires around bends, acceleration situations, and abrupt stops. It is tuned in factories in linear, progressive, or dual rates to enable drivers to adjust the Coil Springs to either high comfort or hardness on a daily basis. Installation of Coil Springs and quality dampers reduces body roll, maintains alignment, and prevents premature tire wear. Even the adjustable Coil Springs allow enthusiasts to lower or raise the ride height to fit larger wheels without sacrificing comfort.
Scion Coil Springs Parts and Q&A
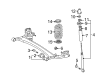
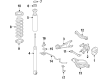
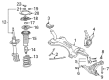
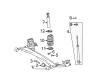
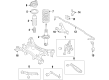
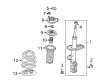
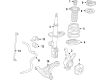
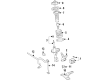
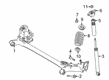
- Q: How to disassemble the rear shock absorber with coil springs on Scion tC?A:The first step for disassembling a rear shock absorber with coil spring requires removal of the rear shock absorber cap. Compress the coil spring with Specific Service Tool: 09727-30021 and 09727-00010 while avoiding impact wrenches since they can harm the tool. The first step is to hold the piston rod with a 6 mm hexagon wrench and unscrew the nut. The disassembly requires removal of the No. 1 shock absorber cushion washer and subsequent components including the suspension support LH, spring front bracket LH, No. 1 shock absorber cushion and No. 1 spring bumper LH, coil spring insulator upper LH. Finally, remove the coil spring.
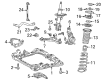
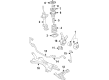
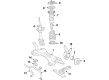
- Q: How to overhaul the front shock absorber with coil springs on Scion xB?A:The procedure for replacing the front shock absorber with coil spring starts by removing the windshield wiper arm cover and left and right front wiper arms and hood to cowl top seal and both cowl top ventilator louvers. First disconnect the hose and wire harness before removing the windshield wiper link assembly and cowl top panel outer by taking out 8 bolts and a hose. Begin the shock absorber with coil spring front wheel replacement by removing the nut holding the speed sensor wire harness clamp on the shock absorber bracket and the bolt securing the flexible hose to it. Start by taking out the front shock absorber containing the coil spring after detached steering knuckle connection bolts followed by shock absorber coil spring attaching nuts then remove suspension support No.2. Position the front shock absorber with coil spring inside a vise then install the two bracket nuts and bolt until fully tightened before compressing the coil spring using Special Service Tool: 09727-30021 (09727-00010, 09727-00021, 09727-00031). Use this tool instead of an impact wrench to prevent damages. After you remove the front suspension support dust cover and the front support to front shock absorber left nut secured with 2 nuts and a screwdriver to hold the front shock absorber you can uninstall the front suspension support of each side as well as the front suspension support left dust seal, the front coil spring seat upper left, the front coil spring insulator upper left, the front coil spring left, and the front spring bumper left. The front left shock absorber assembly needs inspection through shock absorber rod operation for abnormal resistance or sound which calls for a replacement if found. The front left shock absorber assembly receives installation first after which technicians should mount the front spring bumper left and front coil spring left while using Special Service Tool: 09727-30021 (09727-00010, 09727-00021, 09727-00031) to compress the spring before placing it into the shock absorber assembly. Begin by mounting the front coil spring insulator upper left with the "a" mark visible from outside before placing the front coil spring seat upper left that displays the "OUT" indicator. Keep installing the front suspension support left dust seal followed by the front suspension support sub-assembly left. Apply a new center nut to connect the front support with the front shock absorber left nut before torquing it to 33 Nm (340 kgf-cm, 25 ft. lbs.). Do this while carefully avoiding damage to the suspension support stud bolts. Apply MP grease to the suspension support while using Special Service Tool: 09727-30021 (09727-00010, 09727-00021, 09727-00031). The service starts with installing the front shock absorber coil spring by using suspension support number two while tightening three nuts to 39 Nm (400 kgf-cm and 29 ft lbs). The next step involves connecting this assembly to the steering knuckle through two bolts and a nut before torqueing the nut to 132 Nm (1,350 kgf-cm and 97 ft lbs). The installation process starts with the flexible hose receiving a torque of 29 Nm (300 kgf-cm, 22 ft. lbs.) followed by front wheel torquing to 103 Nm (1,050 kgf-cm, 76 ft. lbs.) and cowl top panel outer with 8 bolts experiencing 5.0 Nm (51 kgf-cm, 44 inch lbs.). Then hose and wire harness reconnection will take place. After installation of the windshield wiper link assembly, cowl top ventilator louvers and hood to cowl top seal, complete the work by adding the left and right front wiper arms and inspect front wheel alignment. The disposal process for front left shock absorbers requires users to extend the rod completely and drill a hole between points A and B on the cylinder to release the gas contents with appropriate safety gear because metal fragments can occur as the gas is colorless, odorless and non-toxic.