×
ToyotaParts- Hello
- Login or Register
- Quick Links
- Live Chat
- Track Order
- Parts Availability
- RMA
- Help Center
- Contact Us
- Shop for
- Toyota Parts
- Scion Parts
My Garage
My Account
Cart
OEM Scion Sway Bar Kit
Stabilizer Sway Bar Set- Select Vehicle by Model
- Select Vehicle by VIN
Select Vehicle by Model
orMake
Model
Year
Select Vehicle by VIN
For the most accurate results, select vehicle by your VIN (Vehicle Identification Number).
15 Sway Bar Kits found


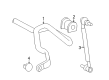
Scion Stabilizer Bar, Rear
Part Number: SU003-00395$92.44 MSRP: $120.68You Save: $28.24 (24%)Ships in 1-3 Business DaysProduct Specifications- Other Name: Stabilizer Rear D14; Suspension Stabilizer Bar, Rear; Sway Bar; Bar, Stabilizer, Rear
- Position: Rear


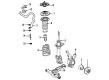
Scion Stabilizer Bar, Front
Part Number: SU003-00391$115.56 MSRP: $150.85You Save: $35.29 (24%)Ships in 1-3 Business DaysProduct Specifications- Other Name: Stabilizer Front; Suspension Stabilizer Bar, Front; Sway Bar; Bar, Stabilizer, Front
- Position: Front


Scion Stabilizer Bar, Front
Part Number: 48811-WB001$62.57 MSRP: $87.83You Save: $25.26 (29%)Ships in 1-3 Business DaysProduct Specifications- Other Name: Bar, Stabilizer; Suspension Stabilizer Bar, Front; Sway Bar; Bar, Stabilizer, Front
- Position: Front

Scion Stabilizer Bar, Front
Part Number: 48811-52290$118.66 MSRP: $167.98You Save: $49.32 (30%)Ships in 1-3 Business DaysProduct Specifications- Other Name: Bar, Stabilizer, Front; Suspension Stabilizer Bar, Front; Sway Bar
- Position: Front
- Replaces: 48811-52220

Scion Stabilizer Bar, Rear
Part Number: 48812-21060$96.58 MSRP: $135.56You Save: $38.98 (29%)Ships in 1-3 Business DaysProduct Specifications- Other Name: Bar, Stabilizer, Rear; Suspension Stabilizer Bar, Rear; Sway Bar
- Position: Rear
Scion Stabilizer Bar, Rear
Part Number: 48812-21030$115.29 MSRP: $161.83You Save: $46.54 (29%)Ships in 1-3 Business DaysProduct Specifications- Other Name: Bar, Stabilizer, Rear; Suspension Stabilizer Bar, Rear; Sway Bar
- Position: Rear

Scion Stabilizer Bar, Rear
Part Number: 48812-12380$85.07 MSRP: $119.41You Save: $34.34 (29%)Ships in 1-3 Business DaysProduct Specifications- Other Name: Bar, Stabilizer, Rear; Suspension Stabilizer Bar, Rear; Sway Bar
- Position: Rear

Scion Stabilizer Bar, Front
Part Number: 48811-52060$127.36 MSRP: $180.29You Save: $52.93 (30%)Ships in 1-3 Business DaysProduct Specifications- Other Name: Bar, Stabilizer, Front; Suspension Stabilizer Bar, Front; Sway Bar
- Position: Front

Scion Stabilizer Bar, Front
Part Number: 48811-47060$117.61 MSRP: $166.49You Save: $48.88 (30%)Ships in 1-3 Business DaysProduct Specifications- Other Name: Bar, Stabilizer; Suspension Stabilizer Bar, Front; Sway Bar; Bar, Stabilizer, Front
- Position: Front

Scion Stabilizer Bar, Front
Part Number: 48811-21050$115.29 MSRP: $161.83You Save: $46.54 (29%)Ships in 1-3 Business DaysProduct Specifications- Other Name: Bar, Stabilizer; Suspension Stabilizer Bar, Front; Sway Bar; Bar, Stabilizer, Front
- Position: Front

Scion Stabilizer Bar, Front
Part Number: 48811-12A50$104.51 MSRP: $146.69You Save: $42.18 (29%)Ships in 1-3 Business DaysProduct Specifications- Other Name: Bar, Stabilizer; Suspension Stabilizer Bar, Front; Sway Bar; Bar, Stabilizer, Front
- Position: Front

Scion Stabilizer Bar, Front
Part Number: 48811-12A10$86.49 MSRP: $121.41You Save: $34.92 (29%)Ships in 1-3 Business DaysProduct Specifications- Other Name: Bar, Stabilizer, Front; Suspension Stabilizer Bar, Front; Sway Bar
- Position: Front


 Product Specifications
- Other Name: Bar, Stabilizer; Suspension Stabilizer Bar, Front; Sway Bar; Bar, Stabilizer, Front
- Position: Front
 Product Specifications
- Other Name: Trd Sway Bar Fnt Rer; Suspension Stabilizer Bar, Front; Sway Bar
- Position: Front

 Product Specifications
- Other Name: Bar, Stabilizer, Front; Suspension Stabilizer Bar, Front; Sway Bar
- Position: Front
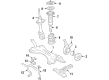
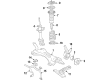
Scion Sway Bar Kit
OEM parts deliver unmatched quality you can rely on. They pass extensive quality control inspections. Scion produces them to the official factory specifications. This process helps prevent defects and imperfections. So you can get exceptional lifespan and a flawless fit. Need new OEM Scion Sway Bar Kit? You'll love our wide selection of genuine options. Shop in minutes and skip the hunt. Our prices are unbeatable, you'll save time and money. It's easy to shop and find the right piece. Our committed customer service team gives professional help from start to finish. Every part includes a manufacturer's warranty. We ship quickly, your parts will arrive fast at your door.
Scion Sway Bar Kit removes body roll to help drivers round corners with even greater precision and predictability. Scion entered streets in 2003, appealing to young motorists with loud paint, no-haggle prices, and zany advertisements such as the virtual city which gave buyers a chance to virtually test cars on a computer screen before they ever put a steering wheel in their hands, and limited Release Series drops ensured that there was never a lack of buzz. Scion was Toyota's test lab, introducing new body designs and interior layouts to test their preferences, and those gambits brought over a million first-time buyers into the family. Scion allowed owners to modify wheels, audio, and trim in the showroom, hence bragging rights began the moment rubber met asphalt. Scion went out of business in 2016, but its rebel theme continues to guide the expectations of drivers when it comes to creativity by affordable compacts. Sway Bar Kit consists of bolts mounted on the chassis connecting left and right suspension arms together with a torsion bar that increases roll stiffness, maintains tires flatter in turns, and allows the car to remain on bumpy pavement. Sway Bar Kit adds adjustable stiffness options, thus enabling a weekend autocrosser to tune in oversteer or understeer balance without changing the hard parts. The native mounting is the same as that of a factory component, Sway Bar Kit can be installed with simple hand tools, and allows drivers to be on the road sooner rather than struggling with custom brackets. Sway Bar Kit is also earned on the daily commutes as it cuts the top-heavy lean that transforms the changes of lanes into a slow-motion flopping fish.
Scion Sway Bar Kit Parts and Q&A
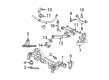
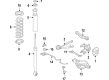
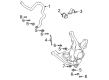
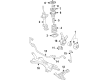
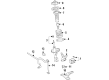
- Q: How to install the front Sway Bar Kit and related components on Scion tC?A:Start by mounting the front sway bar kit followed by the front No. 1 sway bar bush and orient it with the cutout toward the back side. The installation begins by fitting the suspension crossmember bolts of the front No. 1 sway bar bracket LH and obtaining a torque of 19 Nm (194 kgf-cm, 14 ft-lbf). This process should be repeated for attaching the front No. 1 sway bar bracket RH. You should first put in the front suspension crossmember sub-assembly followed by installing the No. 1 hook. Follow the same installation procedures to connect the front suspension No. 1 lower arm sub-assembly beginning first with the LH side then finishing with the RH side. The installation of the front sway bar link assembly requires both LH and RH units before connecting the pressure feed tube assembly. Repeat the tie rod end sub-assembly LH installation process also for the RH side. You should install the exhaust pipe assembly at the center position and the front floor panel brace. The front wheel completion requires connecting both the No. 1 steering column hole cover sub-assembly and the No. 2 steering intermediate shaft assembly. Install the front floor panel brace together with the column hole cover silencer sheet before you put on the No. 1 engine cover sub-assembly. Check the power steering fluid supply then bled the fluid system while also inspecting fluid level in the reservoir and checking for any fluid leaks. The technician must inspect and adjust the hood sub-assembly before performing front wheel alignment inspection and adjustment. Finish the installation by placing the engine under cover on both left hand side and right hand side positions.
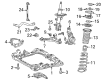
- Q: How to install the front Sway Bar Kit and related components on Scion xB?A:Begin stabilization of the front sway bar kit by firmly attaching the No. 1 front sway bar bush for the LH side onto the front bar while positioning its dust lips to face externally and cutouts at the back. At the RH side follow the same procedure to remove the No. 1 front sway bar bush. Position the identification mark of the front sway bar kit on the right side of the vehicle before you mount it onto the front suspension crossmember sub-assembly. Secure the 4 bolts to the front suspension member front brace LH while torquing them to 87 Nm (887 kgf-cm, 64 ft-lbf) then make an initial bolt A tightening followed by complete tightening starting with B then proceeding to C then D lastly A before checking if the No. 1 front sway bar bushing sticks out. The repetition should include installation of the front suspension member front brace RH. Proceed by fixing the front lower No. 1 suspension arm sub-assembly LH before installing the front suspension crossmember sub-assembly, followed by front suspension member brace rear LH and rear RH installations which will be done using identical procedures. The service procedure requires installation of the front suspension member reinforcement at both LH and RH positions followed by connecting the front lower No. 1 suspension arm sub-assemblies on left and right sides and joining the tie rod end sub-assemblages on both sides. First mount both front sway bar link assemblies after which add No. 1 steering column hole cover sub-assembly followed by No. 2 steering intermediate shaft assembly and column hole cover silencer sheet. Engine under cover installation should be done by starting with the rear RH section followed by rear LH and moving to No. 2 and concluding with No. 1. The procedure concludes by installing front wheels alongside stabilization of suspension followed by complete tightening of the front lower No. 1 suspension arm sub-assembly LH before conducting an inspection and adjustment of front wheel alignment.