×
ToyotaParts- Hello
- Login or Register
- Quick Links
- Live Chat
- Track Order
- Parts Availability
- RMA
- Help Center
- Contact Us
- Shop for
- Toyota Parts
- Scion Parts
My Garage
My Account
Cart
OEM Scion Ball Joint
Control Arm Joint- Select Vehicle by Model
- Select Vehicle by VIN
Select Vehicle by Model
orMake
Model
Year
Select Vehicle by VIN
For the most accurate results, select vehicle by your VIN (Vehicle Identification Number).
3 Ball Joints found


Scion Joint Assembly, Lower Ball, Front Passenger Side Part Number: 43330-19275
$61.61 MSRP: $86.48You Save: $24.87 (29%)Ships in 1-3 Business DaysProduct Specifications- Other Name: Joint Assembly, Lower Ball; Joint Assembly, Lower Ball, Front Driver Side; Suspension Ball Joint; Ball Joint
- Position: Lower
- Replaces: 43330-19255, 43330-19245


Scion Lower Ball Joint Part Number: 43330-09670
$59.02 MSRP: $82.15You Save: $23.13 (29%)Ships in 1-2 Business DaysProduct Specifications- Other Name: Joint Set, Lower Ball; Suspension Ball Joint, Front; Joint Assembly, Lower Ball, Front Passenger Side; Front Driver Side; Suspension Ball Joint.
- Position: Lower
- Replaces: 43330-29425, 43330-09190

Scion Lower Ball Joint Part Number: SU003-00358
Product Specifications- Other Name: Ball Joint Complete; Ball Joint
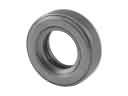
Scion Ball Joint
OEM parts deliver unmatched quality you can rely on. They pass extensive quality control inspections. Scion produces them to the official factory specifications. This process helps prevent defects and imperfections. So you can get exceptional lifespan and a flawless fit. Need new OEM Scion Ball Joint? You'll love our wide selection of genuine options. Shop in minutes and skip the hunt. Our prices are unbeatable, you'll save time and money. It's easy to shop and find the right piece. Our committed customer service team gives professional help from start to finish. Every part includes a manufacturer's warranty. We ship quickly, your parts will arrive fast at your door.
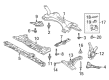
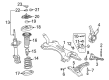
Scion Ball Joint prevents the wheels as well as steering from being wobbly, and the drivers are assured when going around a turn. Scion wrote new rules for the showrooms, as they have abandoned the outlived brochures and have introduced mixtapes, online avatars, and national pop-up parties that give young drivers the opportunity to create the vibe themselves. Using simple one-price stickers and gaudy factory paint, Scion enabled customers to traverse the negotiation process, which would inevitably lead to a life-threatening soul drain, and jump right to the process of selecting wheels, audio, and decals that would better fit their playlists. Limited-run Release Series drops were sneaker-like launches, and Scion generated buzz with the promise that the next one would reverse the script once more, which kept message boards buzzing and parking lots vibrant into the night. By the time the curtain went down in 2016, Scion was still vibrating in forums, and this demonstrates that even a small badge can put a giant company on its feet and lead first-time loyalists who are hungry to be unique. At the suspension pivot, the Ball Joint connects the control arm to the steering knuckle and allows the wheel to arc smoothly without losing alignment due to potholes, hard cornering, and abrupt braking loads. The Ball Joint is shaken off grit and water by high-strength steel and a closed boot, all the wear is trimmed off, and the drivers no longer need a weekly grease session. Since the Ball Joint protects camber and caster angles, tires maintain their shape and the steering wheel remains stable over uneven pavements.
Scion Ball Joint Parts and Q&A
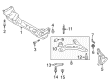
- Q: How to remove the front lower ball joint assembly on the LH side on Scion tC?A:The process to remove the LH front lower ball joint assembly begins with vehicle front lifting and lower suspension movement inspection using wood and a cloth to protect the bolt and nuts. The installation order starts with removing both front wheel and the LH front axle shaft nut. While performing the front suspension repair disconnect the front speed sensor LH as well as the tie rod end sub-assembly LH. The next operation requires detachment of the front No. 1 suspension arm sub-assembly lower LH while removing the front axle assembly LH. To remove the front lower ball joint assembly LH use Special Service Tool: 09628-62011 while completing the steps of extracting the cotter pin and castle nuts.
- Q: How to install the front lower ball joint assembly on Scion xB?A:The front axle assembly should go into a vise without using too much force during installation of the front lower ball joint assembly. The front lower ball joint assembly requires installation on the front axle assembly along with the nut while torqueing to 133 Nm (1356 kgf-cm, 98 ft-lbf). After installing a new cotter pin add another 60 degrees of nut rotation if the cotter pin holes need realignment. Begin by mounting the front axle assembly followed by front lower No. 1 suspension arm sub-assembly installation and then connecting the tie rod end sub-assembly to its proper place. First install the front disc and follow it with the front disc brake caliper assembly and finish with the front speed sensor. The last step in the process involves installing the front wheel along with the front axle hub nut. Review the front wheel alignment and inspect VSC sensor signal output as the final step.