×
ToyotaParts- Hello
- Login or Register
- Quick Links
- Live Chat
- Track Order
- Parts Availability
- RMA
- Help Center
- Contact Us
- Shop for
- Toyota Parts
- Scion Parts
My Garage
My Account
Cart
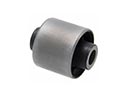
OEM Scion Shock Absorber
Suspension Shock Absorber- Select Vehicle by Model
- Select Vehicle by VIN
Select Vehicle by Model
orMake
Model
Year
Select Vehicle by VIN
For the most accurate results, select vehicle by your VIN (Vehicle Identification Number).
28 Shock Absorbers found


Scion Strut, Front Driver Side Part Number: 48520-WB002
$76.30 MSRP: $107.10You Save: $30.80 (29%)Ships in 1-3 Business DaysProduct Specifications- Other Name: Absorber Assembly, Shock; Suspension Strut, Front Left; Shock Absorber; Absorber Assembly, Shock, Front Driver Side
- Position: Front Driver Side


Scion Shock Absorber Part Number: 48530-80678
$52.21 MSRP: $72.67You Save: $20.46 (29%)Ships in 1 Business DayProduct Specifications- Other Name: Absorber Set, Shock; Suspension Shock Absorber, Rear; Suspension Shock Absorber Kit; Shock Absorber Set; Strut Shock Kit; Shock Absorber Assembly, Rear Passenger Side & Driver Side; Suspension Shock Absorber
- Manufacturer Note: MARK 48530-21200
- Replaces: 48530-80568


Scion Shock Absorber, Rear Part Number: 48530-WB010
$65.52 MSRP: $91.97You Save: $26.45 (29%)Ships in 1-3 Business DaysProduct Specifications- Other Name: Absorber Assembly, Shock; Suspension Shock Absorber, Rear; Shock Absorber, Rear; Absorber Assembly, Shock, Rear Passenger Side; Absorber Assembly, Shock, Rear Driver Side
- Position: Rear
- Replaces: 48530-WB007, 48530-WB004, 48530-WB001


Scion Shock Absorber Part Number: 48530-74080
$44.32 MSRP: $61.69You Save: $17.37 (29%)Ships in 1-3 Business DaysProduct Specifications- Other Name: Absorber Assembly, Shock; Suspension Shock Absorber, Rear; Shock; Absorber Assembly, Shock, Rear Passenger Side; Absorber Assembly, Shock, Rear Driver Side
- Manufacturer Note: MARK 48530-74080


Scion Shock Absorber Part Number: 48530-59815
$60.19 MSRP: $84.48You Save: $24.29 (29%)Ships in 1-3 Business DaysProduct Specifications- Other Name: Absorber Assembly, Shock; Rear Suspension Kit; Strut Assembly; Shock Set; Complete Strut; Shock Absorber Assembly, Rear Passenger Side & Driver Side; Suspension Shock Absorber
- Manufacturer Note: MARK 48530-52630


Scion Shock Absorber Part Number: 48530-80752
$63.74 MSRP: $89.47You Save: $25.73 (29%)Product Specifications- Other Name: Absorber Set, Shock; Suspension Shock Absorber, Rear; Absorber Assembly, Shock, Rear Passenger Side; Absorber Assembly, Shock, Rear Driver Side
- Manufacturer Note: MARK 48530-12G00


Scion Shock Absorber Part Number: 48530-80420
$64.45 MSRP: $90.47You Save: $26.02 (29%)Ships in 1 Business DayProduct Specifications- Other Name: Absorber Assembly, Shock; Rear Suspension Shock Absorber Kit; Strut Shock Kit; Shock Absorber Assembly, Rear Passenger Side & Driver Side; Suspension Shock Absorber
- Manufacturer Note: MARK 48530-12E10


Scion Shock Absorber Part Number: 48530-80573
$67.89 MSRP: $95.29You Save: $27.40 (29%)Ships in 1-3 Business DaysProduct Specifications- Other Name: Absorber Set, Shock; Suspension Shock Absorber, Rear; Shock; Absorber Assembly, Shock, Rear Passenger Side; Absorber Assembly, Shock, Rear Driver Side
- Manufacturer Note: MARK 48530-52G30


Scion Shock Absorber, Rear Part Number: SU003-00382
$81.40 MSRP: $114.26You Save: $32.86 (29%)Ships in 1-2 Business DaysProduct Specifications- Other Name: Shock Absorber Complete Rear; Strut; Absorber Assembly, Shock, Rear Passenger Side; Absorber Assembly, Shock, Rear Driver Side
- Manufacturer Note: MARK 20365-CA000
- Position: Rear


Scion Shock Absorber, Rear Passenger Side Part Number: 48530-80268
$104.51 MSRP: $146.69You Save: $42.18 (29%)Ships in 1-2 Business DaysProduct Specifications- Other Name: Absorber Set, Rear Right-Hand; Suspension Shock Absorber; Strut Assembly Kit; Complete Strut; Shock; Absorber Assembly, Shock, Rear Passenger Side; Absorber Assembly, Shock, Rear Driver Side
- Manufacturer Note: MARK 48530-21140
- Position: Rear Passenger Side


Scion Strut, Front Driver Side Part Number: 48520-80127
$121.01 MSRP: $171.31You Save: $50.30 (30%)Ships in 1-3 Business DaysProduct Specifications- Other Name: Absorber Assembly, Shock; Front Left Suspension Strut; Shock Absorber Kit; Set; Strut Shock Kit; Absorber Assembly, Shock, Front Driver Side
- Manufacturer Note: MARK 48520-12C70
- Position: Front Driver Side

Scion Strut, Front Driver Side Part Number: 48520-80435
$129.83 MSRP: $183.78You Save: $53.95 (30%)Ships in 1-3 Business DaysProduct Specifications- Other Name: Absorber Set, Shock; Suspension Strut, Front Left
- Position: Front Driver Side
- Replaces: 48520-80438
Scion Strut, Front Passenger Side Part Number: 48510-80758
$129.83 MSRP: $183.78You Save: $53.95 (30%)Ships in 1-3 Business DaysProduct Specifications- Other Name: Absorber Set, Shock; Suspension Strut, Front Right
- Position: Front Passenger Side
- Replaces: 48510-80761

Scion Strut, Front Driver Side Part Number: SU003-10820
$156.62 MSRP: $221.71You Save: $65.09 (30%)Ships in 1-3 Business DaysProduct Specifications- Other Name: Strut Complete Front Left-Hand; Suspension Strut, Front Left
- Position: Front Driver Side
- Replaces: SU003-00372
Scion Strut, Front Passenger Side Part Number: SU003-10819
$111.85 MSRP: $157.00You Save: $45.15 (29%)Ships in 1-3 Business DaysProduct Specifications- Other Name: Strut Complete Front Right-Hand; Suspension Strut, Front Right
- Position: Front Passenger Side
- Replaces: SU003-00371
Scion Strut, Front Passenger Side Part Number: 48510-WB002
$77.25 MSRP: $108.44You Save: $31.19 (29%)Ships in 1-3 Business DaysProduct Specifications- Other Name: Absorber Assembly, Shock; Suspension Strut, Front Right; Shock Absorber; Absorber Assembly, Shock, Front Passenger Side
- Position: Front Passenger Side
Scion Strut, Front Passenger Side Part Number: SU003-10821
$121.72 MSRP: $172.31You Save: $50.59 (30%)Ships in 1-3 Business DaysProduct Specifications- Other Name: Strut Complete Front Right-Hand; Suspension Strut, Front Right
- Position: Front Passenger Side
- Replaces: SU003-05256

Scion Strut, Front Driver Side Part Number: 48520-74082
$127.01 MSRP: $179.79You Save: $52.78 (30%)Ships in 1-3 Business DaysProduct Specifications- Other Name: Absorber Assembly, Shock; Shock Absorber; Absorber Assembly, Shock, Front Driver Side
- Manufacturer Note: MARK 48520-74082
- Position: Front Driver Side

Scion Strut, Front Passenger Side Part Number: 48510-80263
$128.30 MSRP: $181.62You Save: $53.32 (30%)Ships in 1-3 Business DaysProduct Specifications- Other Name: Absorber Set, Front Right-Hand; Suspension Strut; Shock Absorber Kit; Strut Assembly; Complete Strut; Absorber Assembly, Shock, Front Passenger Side; Absorber Assembly, Shock, Front Driver Side
- Manufacturer Note: MARK 48510-52C10
- Position: Front Passenger Side
Scion Strut Part Number: 48510-59765
$124.54 MSRP: $176.30You Save: $51.76 (30%)Ships in 1-3 Business DaysProduct Specifications- Other Name: Absorber Assembly, Shock; Front Suspension Strut; Shock Absorber Kit; Strut Assembly Kit; Complete Strut; Absorber Assembly, Shock, Front Passenger Side; Absorber Assembly, Shock, Front Driver Side
- Manufacturer Note: MARK 48510-52610
| Page 1 of 2 |Next >
1-20 of 28 Results
Scion Shock Absorber
OEM parts deliver unmatched quality you can rely on. They pass extensive quality control inspections. Scion produces them to the official factory specifications. This process helps prevent defects and imperfections. So you can get exceptional lifespan and a flawless fit. Need new OEM Scion Shock Absorber? You'll love our wide selection of genuine options. Shop in minutes and skip the hunt. Our prices are unbeatable, you'll save time and money. It's easy to shop and find the right piece. Our committed customer service team gives professional help from start to finish. Every part includes a manufacturer's warranty. We ship quickly, your parts will arrive fast at your door.
Scion Shock Absorber smoothes the ride by converting rough kinetic blows into heat that is easy to control. In 2003, Scion exploded on the streets aimed at young drivers seeking cars they could personalize without the dealership bargaining, through their guerrilla marketing techniques such as an online Scion City and small-run Release Series to create buzz and make any purchase seem like a subculture membership. Scion turned showrooms into guinea pits, launching brash paint, plain trims, no-haggle stickers that forced first-time buyers directly into ownership and shot a stream of fresh ideas back to the corporate mothership. The Scion might have died in 2016, but its legacy is still felt as drivers continue to embrace the DIY nature of the company, the notion that a small car can be a blank slate, and the fact that taking risks can exist within a large corporation. The Shock Absorber in each corner imbibes the vertical mayhem when the road goes wild, the twin-tube or mono-tube guts slurping oil through quick-reacting valves, position sensitive damping hardening or softening areas so that this Shock Absorber maintains contact with tires over potholes, swerving cambers, and changes of weight. The sealed gas charge is impervious to fade, thus the Shock Absorber maintains the same damping throughout spirited runs and puts any car on a flat plane enabling the drivers to cut curves and have the passengers remain relaxed. On washboard gravel, the Shock Absorber cools quickly, without foam and protecting ride quality over the long term.
Scion Shock Absorber Parts and Q&A
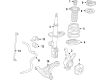
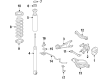
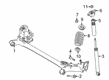
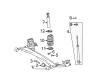
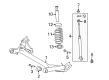
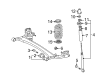
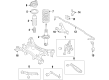
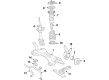
- Q: How to service and repair the rear shock absorber with coil spring on Scion tC?A:Service and repair of the rear shock absorber with coil spring requires first removing the tonneau cover and several components like deck board assembly, back door scuff plate, and deck floor boxes (LH and RH) and rope hook followed by rear No. 1 floor board, rear seat cushion assembly, rear seatback assembly, front door scuff plate, No. 1 luggage compartment trim hook, No. 1 side trim assembly, No. 2 deck side trim hook and deck trim side panel assembly before handling the rear wheel. Disengage the skid control sensor wire followed by removing the bolt as well as wire bracket then proceed to disconnect rear stabilizer link assembly LH and RH. To support the LH suspension arm No. 1 users should initially remove the nut while holding it then detach the 3 nuts, 3 bolts and suspension lower brace LH, 2 bolts for the No. 3 parking brake cable, and 3 bolts from the suspension arm bracket LH. First pull down the No. 1 suspension arm LH and then remove the shock absorber together with its coil spring. Disassemble the rear shock absorber by first removing its cap followed by spring coil compression using Special Service Tool: 09727-30021 (09727-00010, 09727-00021, 09727-00031) while you use a 6 mm hexagon wrench to hold the piston rod until you successfully detach the nut. Proceed with removal of the No. 1 shock absorber cushion washer, suspension support LH, spring front bracket LH, No. 1 shock absorber cushion and No. 1 spring bumper LH, coil spring insulator upper LH and coil spring. Use aprocedure tocheck the rear shock absorber through compression and extension of its rod while checkingfor absent or strange sounds or resistance and replace it if a malfunction is present. Reassembly requires using the special service tool to compress the coil spring then inserting the coil spring into the shock absorber with the lower end sitting properly inside the spring lower seat. Afterward, install the No. 1 spring bumper LH followed by the suspension support LH and position the coil spring insulator upper LH to the spring front bracket LH. After installing the suspension support LH with No. 1 shock absorber cushion washer and the spring front bracket LH next to the coil spring insulator upper LH, use a new center nut to make temporary tightening followed by special service tool removal to verify spring bracket direction before securing it with a 6 mm hexagon wrench to 56 Nm (571 kgf-cm, 41 ft. lbs.) torque. Install the rear shock absorber cap, then install the shock absorber with coil spring using 3 nuts, tightening them to 80 Nm (816 kgf-cm, 59 ft. lbs.), temporarily tighten the bolt and nut while fixing the nut, install the suspension No. 1 arm LH with 3 bolts to a torque of 65 Nm (663 kgf-cm, 48 ft. lbs.), connect the No. 3 parking brake cable with 2 bolts to a torque of 6.0 Nm (61 kgf-cm, 53 inch lbs.), and install the suspension lower brace LH with 3 bolts to a torque of 64 Nm (653 kgf-cm, 47 ft. lbs.). Connect the rear stabilizer link assembly LH to the nut at 44 Nm (449 kgf-cm, 32 ft. lbs.) while using a 5-mm hexagon wrench if the ball joint spins with the nut before reinstalling it on the opposite side. The skid control sensor wire installation requires wiring it to the bracket with a 5.0 Nm (51 kgf-cm, 44 inch lbs.) torque setting before linking the sensor connector. Fully tighten the rear shock absorber with coil spring bolt and nut to 140 Nm (1,430 kgf-cm, 103 ft. lbs.) while holding the nut in place after emptying the vehicle and bouncing it multiple times for suspension stabilization. End the procedure by verifying the rear wheel alignment while also testing the ABS speed sensor output. Before disposal start by stretching the shock absorber rod fully and next drill a hole at the cylinder section between points A and B to remove the internal gas while maintaining safe equipment use because of the potential metal debris. The discharged gas appears clear with no scent and shows no poisonous properties.
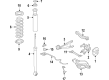
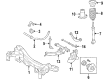
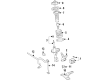
- Q: How to install the rear shock absorber on Scion xB?A:Installation of the rear shock absorber begins with placing the rear No. 1 spring bumper on top of the absorber assembly. Set up the jack and wooden block beneath the spring seat of the rear axle beam assembly while keeping the assembly from excessive height increase. The rear shock absorber assembly needs to be bolted temporarily to the rear axle beam assembly using the bolt and nut as you slowly raise the jack to insert the upper part of the rear shock absorber into the installation hole during compression until you reach 20-30 mm (0.78 to 1.18 in.). Proceed to install the rear suspension support following the correct placement as depicted in the illustration. The procedure calls for attaching the socket hexagon wrench (6 mm) to lock the rear shock absorber assembly with correct direction before applying torque of 25 Nm (255 kgf-cm, 18 ft-lbf) to the lock nut. Install the rear wheels according to the torque specifications at 103 Nm (1050 kgf-cm, 76 ft-lbf). Lower the vehicle and bounce it several times for rear suspension stabilization before goed in to the stopper nut and tighten the bolt on the lower side of the rear shock absorber to 90 Nm (918 kgf-cm, 67 ft-lbf). Put on the rear floor service hole cover as the last step.