×
ToyotaParts- Hello
- Login or Register
- Quick Links
- Live Chat
- Track Order
- Parts Availability
- RMA
- Help Center
- Contact Us
- Shop for
- Toyota Parts
- Scion Parts
My Garage
My Account
Cart
OEM Scion tC Shock Absorber
Suspension Shock Absorber- Select Vehicle by Model
- Select Vehicle by VIN
Select Vehicle by Model
orMake
Model
Year
Select Vehicle by VIN
For the most accurate results, select vehicle by your VIN (Vehicle Identification Number).
3 Shock Absorbers found


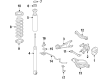
Scion tC Shock Absorber Part Number: 48530-80678
$52.21 MSRP: $72.67You Save: $20.46 (29%)Ships in 1 Business Day

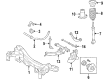
Scion tC Shock Absorber, Rear Passenger Side Part Number: 48530-80268
$104.51 MSRP: $146.69You Save: $42.18 (29%)Ships in 1-2 Business DaysScion tC Shock Absorber Part Number: 48530-80152
$128.26 MSRP: $181.99You Save: $53.73 (30%)Ships in 1-3 Business Days
Scion tC Shock Absorber
Choose genuine Shock Absorber that pass strict quality control tests. You can trust the top quality and lasting durability. Shopping for OEM Shock Absorber for your Scion tC? Our website is your one-stop destination. We stock an extensive selection of genuine Scion tC parts. The price is affordable so you can save more. It only takes minutes to browse and find the exact fit. Easily add to cart and check out fast. Our hassle-free return policy will keep you stress-free. We process orders quickly for swift delivery. Your parts will arrive faster, so you can get back on the road sooner.
The Scion tC Shock Absorber is an aspect of the suspension system in any Scion tC; Cars famous for their reliability and performance. Intended to eliminate shock impulse trains and therefore improve the quality of the ride and control, the Shock Absorber optimizes the experience of handling a car. Engaging kinetic energy into heat, the shock Absorber of Scion tC limits the elongated movement of the suspension system while spring control the vibrations. Some Scion tC models have incorporated twin tube shocks and other have incorporated mono tube shocks; although the mono tube shocks have better heat control and performance. For more specific performance, there is options for Position Sensitive Damping (PSD) and Acceleration Sensitive Damping (ASD) which change the characteristics of shockabsorbers to provide better damping according to the road surface. The Scion tC which is an affordable car with a sporty look has received a lot of attention from young drivers; this is due to the car's chassis and suspension system. A key attribute that speaks volume for this classification of cars is the Shock Absorber which is fundamental in handling and stability of the automobile. The fact that Scion tC Shock Absorber fits almost all the tC models and add performance and safety in your car making it fun to drive. Given the above highlights about Scion's quality, the tC Shock Absorber is still preferred by drivers who are in need of the optimal shocks that will provide comfort plus performance in their automobiles.
Scion tC Shock Absorber Parts and Q&A
- Q: How to install the rear shock absorber with coil spring on Scion tC?A:Begin the procedure for installing the rear shock absorber with coil spring by tightenting the 3 nuts to 80 Nm (816 kgf-cm, 59 ft-lbf) then fasten the bolt and nut as a stop before fixing the nut. The installation process requires attaching the No. 1 AS Suspension Arm LH through 3 bolts that should be torqued to 65 Nm (663 kgf-cm, 48 ft-lbf) and connecting the No. 3 Parking Brake Cable using 2 bolts torqued to 6.0 Nm (61 kgf-cm, 53 in-lbf). Use three bolts to attach the suspension lower brace LH then torque them to 64 Nm (653 kgf-cm, 47 ft-lbf). Use a 5 mm hexagon wrench to keep the ball joint from turning when inserting the nut for the rear stabilizer link assembly LH and tighten it to 44 Nm (449 kgf-cm, 32 ft-lbf). The same assembly routine must be applied to the rear stabilizer link assembly RH. Use the skid control sensor wire by bolting the wire bracket while torquing the bolt to 5.0 Nm (51 kgf cm 44 in lb). Then attach the skid control sensor connector. After installing the rear wheel with a torque of 103 Nm (1,050 kgf-cm, 76 ft-lbf) complete suspension stabilization by bouncing and bouncing the vehicle multiple times. To complete the tightening process of the rear shock absorber with its coil spring secure the bolt and nut together reaching a torque value of 140 Nm (1,430 kgf-cm, 103 ft-lbf) but ensure to keep holding the nut in position and empty the vehicle during this procedure. The rear wheel alignment needs to be inspected with a rear ABS speed sensor signal validation.
- Q: How to remove the rear shock absorber with coil spring on Scion tC?A:The first step for removing the rear shock absorber with coil spring requires removal of the tonneau cover assembly then the deck board assembly followed by the back door scuff plate and both the deck floor box LH and deck floor box RH. Mingle the rope hook with removal steps of the rear No. 1 floor board alongside the rear seat cushion assembly and the rear seatback assembly. Begin by taking out the front door scuff plate followed by the No. 1 luggage compartment trim hook and then remove the No. 1 side trim assembly, No. 2 deck side trim hook and lastly the deck trim side panel assembly. First disconnect the skid control sensor wire through connector removal and by taking out the bolt and wire bracket. Unfasten the rear stabilizer link assembly LH by removing its nut. If the ball joint rotates while the nut is loose keep the stud steady using a h5 mm hexagon wrench. Rephrase the same approach for removing the rear stabilizer link assembly RH. Support the suspension No. 1 arm on the left side and maintain nut position by removing its bolt and nut from the No. 1 suspension arm. The first step is the removal of 3 nuts from the system followed by the 3 bolts and the suspension lower brace LH. Proceed by disconnecting the No. 3 Parking Brake Cable through removal of its 2 bolts while taking the 3 bolts from the suspension arm bracket LH. The shock absorber with coil spring should be removed after pressing the No. 1 suspension arm LH outside of the vehicle.


Related Scion tC Parts
 Scion tC Control Arm
 Scion tC Sway Bars
 Scion tC Bump Stop
 Scion tC Coil Spring Insulator
 Scion tC Control Arm Bracket
 Scion tC Crossmember Bushing
 Scion tC Rear Crossmember
 Scion tC Shock and Strut Boot
 Scion tC Strut Mounts
 Scion tC Suspension Strut Rod
 Scion tC Sway Bar Bushing
 Scion tC Trailing Arm
Browse Scion tC Shock Absorber by Years
2016
2015
2014
2013
2012
2011
2010
2009
2008
2007
2006
2005