×
ToyotaParts- Hello
- Login or Register
- Quick Links
- Live Chat
- Track Order
- Parts Availability
- RMA
- Help Center
- Contact Us
- Shop for
- Toyota Parts
- Scion Parts
My Garage
My Account
Cart
OEM Scion xA Coil Springs
Strut Spring- Select Vehicle by Model
- Select Vehicle by VIN
Select Vehicle by Model
orMake
Model
Year
Select Vehicle by VIN
For the most accurate results, select vehicle by your VIN (Vehicle Identification Number).
4 Coil Springs found


Scion xA Coil Spring, Rear Part Number: 48231-52650
$123.72 MSRP: $175.13You Save: $51.41 (30%)Ships in 1-3 Business Days
Scion xA Coil Spring, Rear Part Number: 48231-52170
$125.24 MSRP: $177.30You Save: $52.06 (30%)Ships in 1-3 Business Days
Scion xA Coil Spring, Front Part Number: 48131-52560
$85.19 MSRP: $119.58You Save: $34.39 (29%)Ships in 1-3 Business DaysScion xA Coil Spring, Front Part Number: 48131-52B60
$99.29 MSRP: $139.37You Save: $40.08 (29%)
Scion xA Coil Springs
Choose genuine Coil Springs that pass strict quality control tests. You can trust the top quality and lasting durability. Shopping for OEM Coil Springs for your Scion xA? Our website is your one-stop destination. We stock an extensive selection of genuine Scion xA parts. The price is affordable so you can save more. It only takes minutes to browse and find the exact fit. Easily add to cart and check out fast. Our hassle-free return policy will keep you stress-free. We process orders quickly for swift delivery. Your parts will arrive faster, so you can get back on the road sooner.
Coil Springs on the Scion xA are standard part of their suspension system, and notable for their durability and efficacy. These spring coil are specifically manufactured for use in Scion xA; their function is to hold the weight of the car while at the same time cushioning it on rough surfaces of the road. Their main function in relation to auto suspensions is to ensure that the vehicles' ride heights and wheel positions are as they should be and not sagging, bottoming out, or experiencing abnormally worn tires all of which help in efficiencies and safety. Drawing a color from the natural dexterity of compatibility, these coil springs are available for several models of Scion xA thus making them ideal for drivers who want to transform their car into a performance machine. The options are linear rate, progressive, and dual rate coil springs enabling the users to choose the stiffness and performance to their preferred style of driving. Also, coil springs with threaded perches can be easily adjusted to make the necessary changes to the height of the car in accordance with the changes in the wheel and tire dimensions. This versatility is quite unique in the automotive market since it maintains the variety of driving conditions. Features such as Scion xA's 1.5 L DOHC I4 engine, and 27/34 mpg city/highway fuel economy and the stability of its coil springs back up this vehicle's specifications. Altogether, the Scion xA Coil Springs are imperative undercarriage bolts crucial to achieving stability and performance in the car; that is why every Scion xA proprietor should have it.
Scion xA Coil Springs Parts and Q&A
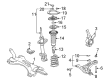
- Q: How to service and repair the front shock absorber with coil springs on Scion xA?A:The service and repair of the front Shock Absorber with coil spring begins with front wiper arm head cap removal followed by disconnecting both left and right front wiper arms and removing the hood to cowl top seal and the cowl top ventilator louvers. The service starts with disconnecting the wiper hose and wire harness before removing 8 bolts from the cowl top panel outer and windshield wiper link assembly. The shock absorber repair begins by removing the front wheel as well as the flexible hose by unscrewing its bolt then releasing the ABS speed sensor wire harness clamp from its bracket position. Detach the 2 nuts and 2 bolts securing the steering knuckle before removing the front shock absorber together with its coil spring. The shock absorber requires unfastening its 3 nuts and the No. 2 suspension support. Secure the front shock absorber with coil spring in a vise through two nuts while employing a bolt to compress the coil spring using Special Service Tool: 09727-30021 (09727-00010, 09727-00021, 09727-00031). Use this tool instead of an impact wrench because it prevents equipment damage. Begin by using a screwdriver with 2 nuts to remove the front suspension support dust cover along with the front support to front shock absorber left-hand nut followed by extraction of the front suspension support left-hand subassembly and dust seal with coil spring seat upper, coil spring insulator upper and coil spring and spring bumper. Inspects the front shock absorber assembly by testing the shock absorber rod for irregular resistance or noises despite compression and extension and needs direct replacement. Reassemble by first putting on the front shock absorber assembly followed by the spring bumper and coil spring and using the special service tool to compress the coil spring to let its lower end fit into the space of the spring lower seat. Position the front coil spring insulator upper first while making sure its mark points toward the exterior followed by the front coil spring seat upper which reveals its marked side to the outside. Assemble the left-hand front suspension dust seal subcomponent after installing its center nut using new hardware while torquing to 33 Nm (340 kgf-cm, 25 ft. lbs.) yet maintain care when avoiding contact with the suspension support bolts. Proceed by installing the dust cover on the suspension support after applying MP grease to it and removing the special service tool. The installation process requires front shock absorber assembly attachment with proper positioning of No. 2 suspension support while securing the shock absorber using 3 nuts tightened to 39 Nm (400 kgf-cm, 29 ft. lbs.) to connect the steering knuckle area and completing the installation with 2 bolts and a nut torqued to 132 Nm (1,350 kgf-cm, 97 ft. lbs.). Follow these installation steps: first torque the flexible hose to 29 Nm (300 kgf-cm) and then install the front wheel to 103 Nm (1,050 kgf-cm) while finishing with the cowl top panel outer bolted by 8 fasteners torqued to 5.0 Nm (51 kgf-cm). Next reconnect the hose and wire harness for the wiper. The windshield wiper link assembly along with both cowl top ventilator louvers and the hood to cowl top seal need installation after positioning the front wiper arms so you can inspect and perform adjustments to the front wheel alignment. When disposing of the shock absorber rods should be fully stretched before drilling a hole through the cylinder while using protective safety gear because of metal part hazards.
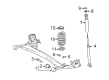
- Q: How to replace the rear left coil springs on Scion xA?A:The replacement procedure for the rear left coil spring begins by taking off the rear wheel followed by disconnecting the skid control sensor connector before removing the bolt to detach the skid control sensor wire from the axle beam. Special Service Tool: 09023-00101 allows you to separate rear brake tube No.4 before removing its clip which must be disposed after use. The same sequence should be followed for disassembling rear brake tube No.3. Follow the same method to detach Parking Brake Cable assembly No.3 from the axle beam by removing its nut. Then use these procedures for parking brake cable assembly No.2 on the right-hand side. Mildly loosen the two bolts which anchor the rear axle beam assembly but do not detach them. Two jacks support the rear axle beam at both sides before technicians remove the nut followed by the spacer which separate the rear left Shock Absorber assembly. Perform the identical shock absorber assembly removal method for the rear right side. Safely lower the jacks to remove both the coil spring along with insulator upper LH and insulator lower LH from the rear left position. Start by installing the insulator upper LH onto the coil spring end component LH as its gap aligns with the coil spring LH end. Then add the insulator lower LH and the coil spring to the rear axle beam with the paint mark beneath the vehicle. The installer can secure the rear left shock absorber assembly to the rear axle beam as jack height increases before continuing with the rear right side operations. Follow the same procedures for parking brake cable assembly No.3 by connecting it with the nut tightened to 5.4 Nm (55 kgf-cm, 48 inch lbs.) and then proceed with No.2 on the right side. The process calls for using Special Service Tool: 09023-00101 to create a 15 Nm (155 kgf-cm, 11 ft. lbs.) torque on rear brake tube No.4 until the clip is secured. Repeat for rear brake tube No.3. Fasten the skid control sensor wire onto its mounting bolt before torquing to 8.0 Nm (82 kgf-cm, 71 inch lbs.). After that, restore the skid control sensor connector. Secure the rear axle beam assembly bolts completely for shock absorber stability before using a jack to support the axle beam and loading its compartment with 90 kg (198 lb.) then torque bolts to 82 Nm (836 kgf-cm, 60 ft. lbs.). Follow the same procedure when tightening the rear right shock absorber assembly nut to 49 Nm (500 kgf-cm, 36 ft. lbs.). The last steps involve bleeding the brake line while installing the rear wheel under 103 Nm (1,050 kgf-cm, 76 ft. lbs.) torque before inspecting the rear wheel alignment and checking the ABS speed sensor signal.


Related Scion xA Parts
 Scion xA Axle Beam Mount
 Scion xA Bump Stop
 Scion xA Camber and Alignment Kit
 Scion xA Coil Spring Insulator
 Scion xA Control Arm
 Scion xA Crossmember Bushing
 Scion xA Front Cross-Member
 Scion xA Shock Absorber
 Scion xA Steering Knuckle
 Scion xA Strut Mounts
 Scion xA Sway Bar Bracket
 Scion xA Sway Bars