×
ToyotaParts- Hello
- Login or Register
- Quick Links
- Live Chat
- Track Order
- Parts Availability
- RMA
- Help Center
- Contact Us
- Shop for
- Toyota Parts
- Scion Parts
My Garage
My Account
Cart
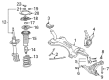
OEM Scion xA Control Arm
Suspension Arm- Select Vehicle by Model
- Select Vehicle by VIN
Select Vehicle by Model
orMake
Model
Year
Select Vehicle by VIN
For the most accurate results, select vehicle by your VIN (Vehicle Identification Number).
4 Control Arms found


Scion xA Lower Control Arm, Passenger Side Part Number: 48068-59065
$261.53 MSRP: $373.41You Save: $111.88 (30%)Ships in 1-3 Business Days
Scion xA Lower Control Arm, Driver Side Part Number: 48069-19156
$257.08 MSRP: $367.06You Save: $109.98 (30%)Ships in 1-3 Business Days
Scion xA Lower Control Arm, Passenger Side Part Number: 48068-19176
$257.08 MSRP: $367.06You Save: $109.98 (30%)Ships in 1-3 Business DaysScion xA Lower Control Arm, Driver Side Part Number: 48069-59065
$261.53 MSRP: $373.41You Save: $111.88 (30%)Ships in 1-3 Business Days
Scion xA Control Arm
Choose genuine Control Arm that pass strict quality control tests. You can trust the top quality and lasting durability. Shopping for OEM Control Arm for your Scion xA? Our website is your one-stop destination. We stock an extensive selection of genuine Scion xA parts. The price is affordable so you can save more. It only takes minutes to browse and find the exact fit. Easily add to cart and check out fast. Our hassle-free return policy will keep you stress-free. We process orders quickly for swift delivery. Your parts will arrive faster, so you can get back on the road sooner.
Scion xA Control Arm is a very important part that has functions to boost the dependability and efficiency of Scion xA automobile. Being one of the main parts that connect the frame of the vehicle to the wheels, the Control Arm allows for the certain amount of the rotation which is required for the wheels to be able to react properly to any sort of roughness of the terrain. This functionality is important in ensuring correct alignment of wheels that are so crucial in the safety and drivability of various models. In the current market, different versions of the Scion xA employ lower control arms, which can be made of stamped steel, cast iron, or lightweight aluminum. The design of the Control Arm has changed over the model years, and newer Scion xA models use improved materials that shed weight while gaining strength. This evolution not only enhances handling characteristic but also the general performance of the Scion xA making it to be one of the premier in the market. Moreover, the Scion xA Control Arm can be applied to various xA models, thus the drivers of all the vehicles have an opportunity to get the most from the upgraded safety and efficiency parameters. The Scion control system such as the anti-lock brakes, traction control among others are featured on the Control Arm hence acting as a crucial component that makes the car extremely easy to handle. In total, the Scion xA control arm can be well-defined as a prude example of scmion's quality and performance vehicle part that shows company's dedication to provide qualitative engineering for Scion xA car model.
Scion xA Control Arm Parts and Q&A
- Q: How to service and repair the Control Arm for the Automatic Transaxle on Scion xA?A:Service engineers should start front suspension NO. 1 lower arm repair by removing both front wheels and hood sub-assemblies to suspend the engine assembly. You can disconnect the front suspension NO. 1 lower arm sub-assembly LH by removing the clip along with the nut while using Special Service Tool: 09628-00011 to separate the lower arm from the steering knuckle. Perform the same steps to disconnect the front suspension NO. 1 lower arm sub-assembly RH. To disconnect the front stabilizer bar begin by securing the stabilizer bolt with a wrench to remove the nut followed by taking off the 2 retainers and the cushion then the stabilizer bolt while repeating on the opposite side. First disconnect the power steering link assembly by taking out the 4 bolts and nuts and suspending the steering link while doing so before disconnecting the pressure feed tube assembly through bolt removal. Remove the front suspension member reinforcement LH and RH by extracting both their 2 bolts. Start by detaching the front suspension crossmember sub-assembly after removing its bolt and 2 nuts then set the crossmember on a jack after which remove the remaining 4 bolts. Mucho Workshop will disconnect the front suspension NO. 1 lower arm sub-assembly LH by extracting all its 2 bolts, the nut, and the lower arm without spinning the nut. Before attaching the nut to the front suspension NO. 1 lower arm sub-assembly LH you must pivot the ball joint stud 5 times in each direction. You should then use a torque wrench to turn the nut steadily at a pace of 2 to 4 seconds per turn and read the torque on the fifth rotation. The front suspension NO. 1 lower arm sub-assembly LH must be preliminarily installed with 2 nuts and 1 bolt before connecting the front suspension crossmember sub-assembly through alignment using Special Service Tool: 09670-00010 followed by bolt A installation at 70 Nm then bolt B installation at 116 Nm and completing the installation with a bolt and 2 nuts torqued to 80 Nm. Secure the front suspension member reinforcement LH and RH with two bolts that reach 47 Nm torque. First bolt together the pressure feed tube assembly with the bolt requiring 7.8 Nm torque strength and then attach the power steering link assembly using four nuts along with four bolts at a torque strength of 74 Nm. Install the 2 retainers along with cushion before applying a wrench to the stabilizer bolt to secure its nut (Torque: 18 Nm). The front suspension NO. 1 lower arm sub-assembly LH must connect to the steering knuckle with a nut that reaches 98 Nm torque value while a new clip needs installation before increasing the nut torque an additional 60 degrees when the clip holes are misaligned. Install the front wheel on both sides by following the specified torque of 103 Nm. Fasten both bolts on the front suspension NO. 1 lower arm sub-assembly LH with a torque of 88 Nm for bolt A and 132 Nm for bolt B and avoid rotating the nut during installation. Check and modify both the hood sub-assembly and front wheel alignment before concluding.
- Q: How to service and repair the Control Arm in a manual transaxle's front suspension on Scion xA?A:The front wheel needs to be detached to start servicing and repairing front suspension No. 1 lower arm for vehicles with manual transaxles. Remove the front suspension No. 1 lower arm sub-assembly LH after disconnecting the front stabilizer bar and its secondary connection point. Install this assembly by removing three bolts as well as the nut and lower arm without applying rotational force to the nut. Apply the following procedure when installing the sub-assembly LH front suspension No. 1 lower arm: Rotate the ball joint stud 5 times in both directions after which apply a torque wrench to twist the nut at a rate of 2 to 4 seconds per turn and measure torque at the fifth turn. Install the front suspension No. 1 lower arm sub-assembly LH with temporary bolts and the nut before reconnecting both sub-assemblies and the front stabilizer bar. The front wheel needs a torque of 103 Nm (1,050 kgf-cm, 76 ft. lbs.) for installation. The front suspension No. 1 lower arm sub-assembly LH must be secured completely by using the 2 bolts to connect the lower arm followed by torquing bolt A to 88 Nm (900 kgf-cm, 65 ft. lbs.) and torquing bolt B to 132 Nm (1,350 kgf-cm, 97 ft. lbs.) without rotating the nut. Conduct an inspection and proper adjustment of front wheel alignment at the end of the process.


Related Scion xA Parts
 Scion xA Wheel Hub
 Scion xA Bump Stop
 Scion xA Camber and Alignment Kit
 Scion xA Coil Spring Insulator
 Scion xA Front Cross-Member
 Scion xA Shock Absorber
 Scion xA Shock and Strut Boot
 Scion xA Steering Knuckle
 Scion xA Strut Mounts
 Scion xA Sway Bar Bracket
 Scion xA Sway Bar Bushing
 Scion xA Sway Bars
Browse Scion xA Control Arm by Years
2006
2005
2004