My Garage
Cart
Make sure this part fits

Toyota 48068-19176
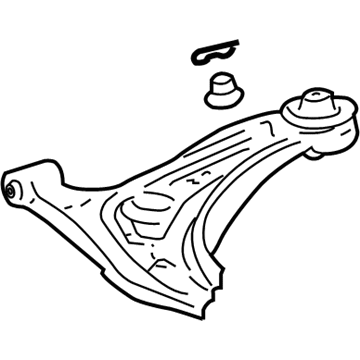
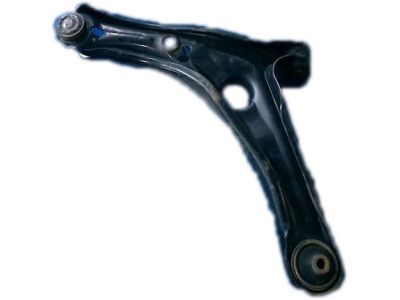
Lower Control Arm, Passenger Side

2000-2006 Toyota 4806819176

Customer Questions & Expert Answers (14)
Toyota 48068-19176 Lower Control Arm, Passenger Side
  • Part Description
    Arm Sub-Assembly, Suspension; Suspension Control Arm, Front Right; Control Arm Assembly
  • Part Name Code
    48068
  • Position
    Passenger Side
  • Replaces
    48068-19175
  • Manufacturer
    Toyota
Make sure this part fits
$257.08 MSRP: $367.06
You Save: $109.98 (30%)
Ships in 1-3 Business Days
1
ADD TO CART
  • Related Parts
  • Product Specifications
  • Vehicle Fitment
  • Customer Questions & Expert Answers
  • Product Specifications

    BrandGenuine Toyota
    Part Name Code48068
    Manufacturer Part Number48068-19176
    Part DescriptionArm Sub-Assembly, Suspension; Suspension Control Arm, Front Right; Control Arm Assembly
    Other NamesArm Sub-Assembly, Front Suspension, Lower Passenger Side; Control Arm
    Item Dimensions18.1 x 12.4 x 4.5 inches
    Item Weight9.30 Pounds
    PositionPassenger Side
    ConditionNew
    Fitment TypeDirect Replacement
    Replaces48068-19175
    ManufacturerToyota
    SKU48068-19176
    WarrantyThis genuine Toyota part is guaranteed by Toyota's factory warranty.
    Shipping & ReturnShipping Policy Return Policy
    Warning: California's Proposition 65
  • Vehicle Fitment

    Year Make Model Trim Engine
    2004 Scion xABase4 Cyl 1.5 L GAS
    2004-2006 Scion xBBase4 Cyl 1.5 L GAS
    2000-2005 Toyota MR2 SpyderBase4 Cyl 1.8 L GAS
  • Customer Questions & Expert Answers

    Q:
    Will 48068-19176 fit my vehicle? Posted by ToyotaPartsNow Specialist
    A:
    Find out if part number 48068-19176 is the right fit for your car by Selecting Your Vehicle model.
    Posted by ToyotaPartsNow Specialist
    Q:
    How to Service and Repair the Control Arm in the Front Suspension on Scion xA? Posted by Customer
    A:
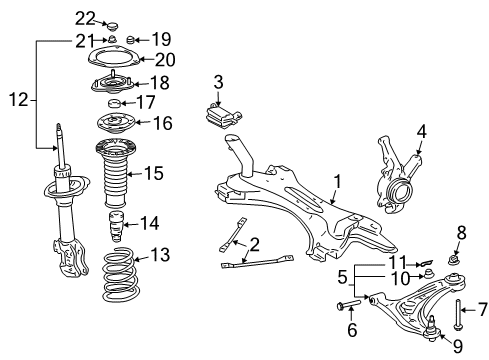
    Begin the replacement procedure of the Lower (MTM) Front Suspension Arm Sub-Assembly Lower No.1 LH by using a first step to remove both front wheels. Separate the LH front suspension arm sub-assembly lower No.1 through the application of Special Service Tool: 09628-00011 before splitting the stabilizer bar front. Begin the front suspension arm sub-assembly lower No.1 LH removal process by taking out its 2 bolts and nut while avoiding turning the nut. The ball joint study on the front suspension arm sub-assembly lower No.1 LH needs to move backward and forwards five times before nut installation. Follow this by turning the nut using a torque wrench at a duration of two to four seconds per turn and record the measurement at the fifth turn for 5.0 Nm (51 kgf-cm, 44 inch lbs.) maximum or less. Installation of front suspension arm sub-assembly lower No.1 LH requires tightening its 2 bolts and nut followed by attaching it to the stabilizer bar front section before wheel reinstallation at a torque of 103 Nm (1,050 kgf-cm, 76 ft. lbs.). The procedure to fully tighten the front suspension arm sub-assembly lower No.1 LH includes using the 2 bolts to reattach the lower suspension arm with a tightness specification of 88 Nm (900 kgf-cm, 65 ft. lbs.) for Bolt A and 132 Nm (1,350 kgf-cm, 97 ft. lbs.) for Bolt B. The process requires avoiding turning the nut and performing a front wheel alignment inspection.
    Posted by ToyotaPartsNow Specialist
    Q:
    How to Service and Repair the Control Arm in the Front Suspension on Scion xB? Posted by Customer
    A:
    The first step to change the MTM-based Lower FRONT SUSPENSION ARM SUB-ASSEMBLY LOWER NO.1 LH starts with removing front wheels. To start with separate the lower No.1 LH front suspension arm sub-assembly by using Special Service Tool: 09628-00011 then disconnect the stabilizer bar front. Take off the front suspension arm sub-assembly lower No.1 LH by removing its 2 bolts and one nut while avoiding the nut rotation. Spare 5 seconds per turn to use a torque wrench on the front suspension arm sub-assembly lower No.1 LH ball joint stud nut while rotating it forward and backward five times before final installation. The correct torque reading should be 5.0 Nm (51 kgf-cm, 44 inch lbs.) or lower. Install the front suspension arm sub-assembly lower No.1 LH by tightening its 2 bolts and nut in a preliminary stage before linking it with the stabilizer bar front and reinstalling front wheels with proper torque at 103 Nm (1,050 kgf-cm, 76 ft. lbs.). The final step includes fully tightening the front suspension arm sub-assembly lower No.1 LH with the 2 bolts secured at 88 Nm (900 kgf-cm, 65 ft. lbs.) for Bolt A and 132 Nm (1,350 kgf-cm, 97 ft. lbs.) for Bolt B without turning the nut and completing the procedure with a wheel alignment check.
    Posted by ToyotaPartsNow Specialist
    Q:
    How to service and repair the Control Arm in a Manual Transaxle on Scion xB? Posted by Customer
    A:
    You should start repairing or servicing the Front Suspension No. 1 Lower Arm for Manual Transaxle by first removing the front wheel. The procedure to detach and replace the Front Suspension No. 1 Lower Arm Sub-Assembly LH starts by disconnecting the Front Stabilizer Bar along with the Front Suspension No. 1 Lower Arm Sub-Assembly LH. Restore this assembly by unfastening its 2 attachment bolts, nut, and lower arm while maintaining the nut position. Before securing the nut on the Front Suspension No. 1 Lower Arm Sub-Assembly LH inspect its ball joint stud by moving it backward and forward five times. Then use a torque wrench to span the nut along a continuous 2 to 4 second period before reading the fifth turn torque measurement. Push in the Front Suspension No. 1 Lower Arm Sub-Assembly LH using the 2 bolts along with the nut then rejoin this assembly to the Front Stabilizer Bar while reattaching the front wheel through torquing to 103 Nm (1,050 kgf-cm, 76 ft. lbs.). The lower suspension arm needs to be completely tightened to the Front suspension No. 1 lower arm sub-assembly LH by installing two bolts with 88 Nm (900 kgf-cm, 65 ft. lbs.) for bolt A and 132 Nm (1,350 kgf-cm, 97 ft. lbs.) for bolt B while avoiding nut rotation. End your procedures by checking and readjusting the alignment of the front wheels.
    Posted by ToyotaPartsNow Specialist
    Q:
    How to service and repair the rear control arm on Toyota MR2 Spyder? Posted by Customer
    A:
    The servicing and repairing process of the rear control arm begins with removing the engine under covers. Researchers should detach the strut rod by removing its 2 bolts and 2 nuts without twisting the nuts and torquing the bolts to 78 Nm (796 kgf-cm, 58 ft. lbs.) when stabilizing the suspension for installation. You must start the No. 1 lower suspension arm removal by removing two bolts and two nuts while torquing bolt A to 87 Nm (887 kgf-cm, 64 ft. lbs.) and bolt B to 103 Nm (1,051 kgf-cm, 76 ft. lbs.), making sure to not turn the nuts and torque them after stabilizing the suspension during installation. Place matchmarks on the cam plate and suspension member of the No. 2 lower suspension arm before removing its nut and cam plate and cam bolt. Install while stabilizing the suspension and torque the components to 87 Nm (887 kgf-cm, 64 ft. lbs.). A new nut should be installed before stabilizing the suspension and torquing with 49 Nm (500 kgf-cm, 36 ft. lbs.). The Special Service Tool: 09610-20012 should be used for No. 2 lower suspension arm extraction. The wheel alignment check should be conducted following installation after executing removal in reverse order.
    Posted by ToyotaPartsNow Specialist
    Q:
    What should be done after fully tightening the suspension arm for the 2004 Scion xB? Posted by Customer
    A:
    Inspect and adjust the front wheel alignment.
    Posted by ToyotaPartsNow Specialist
    See expert answers on similar Control Arm
    Q:
    What is the final step for the front wheels for the 2005 Scion xB? Posted by Customer
    A:
    Install the front wheels, torqued to 103 Nm, then fully tighten the front suspension arm sub-assembly lower No.1 LH with 2 bolts.
    Posted by ToyotaPartsNow Specialist
    See expert answers on similar Control Arm
    Q:
    What should be done after connecting the left front suspension No. 1 lower arm for the 2006 Scion xB? Posted by Customer
    A:
    Repeat the same procedures for the right side, then install the front wheel, torquing to 103 Nm.
    Posted by ToyotaPartsNow Specialist
    See expert answers on similar Control Arm
    Q:
    What is the process for connecting the front suspension crossmember sub-assembly for the 2004 Scion xA? Posted by Customer
    A:
    Use Special Service Tool: 09670-00010 to align the holes, then install it with 4 bolts, tightening Bolt A to 70 Nm (715 kgf-cm, 52 ft. lbs.) and Bolt B to 116 Nm (1,180 kgf-cm, 86 ft. lbs.), followed by installing a bolt and 2 nuts with a torque of 80 Nm (816 kgf-cm, 59 ft. lbs.).
    Posted by ToyotaPartsNow Specialist
    See expert answers on similar Control Arm
    Q:
    What is the final step in the process for the 2002 Toyota MR2 Spyder? Posted by Customer
    A:
    Connect the stabilizer bar link to the stabilizer bar with the nut, torquing to 44 Nm, then finish by installing the front wheel, torquing to 103 Nm.
    Posted by ToyotaPartsNow Specialist
    See expert answers on similar Control Arm
    Q:
    How do you remove the brake caliper and disc for the 2003 Toyota MR2 Spyder? Posted by Customer
    A:
    Take out the 2 bolts and support the caliper securely.
    Posted by ToyotaPartsNow Specialist
    See expert answers on similar Control Arm
    Q:
    What is the torque specification for the nut on the No. 2 lower suspension arm for the 2005 Toyota MR2 Spyder? Posted by Customer
    A:
    Torque it to 49 Nm (500 kgf-cm, 36 ft. lbs.) and use a new nut during installation.
    Posted by ToyotaPartsNow Specialist
    See expert answers on similar Control Arm
    Q:
    What is the procedure after removing the components for the 2000 Toyota MR2 Spyder? Posted by Customer
    A:
    Installation follows the reverse order of removal.
    Posted by ToyotaPartsNow Specialist
    See expert answers on similar Control Arm
    Q:
    What is the torque specification for the cam bolt during No. 2 lower suspension arm installation for the 2001 Toyota MR2 Spyder? Posted by Customer
    A:
    Torque to 87 Nm (887 kgf-cm, 64 ft. lbs.) after stabilizing the suspension.
    Posted by ToyotaPartsNow Specialist
    See expert answers on similar Control Arm
    If you have any questions about this product, please don't hesitate to ask us. We will be happy to help you!

OEM Toyota 48068-19176, Excellent Performance and Perfect Fitment

To ensure reliability, purchase Toyota part # 48068-19176 Lower Control Arm, Passenger Side. It is sometimes referred to as Toyota Control Arm. OEM parts are unrivaled in terms of quality. They go through extensive quality control inspections and are produced in accordance with Toyota's official factory specifications. All of these remove defects and imperfections. So you can relax knowing they promise exceptional lifespan and flawless fitment.

ToyotaPartsNow.com is a leading supplier of genuine Toyota parts such as Toyota 4806819176 Lower Control Arm, Passenger Side. At ToyotaPartsNow.com, we have a wide variety of OEM Toyota parts available at competitive prices. Our comprehensive range of genuine Toyota parts come with a manufacturer's warranty for peace of mind. We also prioritize customer satisfaction, providing a hassle-free return policy and expedited delivery for all our parts. For detailed Toyota parts information, click here.
Choose ToyotaPartsNow for discounted prices, exceptional service and fast delivery