×
ToyotaParts- Hello
- Login or Register
- Quick Links
- Live Chat
- Track Order
- Parts Availability
- RMA
- Help Center
- Contact Us
- Shop for
- Toyota Parts
- Scion Parts
My Garage
My Account
Cart
OEM 2004 Scion xA Coil Springs
Strut Spring- Select Vehicle by Model
- Select Vehicle by VIN
Select Vehicle by Model
orMake
Model
Year
Select Vehicle by VIN
For the most accurate results, select vehicle by your VIN (Vehicle Identification Number).
2 Coil Springs found


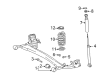
2004 Scion xA Coil Spring, Rear
Part Number: 48231-52170$121.60 MSRP: $172.14You Save: $50.54 (30%)Ships in 1-3 Business DaysProduct Specifications- Other Name: Spring, Coil, Rear; Coil Spring, Rear; Coil Spring Rear; Coil Springs; Spring; Spring, Coil, Rear Passenger Side; Spring, Coil, Rear Driver Side
- Position: Rear
- Item Weight: 4.80 Pounds
- Item Dimensions: 16.8 x 10.6 x 5.7 inches
- Condition: New
- Fitment Type: Direct Replacement
- SKU: 48231-52170
- Warranty: This genuine part is guaranteed by Toyota's factory warranty.

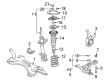
2004 Scion xA Coil Spring, Front
Part Number: 48131-52560$82.68 MSRP: $116.05You Save: $33.37 (29%)Ships in 1-3 Business DaysProduct Specifications- Other Name: Spring, Coil, Front; Coil Spring, Front; Coil Springs; Spring; Spring, Front Coil, Passenger Side; Spring, Front Coil, Driver Side
- Position: Front
- Item Weight: 7.30 Pounds
- Item Dimensions: 15.9 x 6.9 x 6.0 inches
- Condition: New
- Fitment Type: Direct Replacement
- SKU: 48131-52560
- Warranty: This genuine part is guaranteed by Toyota's factory warranty.
2004 Scion xA Coil Springs
Looking for affordable OEM 2004 Scion xA Coil Springs? Explore our comprehensive catalogue of genuine 2004 Scion xA Coil Springs. All our parts are covered by the manufacturer's warranty. Plus, our straightforward return policy and speedy delivery service ensure an unparalleled shopping experience. We look forward to your visit!
2004 Scion xA Coil Springs Parts Q&A
- Q: How to replace the rear left coil springs on 2004 Scion xA?A: Start by taking off the wheel followed by an unscrew of the skid control sensor connector and removing its bolt allowing the wire to separate from the axle beam. The technician should use Service Tool: 09023-00100 to break rear brake tube No.4 while removing the clip for non-reuse. Rephrase the same brake tube separation steps for rear brake tube No.3. The replacement process progresses by removing the nut from the axle beam to detach parking brake cable assembly No.3 then repeat this method with parking brake cable assembly No.2 on the right-hand side. Keep the two bolts of the rear axle beam assembly in place but loosen their tightness. Separate the rear left shock absorber assembly by first supporting both rear axle beam sides with jacks and then removing the nut followed by the spacer. The method for removing and installing the rear right shock absorber assembly will remain identical to the previous section. The process of taking out the rear left coil spring requires slowly lowering the jacks before removing the components which include coil spring and both insulators named upper LH and lower LH. Insert the insulator upper LH until its gap aligns with the coil spring LH end before attaching the insulator lower LH and coil spring against the rear axle beam with the paint mark below the vehicle. Perform the same procedure on the rear right shock absorber assembly to the rear axle beam while continuing to raise the jacks. Torque parking brake cable assembly No.3 with a nut to 5.4 Nm (55 kgf-cm, 48 inch lbs.) following the same cable assembly No.2 installation procedure for the right-hand side. Use Special Service Tool: 09023-00100 to connect rear brake tube No.4 with its flexible hose while torquing it to 15 Nm (155 kgf-cm, 11 ft. lbs.) then install the clip. Repeat for rear brake tube No.3. Install the skid control sensor wire onto the bolt before tightening it to 8.0 Nm (82 kgf-cm, 71 inch lbs.) and then connect its connector. Use a proper torque wrench to secure the rear axle beam assembly bolts for shock absorber stability while utilizing a jack for axle support then loading the same compartment with 90 kg (198 lb.) before complete tightening at 82 Nm (836 kgf-cm, 60 ft. lbs.). Complete tightening of the rear left shock absorber assembly nut to 49 Nm (500 kgf-cm, 36 ft. lbs.) should be followed by similar treatment of the rear right assembly nut. The last step requires bleeding the brake line and installing the rear wheel with 76 ft. lbs. torque (1,050 kgf-cm, 103 Nm). Next, check the alignment of the rear wheel together with the ABS speed sensor signal.
Related 2004 Scion xA Parts
 2004 Scion xA Wheel Hub
 2004 Scion xA Axle Beam Mount
 2004 Scion xA Bump Stop
 2004 Scion xA Control Arm
 2004 Scion xA Control Arm Bolt
 2004 Scion xA Control Arm Bushing
 2004 Scion xA Crossmember Bushing
 2004 Scion xA Front Cross-Member
 2004 Scion xA Shock Absorber
 2004 Scion xA Sway Bar Bracket
 2004 Scion xA Sway Bar Bushing
 2004 Scion xA Sway Bar Kit