×
ToyotaParts- Hello
- Login or Register
- Quick Links
- Live Chat
- Track Order
- Parts Availability
- RMA
- Help Center
- Contact Us
- Shop for
- Toyota Parts
- Scion Parts
My Garage
My Account
Cart
OEM 2004 Scion xA Shock Absorber
Suspension Shock Absorber- Select Vehicle by Model
- Select Vehicle by VIN
Select Vehicle by Model
orMake
Model
Year
Select Vehicle by VIN
For the most accurate results, select vehicle by your VIN (Vehicle Identification Number).
2 Shock Absorbers found

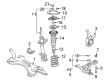
2004 Scion xA Strut
Part Number: 48510-59765$124.54 MSRP: $176.30You Save: $51.76 (30%)Ships in 1-3 Business DaysProduct Specifications- Other Name: Absorber Assembly, Shock; Front Suspension Strut; Shock Absorber Kit; Strut Assembly Kit; Complete Strut; Absorber Assembly, Shock, Front Passenger Side; Absorber Assembly, Shock, Front Driver Side
- Manufacturer Note: MARK 48510-52610
- Item Weight: 9.60 Pounds
- Item Dimensions: 27.1 x 8.4 x 7.7 inches
- Condition: New
- Fitment Type: Direct Replacement
- SKU: 48510-59765
- Warranty: This genuine part is guaranteed by Toyota's factory warranty.

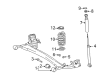
2004 Scion xA Shock Absorber, Rear Passenger Side
Part Number: 48530-80195$81.63 MSRP: $114.58You Save: $32.95 (29%)Ships in 1-3 Business DaysProduct Specifications- Other Name: Absorber Set, Rear Right-Hand; Suspension Shock Absorber Kit; Strut Assembly Kit; Complete Strut; Shock Absorber Assembly, Rear Passenger Side & Driver Side; Suspension Shock Absorber
- Manufacturer Note: MARK 48530-52640
- Position: Rear Passenger Side
- Replaces: 48530-59795
- Item Weight: 6.50 Pounds
- Item Dimensions: 25.6 x 6.6 x 5.8 inches
- Condition: New
- Fitment Type: Direct Replacement
- SKU: 48530-80195
- Warranty: This genuine part is guaranteed by Toyota's factory warranty.
2004 Scion xA Shock Absorber
Looking for affordable OEM 2004 Scion xA Shock Absorber? Explore our comprehensive catalogue of genuine 2004 Scion xA Shock Absorber. All our parts are covered by the manufacturer's warranty. Plus, our straightforward return policy and speedy delivery service ensure an unparalleled shopping experience. We look forward to your visit!
2004 Scion xA Shock Absorber Parts Q&A
- Q: How to overhaul the front shock absorber with coil spring on 2004 Scion xA?A: Start your shock absorber coil spring service by taking off four parts: front wiper arm head cap, both wiper arms, hood to cowl top seal, and cowl top ventilator louvers on both sides. The next step entails disconnecting both hose and wire harness before you remove 8 bolts to take out the windshield wiper link assembly and cowl top panel outer. To remove the front wheel you must disconnect the flexible hose by unbolting both parts of the ABS speed sensor harness bracket and the shock absorber bracket. Unfasten the 2 nuts and bolts connecting the shock absorber with coil spring to the steering knuckle and then unscrew 3 nuts to extract the suspension support No.2 assembly. Insert the front shock absorber with coil spring into a vise while applying 2 nuts and a bolt to the bracket. Before measuring the coil spring with Special Service Tool: 09727-30021 (09727-00010, 09727-00021, 09727-00031), never use an impact wrench to protect the tool from damage. Take off the left-hand front support to shock absorber nut using two nuts and a screwdriver to hold the shock absorber while removing the front suspension support dust cover and sub-assembly together with the dust seal. Take out the upper parts of the spring seat, insulator, spring and bumper in that order. Examine the shock absorber system when pushing and pulling the rod to find gauge and sounds that need replacement. Fitting the shock absorber assembly with front spring bumper and coil spring needs you to compress the coil spring once more using the special service tool to seat the bottom end at the spring's lower section. Mount the front coil spring insulator upper label down first and then put the "OUT" marked front coil spring seat upper part upward. Put back the front suspension support dust seal and sub-system then secure the front shock absorber with a new center nut tightened to 33 Nm yet keep the suspension support stud bolts free from damage during operation. Dismount the special service tool then put MP grease on the suspension support. Secure the shock absorber and coil spring onto the steering knuckle by adding 3 nuts that you apply force of 39 Nm then 2 bolts with a nut at 132 Nm. Put back the flexible hose along with front wheel and cowl top panel parts while making sure they connect correctly and match specified torque values. After installing the windshield wiper links you must put in both ventilator louvers then seal the hood with cowl top the front wiper arms follow. Also perform the wheel alignment test. To dispose of the shock absorber comply with the following steps: Put the rod in its maximum extension position then make a hole in the cylinder using recommended gear to avoid precise metal shards since the gas is colorless transparent and harmless.
Related 2004 Scion xA Parts
 2004 Scion xA Wheel Hub
 2004 Scion xA Alignment Bolt
 2004 Scion xA Bump Stop
 2004 Scion xA Coil Springs
 2004 Scion xA Control Arm Bolt
 2004 Scion xA Control Arm Bushing
 2004 Scion xA Crossmember Bushing
 2004 Scion xA Front Cross-Member
 2004 Scion xA Shock And Strut Mount
 2004 Scion xA Steering Knuckle
 2004 Scion xA Sway Bar Kit
 2004 Scion xA Trailing Arm Bushing