×
ToyotaParts- Hello
- Login or Register
- Quick Links
- Live Chat
- Track Order
- Parts Availability
- RMA
- Help Center
- Contact Us
- Shop for
- Toyota Parts
- Scion Parts
My Garage
My Account
Cart
OEM 2005 Scion xA Shock Absorber
Suspension Shock Absorber- Select Vehicle by Model
- Select Vehicle by VIN
Select Vehicle by Model
orMake
Model
Year
Select Vehicle by VIN
For the most accurate results, select vehicle by your VIN (Vehicle Identification Number).
4 Shock Absorbers found

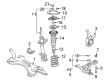
2005 Scion xA Strut, Front Passenger Side
Part Number: 48510-80263$124.54 MSRP: $176.30You Save: $51.76 (30%)Ships in 1-3 Business DaysProduct Specifications- Other Name: Absorber Set, Front Right-Hand; Suspension Strut; Shock Absorber Kit; Strut Assembly; Complete Strut; Absorber Assembly, Shock, Front Passenger Side; Absorber Assembly, Shock, Front Driver Side
- Manufacturer Note: MARK 48510-52C10
- Position: Front Passenger Side
- Item Weight: 9.70 Pounds
- Item Dimensions: 26.1 x 8.3 x 7.6 inches
- Condition: New
- Fitment Type: Direct Replacement
- SKU: 48510-80263
- Warranty: This genuine part is guaranteed by Toyota's factory warranty.
2005 Scion xA Strut
Part Number: 48510-59765$124.54 MSRP: $176.30You Save: $51.76 (30%)Ships in 1-3 Business DaysProduct Specifications- Other Name: Absorber Assembly, Shock; Front Suspension Strut; Shock Absorber Kit; Strut Assembly Kit; Complete Strut; Absorber Assembly, Shock, Front Passenger Side; Absorber Assembly, Shock, Front Driver Side
- Manufacturer Note: MARK 48510-52610
- Item Weight: 9.60 Pounds
- Item Dimensions: 27.1 x 8.4 x 7.7 inches
- Condition: New
- Fitment Type: Direct Replacement
- SKU: 48510-59765
- Warranty: This genuine part is guaranteed by Toyota's factory warranty.

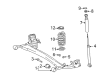
2005 Scion xA Shock Absorber, Rear Passenger Side
Part Number: 48530-80293$90.52 MSRP: $127.06You Save: $36.54 (29%)Ships in 1-3 Business DaysProduct Specifications- Other Name: Absorber Set, Rear Right-Hand; Suspension Shock Absorber Kit; Strut Assembly Kit; Complete Strut; Shock Absorber Assembly, Rear Passenger Side & Driver Side; Suspension Shock Absorber
- Manufacturer Note: MARK 48530-52C10
- Position: Rear Passenger Side
- Item Weight: 6.90 Pounds
- Item Dimensions: 25.8 x 6.6 x 5.7 inches
- Condition: New
- Fitment Type: Direct Replacement
- SKU: 48530-80293
- Warranty: This genuine part is guaranteed by Toyota's factory warranty.
2005 Scion xA Shock Absorber, Rear Passenger Side
Part Number: 48530-80195$81.63 MSRP: $114.58You Save: $32.95 (29%)Ships in 1-3 Business DaysProduct Specifications- Other Name: Absorber Set, Rear Right-Hand; Suspension Shock Absorber Kit; Strut Assembly Kit; Complete Strut; Shock Absorber Assembly, Rear Passenger Side & Driver Side; Suspension Shock Absorber
- Manufacturer Note: MARK 48530-52640
- Position: Rear Passenger Side
- Replaces: 48530-59795
- Item Weight: 6.50 Pounds
- Item Dimensions: 25.6 x 6.6 x 5.8 inches
- Condition: New
- Fitment Type: Direct Replacement
- SKU: 48530-80195
- Warranty: This genuine part is guaranteed by Toyota's factory warranty.
2005 Scion xA Shock Absorber
Looking for affordable OEM 2005 Scion xA Shock Absorber? Explore our comprehensive catalogue of genuine 2005 Scion xA Shock Absorber. All our parts are covered by the manufacturer's warranty. Plus, our straightforward return policy and speedy delivery service ensure an unparalleled shopping experience. We look forward to your visit!
2005 Scion xA Shock Absorber Parts Q&A
- Q: How to replace the shock absorber assembly rear LH on 2005 Scion xA?A: Start the replacement of the shock absorber assembly rear LH by eliminating the rear absorber cap and the rear wheel. You should support the rear axle beam with a jack while holding the piston rod to remove the two nuts. After you remove the cushion retainer and the suspension support then uninstall the nut followed by the spacer until you reach the shock absorber assembly. The technician should separate the suspension support assembly from the shock absorber assembly. When inspecting the shock absorber assembly, squeeze and stretch the rod to determine normal resistance along with listening for odd sounds; find any issues for a shock absorber replacement. Begin by attaching the suspension support assembly to the shock absorber before you install both components and the suspension support with cushion retainer onto the body. Install the lower nut while holding the piston rod before the rod extends 15 to 18 mm (0.591 to 0.709 inch) from the lower nut. Then install and tighten the upper nut to 25 Nm (250 kgf-cm, 18 ft. lbs.). First lift the jack until you can install the shock absorber assembly between the rear axle beam and its spacer with the nut at a 49 Nm torque level (500 kgf-cm, 36 ft. lbs.). After fixing the rear wheel align the wheel correctly then tighten it to 103 Nm (1,050 kgf-cm, 76 ft. lbs.). Drill a vent hole between points A and B of the shock absorber assembly rear LH while completely extending its shock absorber rod because this allows gas discharge safely but require essential protective equipment for fragmentary metal debris. Liquid gas exhibits no color and odor and shows no poisoning effects.
Related 2005 Scion xA Parts
 2005 Scion xA Wheel Hub
 2005 Scion xA Alignment Bolt
 2005 Scion xA Bump Stop
 2005 Scion xA Coil Springs
 2005 Scion xA Control Arm Bolt
 2005 Scion xA Control Arm Bushing
 2005 Scion xA Crossmember Bushing
 2005 Scion xA Front Cross-Member
 2005 Scion xA Shock And Strut Mount
 2005 Scion xA Steering Knuckle
 2005 Scion xA Sway Bar Kit
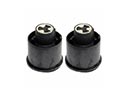 2005 Scion xA Trailing Arm Bushing