×
ToyotaParts- Hello
- Login or Register
- Quick Links
- Live Chat
- Track Order
- Parts Availability
- RMA
- Help Center
- Contact Us
- Shop for
- Toyota Parts
- Scion Parts
My Garage
My Account
Cart
OEM Scion ABS Control Module
Anti Lock Brake Control Module- Select Vehicle by Model
- Select Vehicle by VIN
Select Vehicle by Model
orMake
Model
Year
Select Vehicle by VIN
For the most accurate results, select vehicle by your VIN (Vehicle Identification Number).
28 ABS Control Modules found

Scion Control Module Part Number: SU003-05755
$1513.58 MSRP: $2062.89You Save: $549.31 (27%)Ships in 1-3 Business DaysProduct Specifications- Other Name: Ecu Repair-Vdc; ABS Control Module; Module
Scion Control Module Part Number: SU003-05752
$1513.58 MSRP: $2062.89You Save: $549.31 (27%)Ships in 1-3 Business DaysProduct Specifications- Other Name: Ecu Repair-Vdc; ABS Control Module; Module
Scion Control Module Part Number: SU003-04295
$1513.58 MSRP: $2062.89You Save: $549.31 (27%)Ships in 1-3 Business DaysProduct Specifications- Other Name: Ecu Repair-Vdc; ABS Control Module; Module
Scion Control Module Part Number: SU003-04292
$1513.58 MSRP: $2062.89You Save: $549.31 (27%)Ships in 1-3 Business DaysProduct Specifications- Other Name: Ecu Repair-Vdc; ABS Control Module; Module


Scion Modulator Valve Part Number: 44050-WB010
$614.72 MSRP: $773.81You Save: $159.09 (21%)Ships in 1-2 Business DaysProduct Specifications- Other Name: Actuator Assembly, Brake; ABS Hydraulic Assembly; ABS Control Unit

Scion Modulator Valve Part Number: 44050-52800
$770.77 MSRP: $970.25You Save: $199.48 (21%)Ships in 1-3 Business DaysProduct Specifications- Other Name: Actuator Assembly, Brake; ABS Hydraulic Assembly; ABS Pump And Motor Assembly; ABS Control Module; Actuator Assembly

Scion Modulator Valve Part Number: 44050-52370
$793.92 MSRP: $999.39You Save: $205.47 (21%)Ships in 1-3 Business DaysProduct Specifications- Other Name: Actuator Assembly, Brake; ABS Hydraulic Assembly; ABS Pump And Motor Assembly; ABS Control Module; Actuator Assembly

Scion Modulator Valve Part Number: 44050-12591
$873.14 MSRP: $1099.12You Save: $225.98 (21%)Ships in 1-3 Business DaysProduct Specifications- Other Name: Actuator Assembly, Brake; ABS Hydraulic Assembly; ABS Pump And Motor Assembly; ABS Control Module; Actuator Assembly
Scion Modulator Valve Part Number: 44050-12522
$906.97 MSRP: $1141.70You Save: $234.73 (21%)Ships in 1-3 Business DaysProduct Specifications- Other Name: Actuator Assembly, Brake; ABS Hydraulic Assembly; ABS Pump And Motor Assembly; ABS Control Module; Actuator Assembly

Scion Modulator Valve Part Number: 44050-52520
$931.37 MSRP: $1172.41You Save: $241.04 (21%)Ships in 1-3 Business DaysProduct Specifications- Other Name: Actuator Assembly, Brake; ABS Hydraulic Assembly; ABS Modulator Valve; ABS Pump And Motor Assembly; ABS Control Module; Actuator Assembly
- Manufacturer Note: MOON ROOF
Scion Actuator Assembly Part Number: 44050-12521
$933.07 MSRP: $1174.56You Save: $241.49 (21%)Ships in 1-3 Business DaysProduct Specifications- Other Name: Actuator Assembly, Brake; ABS Hydraulic Assembly; ABS Pump And Motor Assembly; ABS Control Module

Scion Modulator Valve Part Number: 44050-12D70
$950.32 MSRP: $1196.27You Save: $245.95 (21%)Ships in 1-3 Business DaysProduct Specifications- Other Name: Actuator Assembly, Brake; ABS Hydraulic Assembly; ABS Control Module; ABS Control Unit

Scion Modulator Valve Part Number: 44050-21100
$933.64 MSRP: $1175.27You Save: $241.63 (21%)Ships in 1-3 Business DaysProduct Specifications- Other Name: Actuator Assembly, Brake; ABS Hydraulic Assembly; ABS Pump And Motor Assembly; ABS Control Module; Actuator Assembly

Scion Modulator Valve Part Number: 44050-21130
$990.16 MSRP: $1246.42You Save: $256.26 (21%)Ships in 1-3 Business DaysProduct Specifications- Other Name: Actuator Assembly, Brake; ABS Hydraulic Assembly; ABS Control Module; Actuator
Scion Modulator Valve Part Number: 44050-21140
$963.26 MSRP: $1212.57You Save: $249.31 (21%)Ships in 1-3 Business DaysProduct Specifications- Other Name: Actuator Assembly, Brake; ABS Hydraulic Assembly; ABS Control Module; Actuator

Scion Modulator Valve Part Number: 44050-52C90
$972.46 MSRP: $1224.13You Save: $251.67 (21%)Ships in 1-3 Business DaysProduct Specifications- Other Name: Actuator Assembly, Brake; ABS Hydraulic Assembly; ABS Pump And Motor Assembly; ABS Control Module; Actuator Assembly
Scion Modulator Valve Part Number: 44050-52G60
$973.59 MSRP: $1225.57You Save: $251.98 (21%)Ships in 1-3 Business DaysProduct Specifications- Other Name: Actuator Assembly, Brake; ABS Hydraulic Assembly; ABS Pump And Motor Assembly; ABS Control Module; Actuator Assembly
Scion Modulator Valve Part Number: 44050-52G62
$1022.17 MSRP: $1286.71You Save: $264.54 (21%)Ships in 1-3 Business DaysProduct Specifications- Other Name: Actuator Assembly, Brake; ABS Hydraulic Assembly; ABS Pump And Motor Assembly; ABS Control Module; Actuator Assembly

Scion Modulator Valve Part Number: 44050-74051
$1037.27 MSRP: $1305.72You Save: $268.45 (21%)Ships in 1-3 Business DaysProduct Specifications- Other Name: Actuator Assembly, Brake; ABS Hydraulic Assembly; ABS Pump And Motor Assembly; ABS Control Module; Actuator Assembly
Scion Modulator Valve Part Number: 44050-21110
$1051.68 MSRP: $1323.86You Save: $272.18 (21%)Ships in 1-3 Business DaysProduct Specifications- Other Name: Actuator Assembly, Brake; ABS Control Module; Actuator
| Page 1 of 2 |Next >
1-20 of 28 Results
Scion ABS Control Module
OEM parts deliver unmatched quality you can rely on. They pass extensive quality control inspections. Scion produces them to the official factory specifications. This process helps prevent defects and imperfections. So you can get exceptional lifespan and a flawless fit. Need new OEM Scion ABS Control Module? You'll love our wide selection of genuine options. Shop in minutes and skip the hunt. Our prices are unbeatable, you'll save time and money. It's easy to shop and find the right piece. Our committed customer service team gives professional help from start to finish. Every part includes a manufacturer's warranty. We ship quickly, your parts will arrive fast at your door.
Scion ABS Control Module ensures the wheels do not lock but rather stay steady when a driver has to hit the brakes during a panic stop. Scion tapped into first-timers with simple pricing, aggressive paint and release series drops that made every purchase look like a club membership, and the digital playgrounds of the virtual city that followed the brand, like the ABS Control Module, offered the ability to fit in across variants without intricate option selections, further reinforcing that sense of youthful taste when rewarded with simple, personal, and easy customization that is now part of the lineup and clear space gear like the ABS Control Module can easily fit in across variants without an option tree of complex tasks. Scion also demonstrated that low dealer bargaining and factory amenities could co-exist and that owners could stamp identity in small platforms and the parent company could get actual data on color preferences, infotainment preferences, and ownership patterns at an even quicker rate than traditional channels. Scion also equips the ABS Control Module with wheel-speed inputs, hydraulic valves, and a high-speed processor that pulses the brake pressure hundreds of times a second, eliminating lockups, reducing the stopping distance on slick asphalt, and maintaining steering action even when the driver stomps the pedal at highway speed, with built-in stability and traction logic that manipulates the torque so that the hatchback, coupe, or sedan would remain in its intended path rather than fishtailing into trouble. In combination with basic diagnostics and robust electronics, Scion matches ABS Control Module with simple maintenance and long-lasting safety technology that is easy to use and needs little attention on a daily basis.
Scion ABS Control Module Parts and Q&A
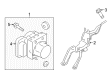
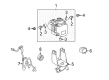
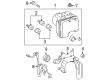
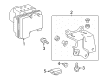
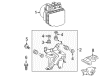
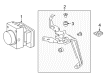
- Q: How to remove the ABS Control Module for the Antilock Brakes on Scion tC?A:Disconnection of the Hydraulic Control Assembly from the Antilock Braking system requires first removing the cable from the negative battery terminal followed by a 90-second minimum waiting period for Air Bag and seat belt pretensioner prevention; system initialization may be essential after reconnection. Immediate brake fluid draining is essential while properly cleaning any paint surface contamination with fluid. The removal process requires front right wheel removal and the hood to front end panel seal and left and right front fender liners and front bumper cover. The next step requires removing the right headlight unit itself. To remove the six brake tubes from the actuator use Special Service Tool: 09023-00101 while noting the original tubing positions. The connector for the actuator must be detached beforehand. The brake actuator can be detached from its bracket by removing the two bolts while unfastening the nut then removing the actuator with bracket while maintaining care for brake tubes and wire harness.
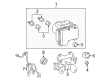
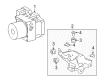
- Q: How to remove the ABS Control Module for the Antilock Brakes on Scion xB?A:The first step to remove the Antilock Brakes Hydraulic Control Assembly requires disconnecting the negative battery cable and draining the brake fluid before cleaning any paint-legging fluid with proper washing techniques. Begin the procedure by taking off the windshield wiper arm cover then uninstalling both right and left front wiper arm and blade assemblies one by one. The next step requires removal of the hood to cowl top seal and the right and left cowl top ventilator louvers and front wiper motor and link. Trim the outer cowl top panel and the air cleaner assembly from the basic assembly. Before disconnection of the brake actuator connector for maintenance purposes always avoid brake fluid entry into the removed connector endpoint while using the safety lock lever release function. A union nut wrench should be used to disconnect the 6 brake tubes from the brake actuator by labeling each tube for reinstallation in the sequence 1: Front wheel cylinder RH, 2: Front wheel cylinder LH, 3: Rear wheel cylinder RH, 4: Rear wheel cylinder LH, 5: First master cylinder, 6: Second master cylinder. The process starts by detaching the 2 tube clamps at the actuator bracket while you remove the 3 nuts to extract the brake actuator with bracket keeping away from damaging tubes or harnesses. Remove the brake actuator bracket assembly by completing the removal of its four retaining bolts.


