×
ToyotaParts- Hello
- Login or Register
- Quick Links
- Live Chat
- Track Order
- Parts Availability
- RMA
- Help Center
- Contact Us
- Shop for
- Toyota Parts
- Scion Parts
My Garage
My Account
Cart
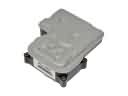
OEM Scion Yaw Sensor
Yaw Rate Sensor- Select Vehicle by Model
- Select Vehicle by VIN
Select Vehicle by Model
orMake
Model
Year
Select Vehicle by VIN
For the most accurate results, select vehicle by your VIN (Vehicle Identification Number).
6 Yaw Sensors found


Scion Yaw Rate Sensor Part Number: 89183-48030
$296.01 MSRP: $422.64You Save: $126.63 (30%)Ships in 1-3 Business DaysProduct Specifications- Other Name: Sensor, Yawrate; Suspension Yaw Sensor; Yaw Sensor


Scion Yaw Rate Sensor, Front Part Number: 89183-60020
$306.97 MSRP: $438.28You Save: $131.31 (30%)Ships in 1-3 Business DaysProduct Specifications- Other Name: Sensor, Yawrate; Suspension Yaw Sensor, Front; Yaw Sensor; Sensor
- Position: Front

Scion Yaw Rate Sensor Part Number: 89180-52050
$872.01 MSRP: $1277.94You Save: $405.93 (32%)Ships in 1-3 Business DaysProduct Specifications- Other Name: Sensor Assembly, Yawrate; Suspension Yaw Sensor; Yaw Sensor; Sensor, Yawrate

Scion Yaw Rate Sensor Part Number: 89180-12140
$874.98 MSRP: $1282.29You Save: $407.31 (32%)Ships in 1-3 Business DaysProduct Specifications- Other Name: Sensor Assembly, Yawrate; Suspension Yaw Sensor; Yaw Sensor
Scion Yaw Rate Sensor Part Number: 89180-12080
$999.99 MSRP: $1465.49You Save: $465.50 (32%)Ships in 1-3 Business DaysProduct Specifications- Other Name: Sensor Assembly, Yawrate; Suspension Yaw Sensor; Yaw Sensor


Scion Yaw Rate Sensor Part Number: 89180-52010
$923.94 MSRP: $1354.04You Save: $430.10 (32%)Ships in 1-3 Business DaysProduct Specifications- Other Name: Sensor Assembly, Yawrate; Sensor, Yawrate
- Manufacturer Note: VEHICLE STABILITY CONT-WITH PUMP UP BA
Scion Yaw Sensor
OEM parts deliver unmatched quality you can rely on. They pass extensive quality control inspections. Scion produces them to the official factory specifications. This process helps prevent defects and imperfections. So you can get exceptional lifespan and a flawless fit. Need new OEM Scion Yaw Sensor? You'll love our wide selection of genuine options. Shop in minutes and skip the hunt. Our prices are unbeatable, you'll save time and money. It's easy to shop and find the right piece. Our committed customer service team gives professional help from start to finish. Every part includes a manufacturer's warranty. We ship quickly, your parts will arrive fast at your door.
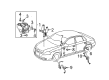
Scion Yaw Sensor follows the rotational movement accurately and maintains all the drivers ready and the car upright. In 2003, Scion hit the streets with compact rides that seemed to be made-to-order right there in the showroom and would not be haggled on. Scion appealed to a young audience by launching flash mobs, playing in the Scion City online and dropping Release Series that quickly faded away. The brand applied its showroom as a laboratory, experimenting with outrageous paint, tight trim, and single price stickers that even someone making their first purchase could assimilate and process without a second thought. The risk-taking spirit of Scion may still resonate in Toyota showrooms around the globe, even though the company had transferred more than 1,000,000 units by the time it went out of business in 2016. Small production batches turned cars into sneaker shoes, and thus the owner boasted of having low number plates compared to their peers. The Yaw Sensor is in the middle of the car and measures rotation on the vertical axis hundreds of times per second and transmits it into the stability control which then pinches one brake pad in front of the chassis going off course. Since the Yaw Sensor tracks real-time change in angular, traction control adjusts the torque to grip instead of making a guess and hope. When it rains, the Yaw Sensor makes the computer identify the throttle as easy and hold the nose up to where the steering wheel indicates. Small size allows the Yaw Sensor to be mounted in any model in the lineup with the same fast corrections without additional tuning and no additional weight.
Scion Yaw Sensor Parts and Q&A
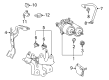
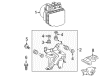
- Q: How to replace the Yaw Sensor on Scion xA?A:Before replacing the Yaw Rate Sensor you need to check its condition and make sure no foreign objects clog the space between it and the body. Also verify that the sensor points in the right direction. To access the yaw rate sensor start by removing the console box sub-assembly and disconnecting its cable before removing the two bolts securing it. To install the yaw rate sensor properly, join its connector and tighten the two mounting bolts at 14 Nm (143 kgf-cm, 10 ft-lbf). Hook back the console box sub-assembly and calibrate the yaw rate sensor zero point. During testing and inspection check the VSC sensor output at the end.
- Q: How to service a Yaw Sensor on Scion xB?A:The servicing process for Yaw Rate and Acceleration Sensor starts by disconnecting negative battery cable first. The service begins with removing the frontal headrest from the seat followed by taking off both the track cover and the inner bracket cover. Disassemble the front seat assembly after finishing the previous steps. The removal of the seat should be followed by unscrewing two bolts to extract the yaw rate and acceleration sensor along with its bracket and performing the connector disconnection. Leaving the installation nuts in place remains essential throughout this operation.