×
ToyotaParts- Hello
- Login or Register
- Quick Links
- Live Chat
- Track Order
- Parts Availability
- RMA
- Help Center
- Contact Us
- Shop for
- Toyota Parts
- Scion Parts
My Garage
My Account
Cart
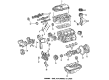
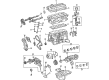
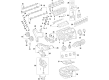
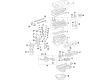
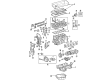
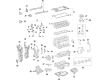
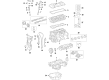
OEM Toyota Camry Camshaft
Cam- Select Vehicle by Model
- Select Vehicle by VIN
Select Vehicle by Model
orMake
Model
Year
Select Vehicle by VIN
For the most accurate results, select vehicle by your VIN (Vehicle Identification Number).
52 Camshafts found


Toyota Camry Camshaft Part Number: 13502-62030
$236.25 MSRP: $337.31You Save: $101.06 (30%)Ships in 1-3 Business Days

Toyota Camry Camshaft Sub-Assembly Part Number: 13054-62030
$236.25 MSRP: $337.31You Save: $101.06 (30%)Ships in 1-3 Business Days


Toyota Camry Camshaft Part Number: 13501-36030
$341.17 MSRP: $499.98You Save: $158.81 (32%)Ships in 1-3 Business Days


Toyota Camry Camshaft Part Number: 13502-74030
$363.98 MSRP: $533.43You Save: $169.45 (32%)Ships in 1-3 Business Days


Toyota Camry Camshaft Sub-Assembly Part Number: 13053-20010
$335.39 MSRP: $478.86You Save: $143.47 (30%)Ships in 1-3 Business Days


Toyota Camry Camshaft Part Number: 13501-28060
$343.78 MSRP: $503.81You Save: $160.03 (32%)
Toyota Camry Camshaft Part Number: 13502-36020
$341.17 MSRP: $499.98You Save: $158.81 (32%)Ships in 1-3 Business Days

Toyota Camry Camshaft Part Number: 13502-28010
$356.95 MSRP: $523.11You Save: $166.16 (32%)Ships in 1-3 Business Days

Toyota Camry Camshaft Part Number: 13501-28010
$359.56 MSRP: $526.93You Save: $167.37 (32%)Ships in 1-3 Business Days
Toyota Camry Camshaft Part Number: 13501-28070
$358.08 MSRP: $524.78You Save: $166.70 (32%)Ships in 1-3 Business Days
Toyota Camry Camshaft Part Number: 13502-F0020
$362.05 MSRP: $530.60You Save: $168.55 (32%)Ships in 1-3 Business Days
Toyota Camry Camshaft Part Number: 13501-F0030
$362.05 MSRP: $530.60You Save: $168.55 (32%)Ships in 1-3 Business Days
Toyota Camry Camshaft Part Number: 13502-36030
$372.95 MSRP: $546.56You Save: $173.61 (32%)Ships in 1-3 Business Days
Toyota Camry Camshaft Part Number: 13501-36050
$383.28 MSRP: $561.70You Save: $178.42 (32%)Ships in 1-3 Business Days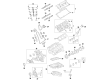
Toyota Camry Camshaft Sub-Assembly Part Number: 13053-31031
$458.52 MSRP: $671.96You Save: $213.44 (32%)Ships in 1-3 Business Days
Toyota Camry Camshaft Part Number: 13502-20903
$503.02 MSRP: $737.18You Save: $234.16 (32%)Ships in 1-3 Business Days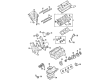
Toyota Camry Camshaft Part Number: 13502-31061
$541.61 MSRP: $793.74You Save: $252.13 (32%)Ships in 1-3 Business Days


Toyota Camry Camshaft Part Number: 13054-20010
$335.62 MSRP: $479.20You Save: $143.58 (30%)

Toyota Camry Camshaft Part Number: 13501-74050

Toyota Camry Camshaft Part Number: 13501-28040
$359.22 MSRP: $526.44You Save: $167.22 (32%)
| Page 1 of 3 |Next >
1-20 of 52 Results
Toyota Camry Camshaft
Choose genuine Camshaft that pass strict quality control tests. You can trust the top quality and lasting durability. Shopping for OEM Camshaft for your Toyota Camry? Our website is your one-stop destination. We stock an extensive selection of genuine Toyota Camry parts. The price is affordable so you can save more. It only takes minutes to browse and find the exact fit. Easily add to cart and check out fast. Our hassle-free return policy will keep you stress-free. We process orders quickly for swift delivery. Your parts will arrive faster, so you can get back on the road sooner.
Camshaft is a road component in Toyota Camry cars and mainly its function is to translate rotational motion on the Camshaft from the crankshaft into reciprocal for interning or exhausting intake or exhaust valves. The DOHC structure of the engines in the XV60 generation Camry possesses two camshafts per cylinder row and uses an intelligent variable valve timing system. Usually the camshaft can be made from steel or cast iron and its design determine top RPM range and performance of the engine. They include OHV, SOHC, and DOHC where different configurations create a variation in power of the engine and quality of its idle tone. Repairing is all about controlling the usage and minimizing the sliding while other technologies such as camless engines are used to solve traditional problems of camshafts.
Toyota Camry Camshaft Parts and Q&A
- Q: How to remove the camshaft on Toyota Camry?A:The first step to remove the 2AZ-FE engine camshaft involves the removal of front wheel RH, engine under cover LH, engine under cover RH, front fender apron seal RH, No. 1 engine cover sub-assembly, Ignition Coil assembly, and cylinder head cover sub-assembly. Set the Number One cylinder at TDC/compression position then take out the Number One chain tensioner assembly. A wrench should be used to stabilize the No. 2 camshaft before loosening its camshaft timing set bolt and following the stated sequence to individually loosen then extract the 10 bearing cap bolts for subsequent bearing cap removal. Hold the No. 2 camshaft while you remove the camshaft timing sprocket set bolt before extracting the timing sprocket with the attached chain followed by separating the sprocket from the chain. The removal process for the main camshaft proceeds by uniformly loosening and removing its 10 bearing cap bolts in sequence while removing the 5 bearing caps after extracting the camshaft and camshaft timing gear that necessitates Timing Chain support. The timing chain requires string tying to stop its descent into the timing chain cover. A vise needs to clamp the camshaft but the timing gear must remain static while vinyl tape covers all ports except the advance port and applying 100 kPa (1.0 kgf/cm2, 14 psi) pressurizes the oil flow during hand-rotation of the camshaft timing gear to the advance side (clockwise), maintaining shop rag coverage over all paths to prevent oil leakage. Finally when replacing the camshaft timing gear remove its flange bolt while keeping all other bolts in place and untie the straight pin lock if using a reused gear.
- Q: How is the camshaft timing gear assembly and camshaft installed, including timing chain alignment, bearing cap tightening, chain tensioner installation, and final component assembly with torque specifications and leak inspection on Toyota Camry?A:The installation process involves positioning the camshaft timing gear and camshaft incorrectly with the straight pin outside the key groove until the operator turns the gear and rolls it against the camshaft until the pin locks into position. Perform this step without rotating toward the retard angle area. The gear must have no clearance with the camshaft before installing a torque of 54 Nm (551 kgf-cm, 40 ft-lbf) to the flange bolt. Check the movement and locking capability of the camshaft timing gear when it moves to its most retarded position on the retard angle side. A thin engine oil coating on the camshaft journal area is required before loading the camshaft timing gear and timing chain with the paint mark precisely matching the timing mark. Verification of all front notches and numbers should be completed before inserting the bearing caps into the cylinder head. The bearing cap bolts undergo a sequential tightening process in which the No. 1 bearing cap receives 30 Nm (301 kgf-cm, 22 ft-lbf) torque while the No. 3 bearing cap uses 9.0 Nm (92 kgf-cm, 80 in-lbf) torque. The entire process requires application of engine oil to the threads and under the heads of these bolts before uniform bolt tightening. You should place the No. 2 camshaft on the cylinder head with engine oil applied to its journal while making sure the paint marks line up with the timing marks. Then fasten the camshaft timing sprocket set bolt loosely and verify the front markings order before installing the bearing caps. Apply engine oil to each bearing cap bolt threads and under their heads before tightening all 10 bolts to 30 Nm (301 kgf-cm, 22 ft-lbf) for the No. 2 bearing caps and 9.0 Nm (92 kgf-cm, 80 in-lbf) for the No. 3 bearing caps. The technician should apply a wrench to the camshaft to torque the camshaft timing sprocket set bolt to 54 Nm (551 kgf-cm, 40 ft-lbf) while verifying that the chain paint marks match the camshaft timing gear and camshaft timing sprocket timing marks and the crankshaft pulley groove points to the timing mark "0" of the timing chain cover. The service calls for installation of the No. 1 chain tensioner assembly together with valve clearance measurement followed by cylinder head cover sub-assembly installation then the Ignition Coil assembly before moving on to install the No. 1 engine cover sub-assembly and the front fender apron seal RH before proceeding with engine under cover LH installation and engine under cover RH installation and front wheel RH installation and an engine oil leak check.


Related Toyota Camry Parts
 Toyota Camry Oil Filter
 Toyota Camry Timing Belt
 Toyota Camry Oil Pan
 Toyota Camry Timing Chain
 Toyota Camry Oil Drain Plug
 Toyota Camry Oil Pump
 Toyota Camry Camshaft Bearing
 Toyota Camry Crankshaft Gear
 Toyota Camry Engine Mount Torque Strut
 Toyota Camry Exhaust Valve
 Toyota Camry Spool Valve
 Toyota Camry Timing Cover