×
ToyotaParts- Hello
- Login or Register
- Quick Links
- Live Chat
- Track Order
- Parts Availability
- RMA
- Help Center
- Contact Us
- Shop for
- Toyota Parts
- Scion Parts
My Garage
My Account
Cart
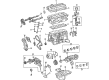
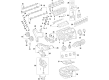
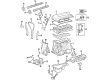
OEM Toyota Camry Timing Belt
Engine Timing Belt- Select Vehicle by Model
- Select Vehicle by VIN
Select Vehicle by Model
orMake
Model
Year
Select Vehicle by VIN
For the most accurate results, select vehicle by your VIN (Vehicle Identification Number).
6 Timing Belts found


Toyota Camry Timing Belt Part Number: 13568-09041
$44.44 MSRP: $61.86You Save: $17.42 (29%)Ships in 1-3 Business Days


Toyota Camry Timing Belt Part Number: 13568-09080
$60.54 MSRP: $84.98You Save: $24.44 (29%)Ships in 1-2 Business Days


Toyota Camry Timing Belt Part Number: 13568-69066
$47.67 MSRP: $66.35You Save: $18.68 (29%)Ships in 1-3 Business Days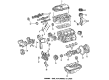
Toyota Camry Belt Set, Timing Part Number: 13568-YZZ06
$57.47 MSRP: $79.99You Save: $22.52 (29%)Ships in 1-3 Business Days
Toyota Camry Timing Belt Part Number: 13568-63023

Toyota Camry Timing Belt Part Number: 13568-69035
Toyota Camry Timing Belt
Choose genuine Timing Belt that pass strict quality control tests. You can trust the top quality and lasting durability. Shopping for OEM Timing Belt for your Toyota Camry? Our website is your one-stop destination. We stock an extensive selection of genuine Toyota Camry parts. The price is affordable so you can save more. It only takes minutes to browse and find the exact fit. Easily add to cart and check out fast. Our hassle-free return policy will keep you stress-free. We process orders quickly for swift delivery. Your parts will arrive faster, so you can get back on the road sooner.
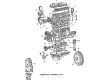
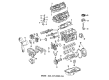
The Toyota Camry Timing Belt is a critical part that is at the center of Toyota's spectacular mid-size sedan, Camry. This Belt works as a connection between the crankshaft and the camshaft so that the engine valves shall open and close in order to be in harmony with the piston movement and therefore attain maximum efficiency. Since 1982, the production of Camry models include the generations 7V, 8V, 9V, and 10V have differences and mostly employ these tough timing belts that are manufactured from high quality, high rubber materials with fibers and the benefits that comes with the use of these belts include low friction, low noise level, and cheaper to purchase as opposed to its steel counterpart. The specifications of the Timing Belt include curves on the teeth for better strength, durability and quietness, and therefore the new Camry is a marvel in the automobile industry. Timing Belt replacement is critical because even though what appears as a minor stretch might seem harmless, it is in reality, morbid on the vehicle's performance and safety. Another factor is that the Toyota Camry comes with optional 4-cylinder and V6 types of engines, and any of these engine types makes use of the Timing Belt system, also adding to the belt's versatility. Thus, efficacy and safety of Toyota Camry are marked by the role of Timing Belt, which assures correct timing and coordination during the car's operation, making the car popular among those in search of reliable vehicle. That is why the Toyota Camry Timing Belt wholly corresponds to its owner's expectations and once again proves Toyota's impeccable experience in car production and innovations.
Toyota Camry Timing Belt Parts and Q&A
- Q: How to Service and Repair a Timing Belt on Toyota Camry?A:The service procedure starts with unfastening the generator and right-hand front wheel together with the right-hand front fender apron seal and PS pump Drive Belt through two bolts. Start the procedure by disconnecting the ground strap connector followed by removing the engine moving control rod after disassembly of 3 bolts and the No.2 right-hand engine mounting bracket with its associated 3 bolts. Start by disconnecting the 4 thick cords from the spark plugs and clamps on the cylinder head cover and then remove both the spark plugs and the No.2 timing belt cover after removing its 4 bolts and two engine wire clamps. Turn the crankshaft pulley to position the No.1 cylinder at TDC/compression where the timing mark "0" lines up with the No.1 timing belt cover while the camshaft timing pulley hole addresses the bearing cap timing mark. The camshaft timing pulley requires Special Service Tool: 09249-63010, 09960-10010 (09962-01000, 09963-01000) for removal of its bolt that enables loosening. Subsequently remove the crankshaft pulley using Special Service Tool: 09213-54015 (91651-00855), 09330-00021 (and bolt) together with proper alignment of matchmarks if reusing the timing belt. Proceed to eliminate the No.1 timing belt cover, timing belt guide, and timing belt while noting down the engine revolution direction for belt reuse. First remove the No.1 idler pulley alongside its tension spring and then extract the No.2 idler pulley from the system. For optimal results use Special Service Tool: 09950-50012 (09951-05010, 09952-05010, 09953-05010, 09953-05020, 09954-05020, 09954-05010) for the removal process of the crankshaft timing pulley. Use Special Service Tool: 09960-10010 (09962-01000, 09963-00500) to free the pulley nut of the oil pump. Look for any damage on the timing belt that is not bent and not twisted and not in contact with oil water or steam also check for idler pulley oil leakage and normal operation. Free-length measurement of tension spring (42.0 mm) combined with 32 - 37 N tension reading at 50.5 mm will indicate whether replacement is required. Position the oil pump pulley first and install the crankshaft timing pulley while ensuring no damage to the angle sensor. Put on the second idler pulley after setting the first idler pulley with the tension spring and verifying normal operation. Begin by installing the timing belt with proper point alignment along with maintaining cleanliness until you place the timing belt guide followed by the No.1 timing belt cover while inspecting the gasket for damages. After securing the crankshaft pulley to the proper torque standard the technician can install the camshaft timing pulley then sets the No.1 cylinder at TDC compression and connects the timing belt to the pulley during the tension check. The valve timing check involves rotating the crankshaft pulley clockwise when the No.1 idler pulley bolt is loosened to align its timing marks before tightening the bolt. Check the No.2 timing belt cover while inspecting gaskets for damage then install the spark plugs and high-tension cords. The installation sequence continues with the No.2 right-hand engine mounting bracket and then follows with engine moving control rod, ground strap connector, PS pump drive belt and right-hand front fender apron seal and right-hand front wheel and generator.
- Q: How to remove and install the timing belt on Toyota Camry?A:Starting the timing belt replacement begins with generator removal while also taking off the right-hand front wheel and right-hand front fender apron seal together with the power steering pump Drive Belt through the procedure of bolt loosening. The ground strap connector should be disconnected and then you can remove the engine moving control rod through 3 bolt removal. The operation begins with separating the No.2 right-hand engine mounting bracket together with its 3 mounting bolts. Remove the four spark plugs after detaching their high-tension cables from the clamp placed on both the cylinder head cover and spark plugs. Proceed by disconnecting the 2 engine wires clamps from the No.2 timing belt cover before removing 4 bolts that allow the cover to be taken off. Set the No.1 cylinder to TDC/compression position by rotating the crankshaft pulley until the timing mark "0" of the No.1 timing belt cover line up and the camshaft timing pulley hole points at the bearing cap timing mark. Switch the crankshaft pulley if alignment is incorrect by turning it one complete revolution. Locate and loosen the mounting bolt of No.1 idler pulley then move it to the left side before tightening it enough to remove the camshaft timing pulley timing belt. Special Service Tools: 09249-63010, 09960-10010 (09962-10000, 09963-01000) help to loosen the pulley bolt prior to removing both the bolt and timing pulley. The Special Service Tools 09213-54015 (91651-60855), 09330-00021 need use to remove the crankshaft pulley bolt while understanding that pulley bolts must use either type A (91651-0885) or type B (91121-40665) with a plate washer required for type B. Loosen the crankshaft pulley bolt but verify that the matching mark matches the timing mark "0" of the No.1 timing belt cover. Adjust the pulley position as needed before removing the bolt and pulley. Apply Special Service Tool: 09950-50012 (list of alternative tools also included) to uninstall the pulley because you should not turn the pulley. Detach the crankshaft position sensor wire from its position on the timing belt cover before you drain the 4 retaining bolts to remove the No.1 timing belt cover. Gently remove the timing belt guide and the timing belt from its position and record engine revolution direction before putting matchmarks on reusable parts of the timing belt and crankshaft timing pulley. Start by uninstalling the No.1 idler pulley accompanied by its tension spring then proceed to remove the No.2 idler pulley. To remove the crankshaft timing pulley that cannot be removed manually use special service tool 09950-50012 (with components 09951-05010, 09952-05010, 09953-05010, 09953-05020, 09954-05010) while being careful not to harm the angle sensor. To remove the oil pump pulley nut first loosen it with Special Service Tool: 09960-10010 (09962-01000, 09963-00500). Check that the timing belt shows no damage and is not physically bent nor twisted nor touching oil water or steam while verifying its proper gasket installation and the Timing Cover gasket is unaffected. If the idler pulleys demonstrate oil leaks with uneven operation the technician must perform component replacement. A test should be performed to determine if the tension spring requires replacement by measuring its free length of 42.0 mm and its installed tension within the specified range of 32 to 37 N at 50.5 mm. Special Service Tool: 09960-10010 (02962-01000) 29963-00500) helps installation of the pulley nut which requires a torque of 24 Nm in this step. Use Special Service Tool: 09249-63010, 09960-10010 (09962-01000, 09963-01000) to install the crankshaft timing pulley bolt after sliding it onto the key groove with a torque of 54 Nm (37 Nm with the tool). The technician should place the No.1 cylinder into a TDC/compression position while aligning the crankshaft pulley groove with timing mark "0" and using Special Service Tool: 09960-10010 (09962-01000, 09963-01000) to match the camshaft timing pulley hole with bearing cap timing mark. The timing belt needs to be installed correctly on the camshaft timing pulley and the tension must be correct while valve timing needs checking through clocking the crankshaft pulley to match the timing marks by removing the No.1 idler pulley bolt. Install the No.2 timing belt cover over the gasket which should remain intact while tightening 4 bolts. First install the spark plugs and high-tension cords then secure the No.2 right-hand engine mounting bracket through tightening its 3 bolts to 52 Nm torque values. The engine moving control rod needs 3 bolts torqued up to 64 Nm which must be followed by reconnecting the ground strap connector, installing the power steering pump drive belt and right-hand front fender apron seal and right-hand front wheel and generator.


Related Toyota Camry Parts
 Toyota Camry Oil Pan
 Toyota Camry Oil Pump
 Toyota Camry Cylinder Head Gasket
 Toyota Camry Oil Filler Cap
 Toyota Camry Oil Pump Gasket
 Toyota Camry Crankshaft Seal
 Toyota Camry Intake Valve
 Toyota Camry Timing Chain Guide
 Toyota Camry Timing Cover
 Toyota Camry Timing Cover Gasket
 Toyota Camry Timing Idler Gear
 Toyota Camry Variable Timing Sprocket