×
ToyotaParts- Hello
- Login or Register
- Quick Links
- Live Chat
- Track Order
- Parts Availability
- RMA
- Help Center
- Contact Us
- Shop for
- Toyota Parts
- Scion Parts
My Garage
My Account
Cart
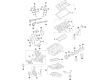
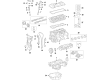
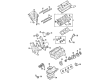
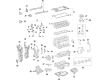
OEM Toyota Camry Timing Chain
Engine Timing Chain- Select Vehicle by Model
- Select Vehicle by VIN
Select Vehicle by Model
orMake
Model
Year
Select Vehicle by VIN
For the most accurate results, select vehicle by your VIN (Vehicle Identification Number).
8 Timing Chains found


Toyota Camry Timing Chain Part Number: 13507-0P010
$73.58 MSRP: $103.28You Save: $29.70 (29%)Ships in 1-2 Business Days


Toyota Camry Timing Chain Part Number: 13507-28010
$92.18 MSRP: $129.39You Save: $37.21 (29%)Ships in 1-2 Business Days

Toyota Camry Timing Chain Part Number: 13506-0V010
$210.74 MSRP: $300.88You Save: $90.14 (30%)Ships in 1-2 Business Days


Toyota Camry Timing Chain Part Number: 13506-0P011
$240.91 MSRP: $343.96You Save: $103.05 (30%)Ships in 1-2 Business Days

Toyota Camry Timing Chain Part Number: 13506-0H011
$268.87 MSRP: $383.89You Save: $115.02 (30%)Ships in 1-2 Business DaysToyota Camry Chain Sub-Assembly Part Number: 13506-0P030
$241.38 MSRP: $344.63You Save: $103.25 (30%)Ships in 1-2 Business Days
Toyota Camry Timing Chain Part Number: 13506-36030
$209.11 MSRP: $298.55You Save: $89.44 (30%)Ships in 1-3 Business Days
Toyota Camry Timing Chain Part Number: 13506-F0010
$217.38 MSRP: $310.37You Save: $92.99 (30%)Ships in 1-3 Business Days
Toyota Camry Timing Chain
Choose genuine Timing Chain that pass strict quality control tests. You can trust the top quality and lasting durability. Shopping for OEM Timing Chain for your Toyota Camry? Our website is your one-stop destination. We stock an extensive selection of genuine Toyota Camry parts. The price is affordable so you can save more. It only takes minutes to browse and find the exact fit. Easily add to cart and check out fast. Our hassle-free return policy will keep you stress-free. We process orders quickly for swift delivery. Your parts will arrive faster, so you can get back on the road sooner.
Timing Chain in Toyota Camry automobiles is an indispensable component that ensures that the motions of the camshaft and crankshaft of the vehicle's engine are correctly coordinated. Used mostly in metal, except for the type used in some models, timing chains are preferred to rubber timing belts as they are not easy to wear out. They entail some amount of lubrication and they are available in high numbers in high-revving engines. Due to the nature of the yoke reversals that are rather frequent in pushrod engines a short chain drive is employed as opposed to the gear drive. Luck of lubrication as well as similar problems that can appear with the tensioner and the chain guides of the timing chain system can manifest themselves with a rattling sound coming from the front of the car's engine.
Toyota Camry Timing Chain Parts and Q&A
- Q: How to remove the timing chain on Toyota Camry?A:The first step for removing the timing chain from a 2AZ-FE engine requires users to disconnect the cable of the negative battery terminal. Remove the sequential parts including No. 1 engine cover sub-assembly, front wheel RH, engine under cover LH, engine under cover RH, and front fender apron seal RH. The driver should begin by draining the engine oil before he removes the front Exhaust Pipe assembly. The service requires removal of the No. 2 engine mounting stay RH followed by removing the engine moving control rod sub-assembly and the No. 2 engine mounting bracket RH. The technician should first remove the V-ribbed belt followed by the generator assembly then the vane pump assembly and Ignition Coil assembly. The ventilation hoses need disconnecting before uninstalling the cylinder head cover sub-assembly through removal of its 2 bolts and 8 bolts and 2 nuts. Locate the No. 1 cylinder at its TDC/Compression position before you remove both the crankshaft pulley and crank position sensor. The Oil Pan sub-assembly removal requires the removal of 12 bolts along with 2 nuts from the main assembly before using an oil pan seal cutter to precisely cut through the sealer. The process to remove the No. 1 chain tensioner assembly demands care because turning the crankshaft should only happen when the assembly is present. Connect engine hangers through bolts before torquing them to 38 Nm (387 kgf-cm, 28 ft-lbf) and link a sling device to the hangers along with a chain block. The V-ribbed belt tensioner assembly can be removed after lifting the engine with a chain block before proceeding to detach the engine mounting insulator by securing a chain hoist to the hangers. Start by handling the engine mounting bracket RH and after that the timing chain cover sub-assembly then follow with the timing chain case oil seal removal. Drive out the Crankshaft Position Sensor plate as well as the chain tensioner slipper and No. 1 chain vibration damper and timing chain guide. After disconnecting the chain sub-assembly you should take out the crankshaft timing sprocket. To finish the procedure you need to turn the crankshaft 90 degrees counterclockwise until the adjusting hole of the oil pump drive shaft sprocket lines up with the oil pump groove, insert a 4 mm diameter bar to secure the gear, and afterward remove the nut and bolt, chain tensioner plate, spring, chain tensioner, oil pump driven sprocket, and chain.
- Q: How to install the No. 2 Timing Chain sub-assembly on Toyota Camry?A:The installation of No. 2 chain sub-assembly starts by setting the crankshaft key to its left horizontal position while turning the drive shaft to face upward with yellow mark links directly aligned to each gear timing mark. Place the crankshaft and oil pump shaft sprockets together using a chain among the gears while using a temporary nut to fix the oil pump drive shaft sprocket. Placing the damper spring inside the adjusting hole enables you to install the chain tensioner plate followed by torquing the bolt to 12 Nm (122 kgf-cm, 9ft-lbf). Use the adjusting hole of the oil pump drive shaft sprocket to match with the oil pump groove while implementing a 4 mm diameter pin lock into the oil pump drive shaft gear adjusting hole before you fasten the nut to 30 Nm (301 kgf-cm, 22ft-lbf). Move the crankshaft 90 degrees clockwise by means of the crankshaft pulley bolt so that the crankshaft key aligns with the highest position. The installation of the crankshaft timing sprocket should be followed by the chain vibration damper which requires 2 bolts tightened to 9.0 Nm (92 kgf-cm, 80in-lbf). To set the No. 1 cylinder at TDC/compression position turn the Camshafts using a wrench while aligning the camshaft timing gear timing marks with the markings on the No. 1 and No. 2 bearing caps and rotate the crankshaft until the crankshaft key faces the uppermost position. Use Special Service Tool: 09309-37010 alongside a hammer to tap in the crankshaft timing sprocket with the gold or pink mark link directed at the crankshaft timing mark. Install the camshaft timing guide after aligning the yellow and gold links to each bearing cap timing mark using Special Service Tool 09309-37010 under harnesses of 9.0 Nm (92 kgf-cm, 80in-lbf). Begin by using a 19 Nm (194 kgf-cm, 14ft-lbf) torque to fasten the chain tensioner slipper along with the "F" marked No. 1 Crankshaft Position Sensor plate while its orientation points toward vehicle forward motion. After installing the timing chain case oil seal it is necessary to integrate the timing chain cover sub-assembly. The spring type component of the V-ribbed belt tensioner assembly requires bolt tightening before nut tightening to 60 Nm (607 kgf-cm, 44ft-lbf) with the pin replacement removing. The engine mounting bracket RH receives 3 bolts that need to reach 54 Nm (551 kgf-cm, 40ft-lbf) torque for installation. Afterwards, raise the engine to set the engine mounting insulator RH with 4 nuts secured at 95 Nm (969 kgf-cm, 70ft-lbf) and Nut B at 87 Nm (888 kgf-cm, 64ft-lbf), followed by installing the steering gear return tube clamps to the frame using 2 bolts torqued to 8.0 Nm (80 kgf-cm, 69in Attach the engine mounting insulator FR by applying 87 Nm (888 kgf-cm, 64ft-lbf) torque on its bolt along with the engine lateral control rod bolt which requires 89 Nm (910 kgf-cm, 66ft-lbf) torque. The Oil Pan sub-assembly requires new seal packing material (4.0 to 4.5 mm (0.157 to 0.177 in.) diameter) that needs to be connected to the cylinder block before tightening all 12 mounting bolts and two nuts to a torque of 9.0 Nm (92 kgf-cm, 80in-lbf). You must first install new gaskets and then use 2 nuts to lock the No. 1 chain tensioner assembly at 9.0 Nm (92 kgf-cm, 80in-lbf) torque while setting the plunger in with the ratchet pawl released before hooking the plunger to the pin passing through the pulley and crank position sensor. Reconfirm the hook will not drop the plunger during installation by turning the crankshaft counterclockwise. Then disconnect the hook from the plunger knock pin followed by a crankshaft clockwise rotation to verify plunger extension. The cylinder head cover sub-assembly needs to be fitted with new seal packing applied to correct positions before installing 8 bolts and 2 nuts in specific torques (Bolt A - 11 Nm (112 kgf-cm, 8ft-lbf), Bolt B - 14 Nm (143 kgf-cm, 10ft-lbf), Nut - 11 Nm (112 kgf-cm, 8ft-lbf)). The process begins with fitting the two engine wires to their respective holes using 2 bolts torqued to 8.4 Nm (86 kgf-cm, 74in-lbf) and then continuing with installing the No. 2 ventilation hose followed by the ventilation hose and Ignition Coil assembly using 4 bolts torqued to 9.0 Nm (92 kgf-cm, 80in-lbf). After installation of the vane pump assembly proceed with adding the generator assembly and V-ribbed belt followed by fitting the No. 2 engine mounting bracket RH and engine moving control rod sub-assembly along with the No. 2 engine mounting stay RH. Installation of the front Exhaust Pipe occurs before engine oil addition and cable connection to the negative terminal while performing oil leak inspection and exhaust and ignition checks followed by front fender apron seal and engine under cover LH and RH and front wheel RH and No. 1 engine cover sub-assembly installation.


Related Toyota Camry Parts
 Toyota Camry Oil Filter
 Toyota Camry Engine Cover
 Toyota Camry Cylinder Head
 Toyota Camry Oil Pump
 Toyota Camry Piston
 Toyota Camry Oil Filler Cap
 Toyota Camry Crankshaft Seal
 Toyota Camry Crankshaft Thrust Washer
 Toyota Camry Dipstick Tube
 Toyota Camry Rod Bearing
 Toyota Camry Spool Valve
 Toyota Camry Timing Cover
Browse Toyota Camry Timing Chain by Years
2024 2023 2022 2021 2020 2019 2018 2017 2016 2015 2014 2013 2012 2011 2010 2009 2008 2007 2006 2005 2004 2003 2002