×
ToyotaParts- Hello
- Login or Register
- Quick Links
- Live Chat
- Track Order
- Parts Availability
- RMA
- Help Center
- Contact Us
- Shop for
- Toyota Parts
- Scion Parts
My Garage
My Account
Cart
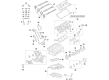
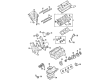
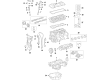
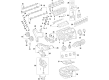
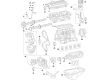
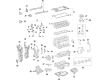
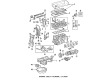
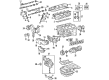
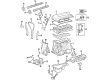
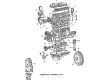
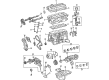
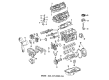
OEM Toyota Camry Oil Pan
Oil Drain Pan- Select Vehicle by Model
- Select Vehicle by VIN
Select Vehicle by Model
orMake
Model
Year
Select Vehicle by VIN
For the most accurate results, select vehicle by your VIN (Vehicle Identification Number).
21 Oil Pans found


Toyota Camry Pan Sub-Assembly, Oil, Lower Part Number: 12102-0P041
$145.92 MSRP: $206.58You Save: $60.66 (30%)Ships in 1-2 Business Days


Toyota Camry Pan Sub-Assembly, Oil, Lower Part Number: 12102-0P020
$142.05 MSRP: $201.08You Save: $59.03 (30%)Ships in 1-2 Business Days

Toyota Camry Pan Sub-Assembly, Oil Part Number: 12101-0V010
$120.07 MSRP: $169.98You Save: $49.91 (30%)Ships in 1 Business Day


Toyota Camry Oil Pan Part Number: 12101-0H010
$126.54 MSRP: $179.13You Save: $52.59 (30%)Ships in 1-3 Business Days


Toyota Camry Pan Sub-Assembly, Oil, Lower Part Number: 12102-20010
$174.36 MSRP: $246.83You Save: $72.47 (30%)Ships in 1-3 Business Days

Toyota Camry Oil Pan, Upper Part Number: 12101-0P040
$188.02 MSRP: $268.45You Save: $80.43 (30%)Ships in 1-2 Business Days

Toyota Camry Pan Sub-Assembly, Oil, Upper Part Number: 12111-0A030
$259.20 MSRP: $370.08You Save: $110.88 (30%)Ships in 1-3 Business Days
Toyota Camry Oil Pan Part Number: 12101-03031
$175.06 MSRP: $247.83You Save: $72.77 (30%)Ships in 1-3 Business Days
Toyota Camry Oil Pan Part Number: 12102-F0010
$114.58 MSRP: $160.83You Save: $46.25 (29%)Ships in 1-3 Business Days

Toyota Camry Oil Pan Part Number: 11420-28032
$744.09 MSRP: $1090.48You Save: $346.39 (32%)Ships in 1-3 Business Days
Toyota Camry Oil Pan Part Number: 12101-0H050
$126.77 MSRP: $179.45You Save: $52.68 (30%)Ships in 1-3 Business Days
Toyota Camry Oil Pan, Upper Part Number: 12111-0P070
$190.93 MSRP: $272.61You Save: $81.68 (30%)Ships in 1-3 Business Days
Toyota Camry Pan Sub-Assembly, Oil, Upper Part Number: 12101-31121
$188.02 MSRP: $268.45You Save: $80.43 (30%)Ships in 1-3 Business Days
Toyota Camry Oil Pan, Upper Part Number: 12111-0A040
$230.66 MSRP: $329.33You Save: $98.67 (30%)Ships in 1-3 Business Days
Toyota Camry Pan, Oil Part Number: 12111-20042
$312.21 MSRP: $445.77You Save: $133.56 (30%)Ships in 1-3 Business DaysToyota Camry Oil Pan Part Number: 12101-74111
$1.54 MSRP: $2.15You Save: $0.61 (29%)
Toyota Camry Oil Pan Part Number: 12101-64020

Toyota Camry Oil Pan Part Number: 12101-63021

Toyota Camry Oil Pan Part Number: 12101-74050

Toyota Camry Pan Sub-Assembly, Oil Part Number: 12101-62031
| Page 1 of 2 |Next >
1-20 of 21 Results
Toyota Camry Oil Pan
Choose genuine Oil Pan that pass strict quality control tests. You can trust the top quality and lasting durability. Shopping for OEM Oil Pan for your Toyota Camry? Our website is your one-stop destination. We stock an extensive selection of genuine Toyota Camry parts. The price is affordable so you can save more. It only takes minutes to browse and find the exact fit. Easily add to cart and check out fast. Our hassle-free return policy will keep you stress-free. We process orders quickly for swift delivery. Your parts will arrive faster, so you can get back on the road sooner.
Toyota Camry Oil Pan is an important part that holds the engine oil which is required to lubricate the vehicles' engine correctly. Located just below the engine, oil pan is a receptacle or sump which holds the oil to get circulated and lubricate the different parts of the engine. Considering that the purpose of an oil pan is to collect any dripping oil and to maintain a consistent levels of oil, the oil pan has to be undamaged. The standard oil pans are typical motor vehicle structures but racing motorcycles and piston aircraft engines have a 'dry sump' system in tackling issues like oil starvation during cornering among others. If you find that your car has developed oil stains somewhere close to the engine, especially round the Toyota Camry, it will be advisable to change the oil pan so that no more extra and unwanted problems of oil leakage are experienced.
Toyota Camry Oil Pan Parts and Q&A
- Q: How to service and repair the oil pan on Toyota Camry?A:The first step to service this oil pan involves removal of the drain plug to drain oil from the pan before proceeding. Proceed by uninstalling the oil pan sub-assembly through the removal of 12 bolts alongside 2 nuts then insert the blade of Special Service Tool: 09032-00100 to cut the applied sealer between the crankcase and oil pan before removing the oil pan with caution toward the cylinder block and oil pan contact surfaces. Place the oil pan within 3 minutes after seal packing while keeping the engine free from start-up for at least 2 hours post-installation. Clear all oil residue from the contact surface before installation. Install seal packing (Part No. 08826-00080 or equivalent) as a continuous bead measuring 3 mm to 4 mm (0.157 in.) before putting on the oil pan once any old packing (FIPG) material gets removed and the contact surfaces remain free of oil. The oil pan requires installation with 12 bolts and 2 nuts using a torque of 9.0 N.m that corresponds to 92 kgfcm as well as 80 in.lbf. You should install a new gasket and oil pan drain plug while tightening it to 25 N. (255 kgfcm, 18 ft.lbf).
- Q: How to remove and install the oil pan sub-assembly No. 2 on Toyota Camry?A:Special Service Tool: 09032-00100 helps detach the No. 2 oil pan by cutting off the applied sealer once the 10 bolts and 2 nuts have been removed from the assembly. Use the tool blade to separate the No. 1 oil pan from the No. 2 oil pan but avoid damaging their contact surfaces. You should begin by removing both the oil strainer sub-assembly bolt then its two nuts and the strainer and gasket. The process to remove the No.1 oil pan involves uniformly tightening then loosening all 15 bolts and 2 nuts before carefully prying the cover from the cylinder block without damaging its contact surface. The contact surface needs cleaning from previous packing materials before spreading seal packing (Part No. 08826-00080 or equivalent) in a circular shape with 3-4 mm (0.12-0.16 inch) width for installation of the oil pan baffle plate. The installation should include the application of seal packing on the bolt opening exterior of "X" and interior of "Y" with no oil present on the surface. The assembly of the No. 1 oil pan needs to occur within a 3-minute period after packing application yet engine oil addition should be postponed for two hours following the assembly. The No. 1 oil pan requires 15 bolts and 2 nuts for installation using equal torque distribution through multiple passes until it reaches 10 mm head 8.0 Nm (82 kgf-cm, 71 inch lbs.) and 12 mm head 20 Nm (199 kgf-cm, 14 ft. lbs.). The oil strainer sub-assembly needs new gaskets before installing the bolt and 2 nuts tightened to 8.0 Nm (82 kgf-cm, 71 inch lbs.). Before installation of oil pan sub-assembly No. 2 it is essential to clean the contact surface while applying seal packing in a 4 - 5 mm (0.16 - 0.20 inch) bead shape after verifying that the surface remains oil-free. Install the oil pan by utilizing the 10 bolts and 2 nuts within 3 minutes after sealing with packing then refrain from adding oil to the engine throughout the subsequent 2 hours before tightening to 8.0 Nm (82 kgf-cm, 71 inch lbs.).


Related Toyota Camry Parts
 Toyota Camry Engine Mount
 Toyota Camry Valve Cover Gasket
 Toyota Camry Timing Chain
 Toyota Camry Engine Cover
 Toyota Camry Camshaft
 Toyota Camry Dipstick
 Toyota Camry Oil Drain Plug Gasket
 Toyota Camry Cylinder Head Gasket
 Toyota Camry Crankshaft Seal
 Toyota Camry Rod Bearing
 Toyota Camry Timing Chain Guide
 Toyota Camry Timing Idler Gear