My Garage
Cart
Make sure this part fits

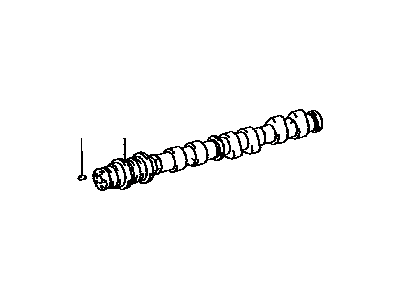
Toyota 13053-31061
Camshaft

2005-2018 Toyota 1305331061

Customer Questions & Expert Answers (15)
Toyota 13053-31061 Camshaft
  • Part Description
    Camshaft Sub-Assembly
  • Part Name Code
    13053
  • Replaces
    13053-0P021, 13053-31080, 13053-0P020, 13053-31060
  • Manufacturer
    Toyota
Make sure this part fits
$501.77 MSRP: $735.36
You Save: $233.59 (32%)
Ships in 1-3 Business Days
1
ADD TO CART
  • Related Parts
  • Product Specifications
  • Vehicle Fitment
  • Customer Questions & Expert Answers
  • Product Specifications

    BrandGenuine Toyota
    Part Name Code13053
    Manufacturer Part Number13053-31061
    Part DescriptionCamshaft Sub-Assembly
    Item Dimensions21.4 x 3.6 x 3.0 inches
    Item Weight4.80 Pounds
    ConditionNew
    Fitment TypeDirect Replacement
    Replaces13053-0P021, 13053-31080, 13053-0P020, 13053-31060
    ManufacturerToyota
    SKU13053-31061
    WarrantyThis genuine Toyota part is guaranteed by Toyota's factory warranty.
    Shipping & ReturnShipping Policy Return Policy
    Warning: California's Proposition 65
  • Vehicle Fitment

    Year Make Model Trim Engine
    2005-2018 Toyota AvalonBase, Limited, Touring, XL, XLE, XLE Plus, XLE Premium, XLE Touring, XLE Touring SE, XLS6 Cyl 3.5 L GAS
    2007-2017 Toyota CamryLE, SE, XLE, XSE6 Cyl 3.5 L GAS
    2008-2016 Toyota HighlanderBase, LE, LE Plus, Limited, Plus, SE, Sport, XLE6 Cyl 3.5 L GAS
    2006-2008 Toyota RAV4Base, Limited, Sport6 Cyl 3.5 L GAS
    2007-2016 Toyota SiennaBase, CE, L, LE, Limited, SE, XLE6 Cyl 3.5 L GAS
    2009-2015 Toyota VenzaBase, LE, Limited, XLE6 Cyl 3.5 L GAS
  • Customer Questions & Expert Answers

    Q:
    Is 13053-31061 a good match for my car? Posted by ToyotaPartsNow Specialist
    A:
    Find out if part number 13053-31061 is the right fit for your car by Selecting Your Vehicle model.
    Posted by ToyotaPartsNow Specialist
    Q:
    How to remove the camshaft on Toyota Camry? Posted by Customer
    A:
    The procedure to remove the 2AZ-FXE engine camshaft begins with the removal of the front wheel on the right side followed by the engine under cover on the left side and right side and the front fender apron seal right side and No. 1 engine cover sub-assembly and ignition coil assembly and cylinder head cover sub-assembly. The next step requires setting the No. 1 cylinder at TDC/compression and afterward extracting the No. 1 chain tensioner assembly. After using a wrench to hold the No. 2 camshaft you can start by loosening the camshaft timing set bolt before uniformly loosening and removing the specific order of 10 bearing cap bolts from the 5 bearing caps. The technician should detach both the camshaft timing sprocket with its attached timing chain after removing the camshaft timing sprocket set bolt and holding the No. 2 camshaft during the process. The removal should be followed by uniformly loosening and removing the 10 bearing cap bolts and the 5 bearing caps while keeping a grip on the chain. A string must tie the timing chain to prevent its fall into the timing chain cover. The correct method to remove the camshaft timing gear assembly includes using a vise clamp to stop camshaft rotation and wrapping electrical tape around all ports except the advance port then applying 100 kPa (1.0 kgf/cm2, 14 psi) air pressure through the oil path as you turn the gear clockwise by hand. Use a shop rag to cover the paths so oil drop prevention is achievable. When removing the camshaft timing gear flange bolt maintain pressure on other four bolts and break the straight pin lock before reuse.
    Posted by ToyotaPartsNow Specialist
    Q:
    How to service and repair the RH bank camshaft on Toyota Avalon? Posted by Customer
    A:
    Begin service and repair of RH bank camshaft (2GR-FE) by detaching these components: engine assembly with transaxle, engine wire, front frame assembly, starter assembly, automatic transaxle assembly, oil level gauge guide sub-assembly, exhaust manifold sub-assemblies (RH and LH), drive plate & ring gear sub-assembly, and fix the engine assembly. Advance by removing idler pulley sub-assembly No.2 together with engine mounting bracket RH, water pump pulley and V-ribbed belt tensioner assembly, timing gear cover No.2, engine mounting stay No.2 RH and engine mounting bracket front No.1 LH, water inlet housing, crankshaft pulley, oil pan sub-assembly No.2, oil strainer sub-assembly, and oil pan sub-assembly, intake air surge tank, ignition coil assembly and oil pipe No.1 and No.2 while taking out all the associated unions and filters. The maintenance process continues by removing sequence the timing chain cover sub-assemblies together with the cylinder head cover sub-assemblies (both RH and LH) and timing chain cover oil seal. Next position cylinder No.1 at TDC/compression and remove all components containing chain tensioner assembly No.1 as well as sub-assembly and camshaft timing gears with the No.2 chain from the RH bank before leveling the camshaft to avoid damage. Detach chain tensioner assembly No.2 and remove the camshafts by using a uniform sequence of bolt removal on the specified bearing caps. Put the camshaft timing gear into position while matching the key groove with the straight pin then secure the fringe bolt at 100 Nm (1,020 kgf-cm, 74 ft. lbs.). Examine the camshaft timing gear assembly for correct locking and evaluate its free rotation before removing the gear. You should install the camshafts at level position and apply engine oil to both the cam portion and cylinder head journals and briefly tighten the bearing cap bolts. Fitting the camshaft housing sub-assembly RH with Part No. 08826-00080 seal packing requires proper bolt torque of 25 Nm (255 kgf-cm, 18 ft. lbs.) while validating the knock pin placement. Safely position the Installation of No.2 chain tensioner assembly before fitting both camshaft timing gears and No.2 chain (RH bank while maintaining proper alignment and torque specifications. The service requires installation of the timing chain cover oil seal (SST 09316-60011) followed by adding the timing chain cover sub-assembly and water inlet housing with engine mounting bracket front No.1 LH and cylinder head cover sub-assemblies (both RH and LH) to which seal packing (Part No.08826-00080) is applied and then bolts are tightened to specified torques. The last step includes fitting oil pipes No.1 and No.2 followed by installing the ignition coil assembly and intake air surge tank and then joining the oil pan sub-assemblies to the crankshaft pulley and engine mounting stay No.2 RH and timing gear cover No.2 and water pump pulley and V-ribbed belt tensioner assembly and engine mounting bracket RH and idler pulley sub-assembly No.2 before reuniting all components with the transaxle while ensuring proper torque on everything.
    Posted by ToyotaPartsNow Specialist
    Q:
    What is the procedure for the camshaft timing gear assembly for the 2007 Toyota Camry? Posted by Customer
    A:
    Clamp the camshaft in a vise, cover oil ports with vinyl tape, apply 100 kPa (1.0 kgf/cm2, 14 psi) air pressure to the oil path, and turn the timing gear counterclockwise to release the lock pin.
    Posted by ToyotaPartsNow Specialist
    See expert answers on similar Camshaft
    Q:
    What special service tools are needed for the initial removal process for the 2006 Toyota Avalon? Posted by Customer
    A:
    Utilize Special Service Tools: 09213-70011 (09213-70020), 09330-00021 to remove the drive plate & ring gear sub-assembly, fix the engine assembly, and then proceed to remove the idler pulley sub-assembly No.2, engine mounting bracket RH, V-ribbed belt tensioner assembly, water pump pulley, and timing gear cover No.2.
    Posted by ToyotaPartsNow Specialist
    See expert answers on similar Camshaft
    Q:
    What steps are involved for the No. 2 camshaft installation for the 2008 Toyota Camry? Posted by Customer
    A:
    Apply engine oil to the journal portion, place it on the cylinder head aligning the paint mark with the timing mark, temporarily tighten the camshaft timing sprocket set bolt, check the front marks and numbers, and install the bearing caps. Apply engine oil to the threads and under the heads of the bearing cap bolts, uniformly tighten the 10 bearing cap bolts with No. 2 Bearing cap at 30 Nm (301 kgf-cm, 22 ft-lbf) and No. 3 Bearing cap at 9.0 Nm (92 kgf-cm, 80 in-lbf). Then hold the camshaft with a wrench and tighten the camshaft timing sprocket set bolt to 54 Nm (551 kgf-cm, 40 ft-lbf).
    Posted by ToyotaPartsNow Specialist
    See expert answers on similar Camshaft
    Q:
    How do you remove the No. 2 camshaft for the 2009 Toyota Camry? Posted by Customer
    A:
    Hold it with a wrench to loosen the camshaft timing set bolt, uniformly loosen and remove the 10 bearing cap bolts in the specified sequence, and remove the 5 bearing caps.
    Posted by ToyotaPartsNow Specialist
    See expert answers on similar Camshaft
    Q:
    What should be done after installing the camshaft timing gear for the 2005 Toyota Avalon? Posted by Customer
    A:
    Inspect the camshaft timing gear assembly, then install the camshafts, ensuring the rocker arm is set to the lash adjuster, applying engine oil to the camshaft journal, camshaft housing, and bearing cap, and confirming the proper positioning of the bearing caps.
    Posted by ToyotaPartsNow Specialist
    See expert answers on similar Camshaft
    Q:
    What are the final steps after installing the camshaft for the 2009 Toyota Camry? Posted by Customer
    A:
    Install the No. 1 chain tensioner assembly, check valve clearance, install the cylinder head cover sub-assembly, install the ignition coil assembly, install the No. 1 engine cover sub-assembly, install the front fender apron seal RH, install the engine under cover LH, install the engine under cover RH, install the front wheel RH, and inspect for engine oil leaks.
    Posted by ToyotaPartsNow Specialist
    See expert answers on similar Camshaft
    Q:
    How do you install the camshaft timing gear assembly for the 2010 Toyota Camry? Posted by Customer
    A:
    Align the camshaft timing gear and camshaft with the straight pin and key groove misaligned, then turn the camshaft timing gear while gently pushing it against the camshaft until the pin fits into the groove, ensuring not to turn it to the retard angle side. Check for no clearance between the gear and camshaft, then tighten the flange bolt to a torque of 54 Nm (551 kgf-cm, 40 ft-lbf). Verify that the camshaft timing gear can move to the retard angle side and is locked in the most retarded position.
    Posted by ToyotaPartsNow Specialist
    See expert answers on similar Camshaft
    Q:
    What is the first step to install the camshaft for the 2GR-FE engine for the 2008 Toyota Highlander? Posted by Customer
    A:
    Apply engine oil to the camshaft journals, camshaft housing sub-assembly RH, and camshaft bearing caps.
    Posted by ToyotaPartsNow Specialist
    See expert answers on similar Camshaft
    Q:
    What should be done after inspecting the camshaft timing gear assembly for the 2008 Toyota Highlander? Posted by Customer
    A:
    Repeat the inspection process for the camshaft timing exhaust gear assembly, ensuring proper alignment, tightening, and smooth operation before removing the flange bolt and camshaft timing exhaust gear assembly.
    Posted by ToyotaPartsNow Specialist
    See expert answers on similar Camshaft
    Q:
    How do you remove the camshaft housing for the 2009 Toyota Highlander? Posted by Customer
    A:
    Pry the camshaft housing away from the cylinder head with a screwdriver, taking care not to damage the contact surfaces.
    Posted by ToyotaPartsNow Specialist
    See expert answers on similar Camshaft
    Q:
    What is the final step in the camshaft removal process for the 2009 Toyota Venza? Posted by Customer
    A:
    Remove the 16 valve rocker arms and the 16 valve lash adjusters from the cylinder head, again arranging the removed parts in the correct order.
    Posted by ToyotaPartsNow Specialist
    See expert answers on similar Camshaft
    Q:
    What is the first step to install the camshaft for the 2009 Toyota Venza? Posted by Customer
    A:
    Set the camshaft timing gear assembly to the advanced position by releasing the lock pin and ensuring it does not rotate clockwise during installation.
    Posted by ToyotaPartsNow Specialist
    See expert answers on similar Camshaft
    If you have any questions about this product, please don't hesitate to ask us. We will be happy to help you!

OEM Toyota 13053-31061, Excellent Performance and Perfect Fitment

To ensure reliability, purchase Toyota part # 13053-31061 Camshaft. It is sometimes referred to as Toyota Camshaft. OEM parts are unrivaled in terms of quality. They go through extensive quality control inspections and are produced in accordance with Toyota's official factory specifications. All of these remove defects and imperfections. So you can relax knowing they promise exceptional lifespan and flawless fitment.

ToyotaPartsNow.com is a leading supplier of genuine Toyota parts such as Toyota 1305331061 Camshaft. At ToyotaPartsNow.com, we have a wide variety of OEM Toyota parts available at competitive prices. Our comprehensive range of genuine Toyota parts come with a manufacturer's warranty for peace of mind. We also prioritize customer satisfaction, providing a hassle-free return policy and expedited delivery for all our parts. For detailed Toyota parts information, click here.
Choose ToyotaPartsNow for discounted prices, exceptional service and fast delivery