My Garage
Cart
Make sure this part fits

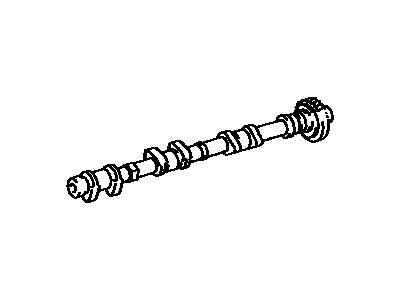
Toyota 13053-31031
Camshaft Sub-Assembly

2008-2015 Toyota 1305331031

Customer Questions & Expert Answers (8)
Toyota 13053-31031 Camshaft Sub-Assembly
  • Part Description
    Camshaft
  • Part Name Code
    13053
  • Replaces
    13053-31030
  • Manufacturer
    Toyota
Make sure this part fits
$458.52 MSRP: $671.96
You Save: $213.44 (32%)
Ships in 1-3 Business Days
1
ADD TO CART
  • Related Parts
  • Product Specifications
  • Vehicle Fitment
  • Customer Questions & Expert Answers
  • Product Specifications

    BrandGenuine Toyota
    Part Name Code13053
    Manufacturer Part Number13053-31031
    Part DescriptionCamshaft
    Manufacturer Note(J)
    Item Dimensions22.1 x 3.5 x 3.0 inches
    Item Weight4.50 Pounds
    ConditionNew
    Fitment TypeDirect Replacement
    Replaces13053-31030
    ManufacturerToyota
    SKU13053-31031
    WarrantyThis genuine Toyota part is guaranteed by Toyota's factory warranty.
    Shipping & ReturnShipping Policy Return Policy
    Warning: California's Proposition 65
  • Vehicle Fitment

    Year Make Model Trim Engine
    2011-2012 Toyota AvalonBase, Limited, XLS6 Cyl 3.5 L GAS
    2012-2013, 2008-2009 Toyota CamryLE, SE, XLE6 Cyl 3.5 L GAS
    2009-2012 Toyota RAV4Base, Limited, Sport6 Cyl 3.5 L GAS
    2011-2013 Toyota SiennaBase, L, LE, Limited, SE, XLE6 Cyl 3.5 L GAS
    2009-2015 Toyota VenzaBase, LE, Limited, XLE6 Cyl 3.5 L GAS
  • Customer Questions & Expert Answers

    Q:
    Is 13053-31031 a good match for my car? Posted by ToyotaPartsNow Specialist
    A:
    Find out if part number 13053-31031 is the right fit for your car by Selecting Your Vehicle model.
    Posted by ToyotaPartsNow Specialist
    Q:
    How to remove the camshaft on Toyota RAV4? Posted by Customer
    A:
    One must begin camshaft removal from the 2AR-FE engine by removing the negative battery cable then waiting at least 90 seconds until the SRS system disables. After disconnecting the timing chain cover you should proceed with the next step. The No. 1 cylinder needs to align with TDC/compression by inserting the crankshaft pulley bolt temporarily during which you rotate the crankshaft clockwise before removing the pulley bolt. The procedure to remove the timing chain guide starts with bolt removal followed by taking out the No. 1 chain tensioner assembly and letting the plunger extend while rotating the stopper plate counterclockwise to unlock it. Push the plunger into the tensioner then set the lock by moving the stopper plate clockwise and inserting a pin into its hole. Finally, remove the two bolts and chain tensioner and gasket. First remove the slipper bolt to release the chain tensioner slipper before proceeding to remove the chain sub-assembly and No. 1 chain vibration damper through its two bolts. To remove the bolt along with the camshaft timing gear from the hexagonal camshaft section use a wrench while taking caution not to damage either the cylinder head or spark plug tube and refrain from breaking down the camshaft timing gear. Repetition of this method must occur for the exhaust gear assembly of camshaft timing. Use a screwdriver to gently separate the cylinder head from the camshaft housing while removing 20 bearing cap bolts stocked in a particular sequence and ensure you do not scar the contact areas. The process requires removal of the camshaft bearing cap through sequential removal of 11 bearing cap bolts and subsequent removal of 5 bearing caps before arranging the parts in correct order. To start the repair process one must first remove the oil control valve filter followed by the No. 1 camshaft bearing before taking out the No. 1 and No. 2 camshafts. Follow the last step by taking out the No. 2 camshaft bearing and both the 16 valve rocker arms along with the 16 valve lash adjusters from the cylinder head while properly arranging all components.
    Posted by ToyotaPartsNow Specialist
    Q:
    How to install the camshaft on Toyota Venza? Posted by Customer
    A:
    Prior to setting the camshaft begin by removing the lock pin then position the timing gear assembly toward the advanced side before installation while maintaining a clockwise prevention of rotation. Place the knock pin from the No. 1 camshaft into the pin hole of the camshaft timing gear without any space between the camshaft timing gear and camshaft flange. Install the bolt onto the camshaft manually while omitting tool use to protect the lock pin from harm. Use non-residue solvent to clean the camshaft journal before applying the vinyl tape to oil paths and providing 200 kPa (2.0 kgf/cm2, 29 psi) of air pressure that should turn the camshaft timing gear assembly counterclockwise. You should first eliminate rubber pieces and tape before removing the bolt and camshaft timing gear. Check the valve lash adjuster prior to reinstalling the original positions of the 16 lash adjusters. Depending on step 15 install 16 valve rocker arms with engine oil on both lash adjuster tips and valve stem caps. After cleaning the camshaft journals and housing together with the bearing caps you should apply engine oil before installing the first and second camshafts. The marks on camshaft bearing caps need to be confirmed before inserting 11 bolts that require 16 Nm (163 kgf-cm, 12 ft-lbf) torque. Then check that the camshaft rotates smoothly. Cover the camshaft housing with seal packing that includes Toyota Genuine Seal Packing Black or Three Bond 1207B or equivalent material. Finally secure the housing with 20 bolts at 27 Nm (275 kgf-cm, 20 ft-lbf). After completing installation do not apply oil to the system until the wait period of at least 4 hours concludes. Secure the camshaft timing gear with a bolt while keeping the No. 1 camshaft knock pin aligned with the gear then tighten it to 85 Nm (867 kgf-cm, 63 ft-lbf). Install the same procedure for the No. 2 camshaft and timing exhaust gear. The installation requires 50 cc (3.1 cu. in) engine oil to be added through the oil hole while verifying that both the low-pressure chamber and oil paths of the lash adjusters contain sufficient oil volume. Temporarily install the crankshaft pulley bolt to reach TDC compression in the No. 1 cylinder by rotating the crankshaft 40 degrees counterclockwise. First secure the chain vibration damper by tightening two bolts to 21 Nm (214 kgf-cm, 15 ft-lbf) before setting the chain onto the camshaft timing gears together with the crankshaft timing sprocket and checking for proper alignment of the mark plates with the timing marks. Lay a string on the chain after securing it before rotating the intake camshaft counterclockwise to meet the timing mark. Finish by tightening the chain tensioner slipper to 21 Nm (214 kgf-cm, 15 ft-lbf). Use new gaskets when installing the No. 1 chain tensioner assembly to torque it up to 10 Nm (102 kgf-cm, 7 ft-lbf) before removing the stopper plate pin. The installation of timing chain guide requires 21 Nm torque (214 kgf-cm, 15 ft-lbf) before you check the timing marks a second time and complete the timing chain cover assembly.
    Posted by ToyotaPartsNow Specialist
    Q:
    What steps are involved for the No. 2 camshaft installation for the 2008 Toyota Camry? Posted by Customer
    A:
    Apply engine oil to the journal portion, place it on the cylinder head aligning the paint mark with the timing mark, temporarily tighten the camshaft timing sprocket set bolt, check the front marks and numbers, and install the bearing caps. Apply engine oil to the threads and under the heads of the bearing cap bolts, uniformly tighten the 10 bearing cap bolts with No. 2 Bearing cap at 30 Nm (301 kgf-cm, 22 ft-lbf) and No. 3 Bearing cap at 9.0 Nm (92 kgf-cm, 80 in-lbf). Then hold the camshaft with a wrench and tighten the camshaft timing sprocket set bolt to 54 Nm (551 kgf-cm, 40 ft-lbf).
    Posted by ToyotaPartsNow Specialist
    See expert answers on similar Camshaft
    Q:
    What should you do to support the timing chain during camshaft removal for the 2009 Toyota Camry? Posted by Customer
    A:
    Support the timing chain with a string to prevent it from slipping off the crankshaft sprocket, taking care not to drop anything inside the timing chain cover.
    Posted by ToyotaPartsNow Specialist
    See expert answers on similar Camshaft
    Q:
    What should you do after tightening the bearing caps for the No. 2 camshaft for the 2009 Toyota Camry? Posted by Customer
    A:
    While holding the camshaft with a wrench, tighten the camshaft timing sprocket set bolt to 54 Nm (551 kgf-cm, 40ft-lbf) and ensure the paint marks on the chain align with the timing marks on the camshaft timing gear and camshaft timing sprocket, as well as the crankshaft pulley groove aligning with the timing mark "0" of the timing chain cover.
    Posted by ToyotaPartsNow Specialist
    See expert answers on similar Camshaft
    Q:
    What is the next step after removing the crankshaft pulley bolt for the 2009 Toyota Venza? Posted by Customer
    A:
    Remove the bolt and timing chain guide, followed by the No. 1 chain tensioner assembly.
    Posted by ToyotaPartsNow Specialist
    See expert answers on similar Camshaft
    Q:
    What components should be installed after the valve rocker arms for the 2009 Toyota RAV4? Posted by Customer
    A:
    Install the No. 1 and No. 2 camshaft bearings, followed by the oil control valve filter.
    Posted by ToyotaPartsNow Specialist
    See expert answers on similar Camshaft
    If you have any questions about this product, please don't hesitate to ask us. We will be happy to help you!

OEM Toyota 13053-31031, Excellent Performance and Perfect Fitment

To ensure reliability, purchase Toyota part # 13053-31031 Camshaft Sub-Assembly. It is sometimes referred to as Toyota Camshaft. OEM parts are unrivaled in terms of quality. They go through extensive quality control inspections and are produced in accordance with Toyota's official factory specifications. All of these remove defects and imperfections. So you can relax knowing they promise exceptional lifespan and flawless fitment.

ToyotaPartsNow.com is a leading supplier of genuine Toyota parts such as Toyota 1305331031 Camshaft Sub-Assembly. At ToyotaPartsNow.com, we have a wide variety of OEM Toyota parts available at competitive prices. Our comprehensive range of genuine Toyota parts come with a manufacturer's warranty for peace of mind. We also prioritize customer satisfaction, providing a hassle-free return policy and expedited delivery for all our parts. For detailed Toyota parts information, click here.
Choose ToyotaPartsNow for discounted prices, exceptional service and fast delivery