×
ToyotaParts- Hello
- Login or Register
- Quick Links
- Live Chat
- Track Order
- Parts Availability
- RMA
- Help Center
- Contact Us
- Shop for
- Toyota Parts
- Scion Parts
My Garage
My Account
Cart
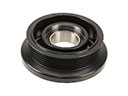
OEM Scion A/C Compressor
Air Conditioning Compressor- Select Vehicle by Model
- Select Vehicle by VIN
Select Vehicle by Model
orMake
Model
Year
Select Vehicle by VIN
For the most accurate results, select vehicle by your VIN (Vehicle Identification Number).
12 A/C Compressors found


Scion Compressor Part Number: 88310-WB001
$723.61 MSRP: $1060.46You Save: $336.85 (32%)Ships in 1-3 Business DaysProduct Specifications- Other Name: Compressor Assembly, With Pulley; A/C Compressor; Compressor Assembly, Cooler

Scion Compressor Part Number: 88310-52250-84
$484.38 MSRP: $717.26You Save: $232.88 (33%)Ships in 1-3 Business DaysProduct Specifications- Other Name: Reman Var Compressor Assembly; A/C Compressor

Scion Compressor Assembly Part Number: 88310-02520
$384.30 MSRP: $563.20You Save: $178.90 (32%)Ships in 1-3 Business DaysProduct Specifications- Other Name: Compressor Assembly, With Pulley; A/C Compressor; New A/C Compressor; Compressor; Compressor Assembly, W/Pulley
- Replaces: 88310-02520-84

Scion Compressor Part Number: 88310-21151
$609.94 MSRP: $987.28You Save: $377.34 (39%)Ships in 1-3 Business DaysProduct Specifications- Other Name: Compressor Assembly, With Pulley; A/C Compressor; Compressor Assembly, W/Pulley
Scion Compressor Assembly Part Number: 88310-1A731
$522.77 MSRP: $769.72You Save: $246.95 (33%)Ships in 1-3 Business DaysProduct Specifications- Other Name: Compressor Assembly, With Pulley; A/C Compressor; New A/C Compressor; Compressor; Compressor Assembly, W/Pulley


Scion Compressor Part Number: 88310-52570-84
$717.32 MSRP: $1062.18You Save: $344.86 (33%)Ships in 1-3 Business DaysProduct Specifications- Other Name: Reman Var Compressor Assembly; A/C Compressor
- Replaces: 88310-52570

Scion Compressor Assembly Part Number: 88320-74060
$447.63 MSRP: $655.89You Save: $208.26 (32%)Ships in 1-3 Business DaysProduct Specifications- Other Name: A/C Compressor; New A/C Compressor; Compressor; Compressor Assembly, Cooler

Scion Compressor Assembly Part Number: 88310-42511
$481.00 MSRP: $706.29You Save: $225.29 (32%)Ships in 1-3 Business DaysProduct Specifications- Other Name: Compressor Assembly, With Pulley; A/C Compressor; New A/C Compressor; Compressor; Compressor Assembly, W/Pulley

Scion Compressor Assembly Part Number: 88310-1A660
$499.16 MSRP: $731.54You Save: $232.38 (32%)Ships in 1-3 Business DaysProduct Specifications- Other Name: Compressor Assembly, With Pulley; A/C Compressor; New A/C Compressor; Compressor; Compressor Assembly, W/Pulley
Scion Compressor Part Number: 88310-52530
$1615.54 MSRP: $2367.59You Save: $752.05 (32%)Ships in 1-3 Business DaysProduct Specifications- Other Name: A/C Compressor; New A/C Compressor; Compressor Assembly, W/Pulley

Scion Compressor Part Number: 88320-21100
$333.53 MSRP: $476.20You Save: $142.67 (30%)Ships in 1-3 Business DaysProduct Specifications- Other Name: Compressor Assembly; A/C Compressor; New A/C Compressor; Compressor Assembly, Cooler

Scion Compressor Part Number: SU003-07255
$512.15 MSRP: $698.03You Save: $185.88 (27%)Ships in 1-3 Business DaysProduct Specifications- Other Name: Compressor Assembly; A/C Compressor; Compressor, W/Magnet Clutch
- Replaces: SU003-02114
Scion A/C Compressor
OEM parts deliver unmatched quality you can rely on. They pass extensive quality control inspections. Scion produces them to the official factory specifications. This process helps prevent defects and imperfections. So you can get exceptional lifespan and a flawless fit. Need new OEM Scion A/C Compressor? You'll love our wide selection of genuine options. Shop in minutes and skip the hunt. Our prices are unbeatable, you'll save time and money. It's easy to shop and find the right piece. Our committed customer service team gives professional help from start to finish. Every part includes a manufacturer's warranty. We ship quickly, your parts will arrive fast at your door.
Widely acclaimed Scion A/C Compressor ensures that the cabin air is cool and the small engine is not overburdened. In 2003, Scion entered the streets with small cars with low prices and in loud colors. Using virtual city, the brand was hunting online young drivers with music, art and quick-click ordering. Limited Release Series releases made the releases interesting and allowed consumers to feel like being in a club. There were simple trim ladders that did not give rise to any confusing upsell to allow shoppers to spend more time driving instead of haggling. There was a wild color palette and owners could change panels, wheels and tech to add identity to each ride. Scion also provided Toyota with a live-test lab which pushed concepts that eventually made their way into larger nameplates. The A/C Compressor, located in every model, pushes refrigerant to pressurization and flows it through the condenser and forces the cold air over your face in the stuffy August traffic. The A/C Compressor of any Scion relies on tight seals and hard bearings and thus rotates without moaning or loss of horsepower. When one fails, the temperatures quickly increase, the windows become foggy, and the focus is lowered, thus changing to a new A/C Compressor restores the comfort and makes driving alert. The A/C Compressor can be healthy with regular belt inspections and clean refrigerant so that every Scion can shake off the brutal summers.
Scion A/C Compressor Parts and Q&A
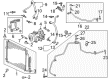
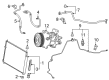
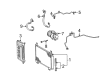
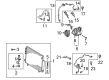
- Q: How to remove and install the A/C Compressor on Scion tC?A:The first step for removing the HVAC compressor requires refrigerant discharge from the refrigeration system followed by waiting 90 seconds to disconnect the negative battery terminal cable and disable Air Bags and pretensioners. You must disconnect the No.1 cooler refrigerant suction hose while removing its bolt and O-ring and use vinyl tape to seal the openings to keep moisture along with foreign matter from entering. The same procedure should be used to disconnect the No.1 cooler refrigerant discharge hose. The first step involves removing the engine under cover RH, the fan as well as generator V belt followed by disconnecting the connector and removing the four bolts from the cooler compressor assembly. The cooler compressor assembly requires four bolts for installation at 25 N.m torque strength (255 kgf.cm, 18 ft.lbf). Reconnect the connector afterwards. For installing the No.1 cooler refrigerant discharge hose first remove its vinyl tape then apply compressor oil (ND-OIL 8 or equivalent) to a new O-ring and the fitting surface before installing the O-ring and securing the hose with a bolt torqued to 9.8 N.m (100 kgf.cm, 7 ft.lbf). You should follow the same installation sequence for the No.1 cooler refrigerant suction hose. Finally reconnect the cable to the negative battery terminal while you reattach the generator V belt and fan as well as the engine under cover RH. Multiple systems need initialization following a battery reconnection procedure. The refrigerant charging process requires engine warming and full refrigerant leak inspection.
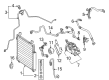
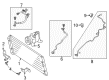
- Q: How to install the A/C Compressor on Scion xB?A:You should begin by adjusting the compressor oil through gentle helium inert gas valve drain followed by venting the correct amount of oil from specified ports until the oil difference equals the 90 (+15) cc (3 (+0.51) fl.oz.) contained in the new unit and the leftover oil in the old compressor. A compressor oil of Equivalent to ND-OIL8 is recommended while operators need to watch for excessive oil buildup that could result in refrigeration system failure. Connect the compressor assembly with a "TORX" socket wrench (E8) using 2 stud bolts that need tightening to 9.8 Nm (100 kgf-cm, 87 in-lbf). Finish by attaching 2 bolts and 2 nuts with a torque of 25 Nm (255 kgf-cm, 18 ft-lbf) following the provided sequence. The discharge hose sub-assembly installation requires users to remove the vinyl tape followed by applying compressor oil to the fitting surface and new O-ring then securing the O-ring and fitting the hose to the compressor with a bolt tightened to 9.8 Nm (100 kgf-cm, 87 in-lbf). The installation process for the suction hose sub-assembly requires compressor oil on a new O-ring before its placement. The maintenance process requires installation of components that include the fan V belt together with the generator V belt and the rear engine under cover RH followed by the No. 1 engine under cover and ending with the center transmission under cover assembly. Finish the process by loading refrigerant into the system followed by engine heating and leak inspection procedures.